With Uncanny Automator, you can publish tweets whenever there’s activity on your site. Automatically push new posts from your WordPress blog to your X / Twitter feed, or post links and photos when admins or even regular users perform specific actions on your website.
If you have the free version of Uncanny Automator, you’ll first need to connect your site with a free Uncanny Automator account, which will give you 250 free app credits to use with Twitter. If you have Uncanny Automator Pro, simply activate your Pro license key to get unlimited usage of the Twitter integration.
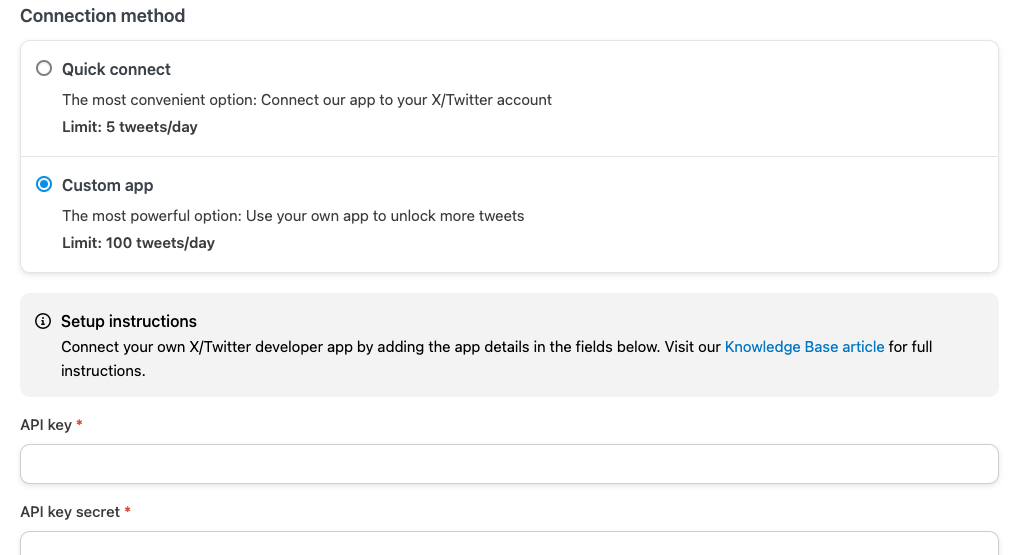
Important: Effective May 1, 2023, posting to Twitter using the Uncanny Automator app is limited to 5 tweets per license per day and posting using your own Twitter app is limited to 100 tweets per license per day. This is related to Twitter API pricing changes that went into effect on April 27, 2023.
Connect X / Twitter
Once you’ve connected your free account or activated your Pro license key, create or edit a recipe and click on the Twitter integration.

You should see a modal window appear with a link to connect your Twitter account to Uncanny Automator.

Click Connect account, which opens the Twitter account settings page in a new window, then click Connect an account.
This launches into the process of connecting your Twitter account with Uncanny Automator, which is what enables Uncanny Automator to post twitters to your Twitter profile. Sign into your Twitter account and/or click Authorize App.
After closing that window, your recipe page will reload and you can now add a Twitter action to your recipe:

That’s it! You can now automatically post to Twitter, using any of the available tokens, and optionally include an image with your tweet. Maybe you want to notify your audience when new posts are published, users complete courses, someone submits a form or anything else you can think of!
Use your own X / Twitter app
By default, the 1-click Twitter connection supported by Automator connects your site with Twitter using the Uncanny Automator Twitter app. This connection method is extremely convenient and effective, it means a lower posting limit because of Twitter API costs.
For heavier Twitter volume and rates that exceed our terms of use, we strongly encourage use of your own Twitter app credentials instead. To use your own app, just choose the “Custom app” option from the Automator > App integrations > X/Twitter page, like this:
When creating the on the X/Twiter , make sure to create it as an API v1.1 app (you may need to create a v2 app first and then request elevated access to create a v1.1 app). A Twitter API v1.1 app is unfortunately required because Twitter still does not support media uploads for v2 of the API. Also make sure that the user authentication is set up with read/write access, as the default is read-only. See below for a screenshot of where to find the settings.

Once on the authentication settings page, make sure to set things up as shown in the screenshot below.

If an override is used, please note that the Connect and Disconnect buttons in Automator settings will not be functional.


Comments (0)