A trigger in the Uncanny Automator plugin is what determines when the recipe will run and perform its actions. A trigger can be almost any behaviour on a WordPress site—logging in, completing a purchase, submitting a form with specific entries, completing a course, and dozens of other possibilities. Each Automator recipe needs at least one trigger. Recipes for Everyone are limited to a single trigger (since it’s not possible to track which triggers have been completed by anonymous users).
Watch a Video Demo
Adding triggers to your recipe

To add a new trigger to a recipe, start by choosing an integration. This is the plugin that contains the behaviour you want to monitor for your recipe. If it’s WordPress core functionality, like monitoring logins, comments, posts, and similar activities, choose WordPress. The list of integrations will change depending on what plugins we detect on your site (make sure you haven’t renamed plugin folders) and whether or not you use the Pro version of the plugin.

After choosing a plugin, a list of triggers supported for that plugin will be displayed. What’s displayed will again depend on the plugin selected and whether or not the Pro version is used. In the example above, some triggers related to learning activities are displayed. The text in blue indicates where there will be variables for a trigger. In the “User completes a course” example at the top, the “a course” text will be replaced with an actual course name in the next step.

Once the trigger is populated in plain text, any conditions that need to be set will be highlighted in blue. Click the blue field to enter the expected value. Make sure that all blue fields have been clicked and values entered to set the trigger up properly.
If you make a mistake and need to delete a trigger, click the icon with 3 dots in the top right area of the trigger and choose Delete to remove the trigger.
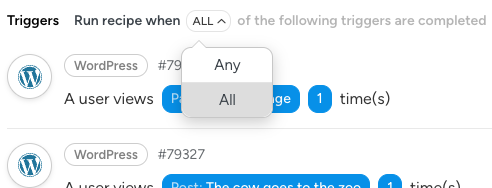
When the Pro version of the Uncanny Automator plugin is enabled, more than one trigger can be added to Logged-in recipes using the same process (Recipes for Everyone only support a single trigger). When a recipe has multiple triggers, the following option will be available at the top of the Triggers section to choose whether actions in a recipe will run when all triggers are completed or 1 of the triggers only:
Important Note: Monitoring and completion of the triggers can only begin after the recipe is added to the system. In other words, recipes cannot be run against historical records. If you have a recipe that’s triggered by a product purchase, for example, the recipe will only run for any purchases made after the Automator plugin was installed and the associated recipe created. There is no way to run recipes against activities that happened in the past.


Comments (0)