Why connect to Zoom
The most obvious reason to use Zoom, or any video conferencing app for that matter, is the coronavirus outbreak. The lockdowns and travel restrictions have moved our business meetings to the web at an unprecedented rate. Zoom stood out from the pack by making it super easy to get on a video call or spin up a webinar.
An informal poll by ZDNet shows that people think Zoom is easier to use, less buggy, and isn’t plagued by spam issues compared to Skype. There’s more—below are Zoom’s main selling points:
- Unlimited free one-on-one meetings.
- Host up to 100 meeting participants.
- Unlimited meetings.
- Ability to join a meeting with just a link (no account or login required).
- Easy to set up live, recorded, and streaming webinars.
- More reliable and better quality compared to its competitors.
Before starting
Here’s what you need before we dive into the tutorial:
- Uncanny Automator
- A paid Zoom plan. If you plan to use Zoom Webinars, you’ll need to purchase the Zoom Webinars add-on for your Zoom plan.
How to set up a Server-to-Server OAuth application for Zoom
This section only applies to sites using Uncanny Automator 4.7 or later.
To connect Uncanny Automator to your Zoom account, follow the instructions for creating a Server-to-Server OAuth app here: https://marketplace.zoom.us/docs/guides/build/server-to-server-oauth-app/. You will set up the new app from inside your account at this link: https://marketplace.zoom.us/develop/create. The steps are the same for both Zoom Meeting and Zoom Webinar users, but this does require a paid account and is not the same as a regular OAuth app (it must be server-to-server).
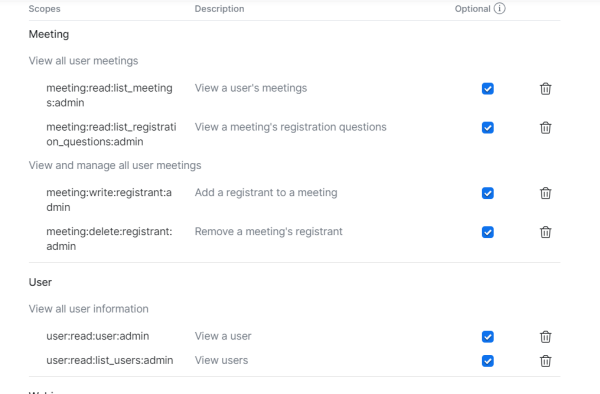
If you are connecting to Meetings in your Automator recipes, make sure that the following scopes are added (you may need to search for these):
- user:read:user:admin
- user:read:list_users:admin
- meeting:read:list_meetings:admin
- meeting:read:list_registration_questions:admin
meeting:write:registrant:admin - meeting:delete:registrant:admin
For webinars, make sure you also choose the following:
- webinar:read:list_registration_questions:admin
- webinar:read:list_webinars:admin
- webinar:delete:registrant:admin
- webinar:write:registrant:admin

- Navigate to Automator > Settings > App Integrations in /wp-admin/. Choose the Zoom Meetings or Zoom Webinars tab to set up the associated integration.
- From https://marketplace.zoom.us/user/build, choose the app you created from the list of available apps. Open it to see your app credentials.
- Copy the Account ID, Client ID and Client secret values from inside your new app into the Automator integration settings. You will find the Zoom values on a page that looks like this:

- Once the required fields are populated, click the Connect button at the bottom of the settings to connect your Zoom account to Automator.
How to set up Zoom action
Once your API details are saved, you’ll see Zoom actions show up in your recipes.

Now that your Zoom account is connected to Automator, you can add and remove users from specific meetings based on purchase, e-learning course activity, event registration or any other triggers you want to use.
How to set up a Zoom Meeting for use with Automator
When creating new Zoom meetings that you want to use with Automator, be sure to check the Required box next to Registration. Users can only be registered for meetings that require registration; if this box is not checked, the actions will fail. This step is not required for Zoom webinars, as registration is automatically required for all webinars.

Using child accounts with Automator
It’s not uncommon to have several child accounts under a Zoom master account for many organizations. In this situations, you will set up the integration with the parent account, but you might need to map to a child account that as (for example) Webinar support that other accounts don’t. There is a filter that you can add to the bottom of the functions.php file in your child theme to map to override the connected account:
add_filter( 'automator_zoom_api_call', function( $params ) {
	$params['body']['user'] = '[email protected]';
	return $params;
} );
Replace the sample email address with the account you want to use to change the mapping.
Troubleshooting
Please note that Zoom requires that all users have a first name, last name and email address, and all 3 of these values must be passed separately. If you are adding a user to a Zoom webinar or meeting please make sure that all 3 values are sent to Zoom for each user, if any are blank or missing for the user then registration will fail.


Comments (0)