

The Facebook Lead Ads integration starts a recipe on your WordPress site each time someone submits the lead form in one of your Facebook ads. The lead’s answers become tokens you can use in the recipe’s actions: email the lead, add them to your mailing list, or create a WordPress user. This article walks through the Facebook setup the integration depends on, connecting Facebook Lead Ads to Uncanny Automator, building the recipe, and sending a test lead.
If you have Uncanny Automator Lite, you’ll first need to connect your site to a free Uncanny Automator account, which gives you app credits to use with Facebook Lead Ads. On a paid plan, app integrations are included.
Important: Facebook needs every step below before it sends leads to Automator. If one is skipped, leads are not delivered and the recipe never runs.
Before you begin
You need the following in Facebook, with admin access to each of them:
- A Facebook Business portfolio
- A Facebook Page linked to that business
- An ad account linked to the business and the Page
- A Leads campaign that uses an Instant form
Your WordPress site must also be reachable at a public URL. Facebook delivers leads to your site over the internet, so a local site cannot receive them; on a site Automator detects as local, the Facebook Lead Ads settings page says “Webhooks need the site at a public URL, and this site is local.”
If your Facebook business, Page, ad account, and lead form are already set up, skip to Step 7: Connect Facebook Lead Ads in Automator.
Step 1: Set up your Facebook Business portfolio
Go to business.facebook.com. If you already have a Business portfolio, go on to Step 2. Otherwise:
- Click the business menu in the top left corner.
- Select Create a business portfolio.
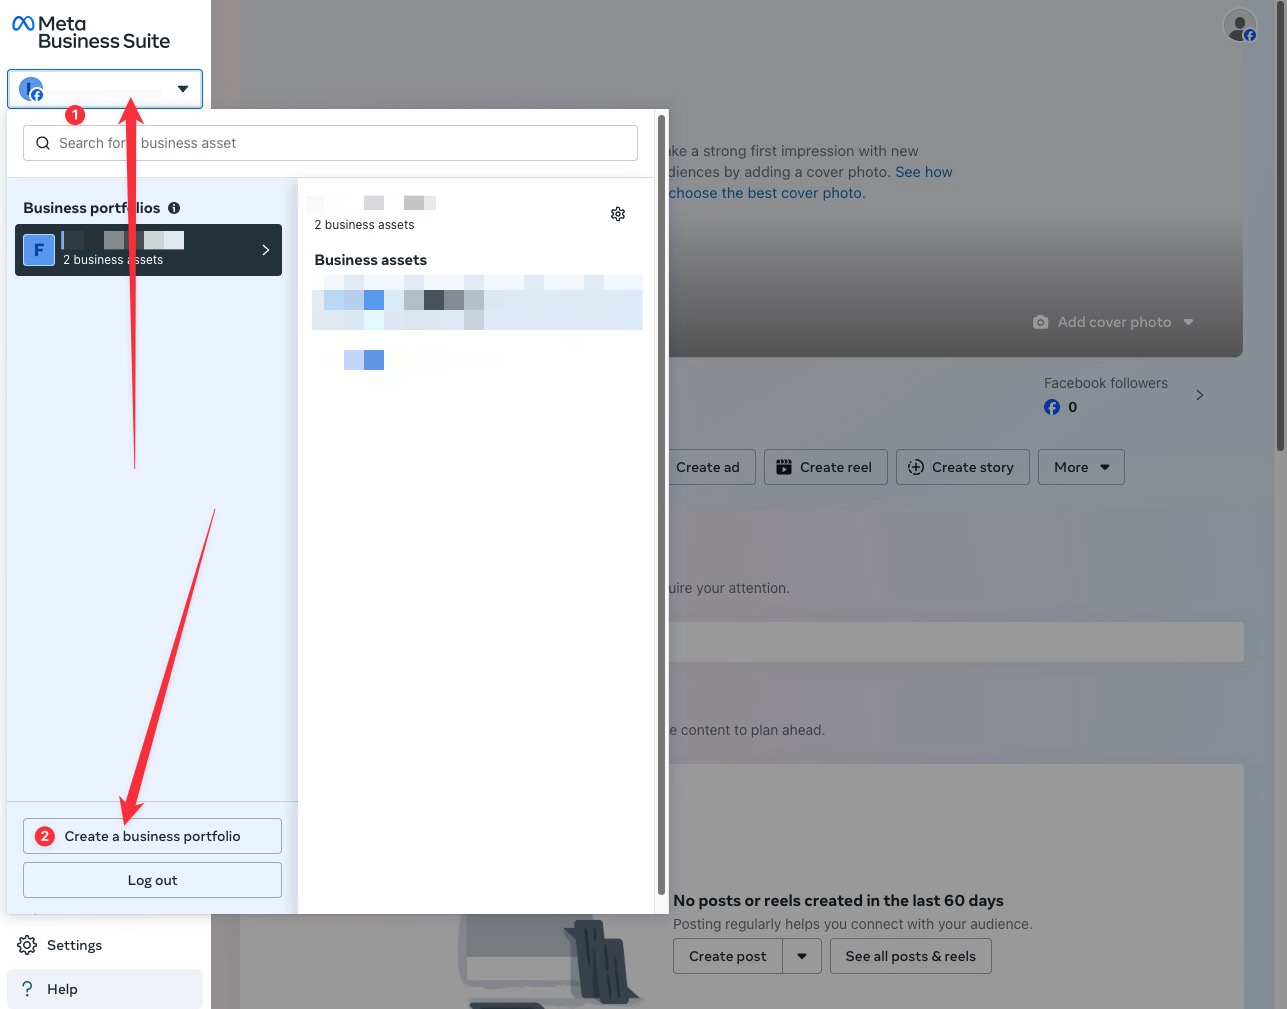
- Enter your business information and follow the prompts until the business is created.
Step 2: Create or link a Facebook Page
If you already have a Facebook Page connected to the business, go on to Step 3. Otherwise:
- Open the menu again, choose Pages, and click Add.
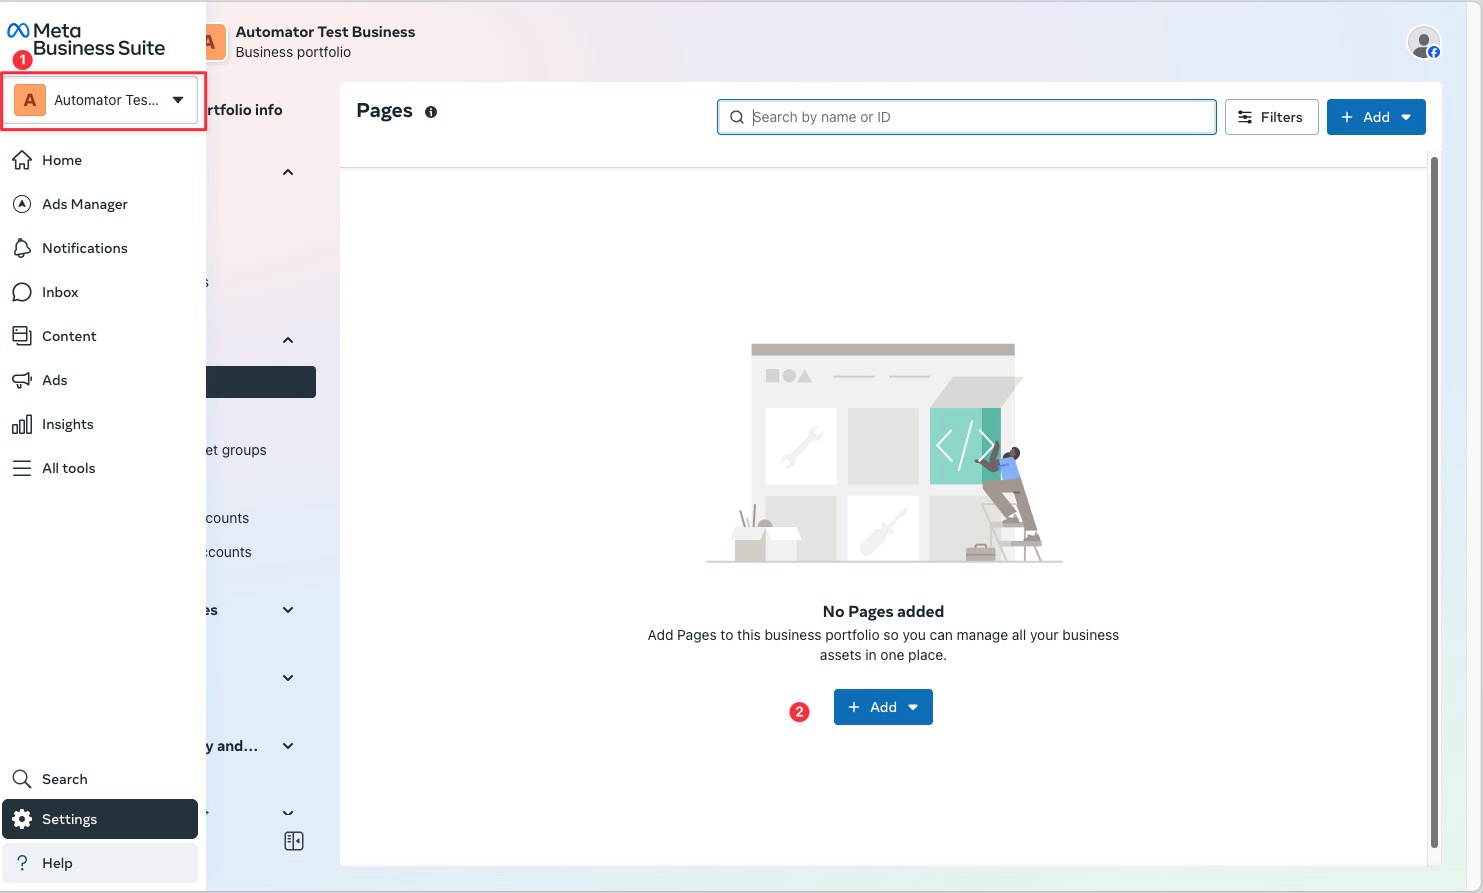
- Enter the Page name, a category, and the other details Facebook asks for.
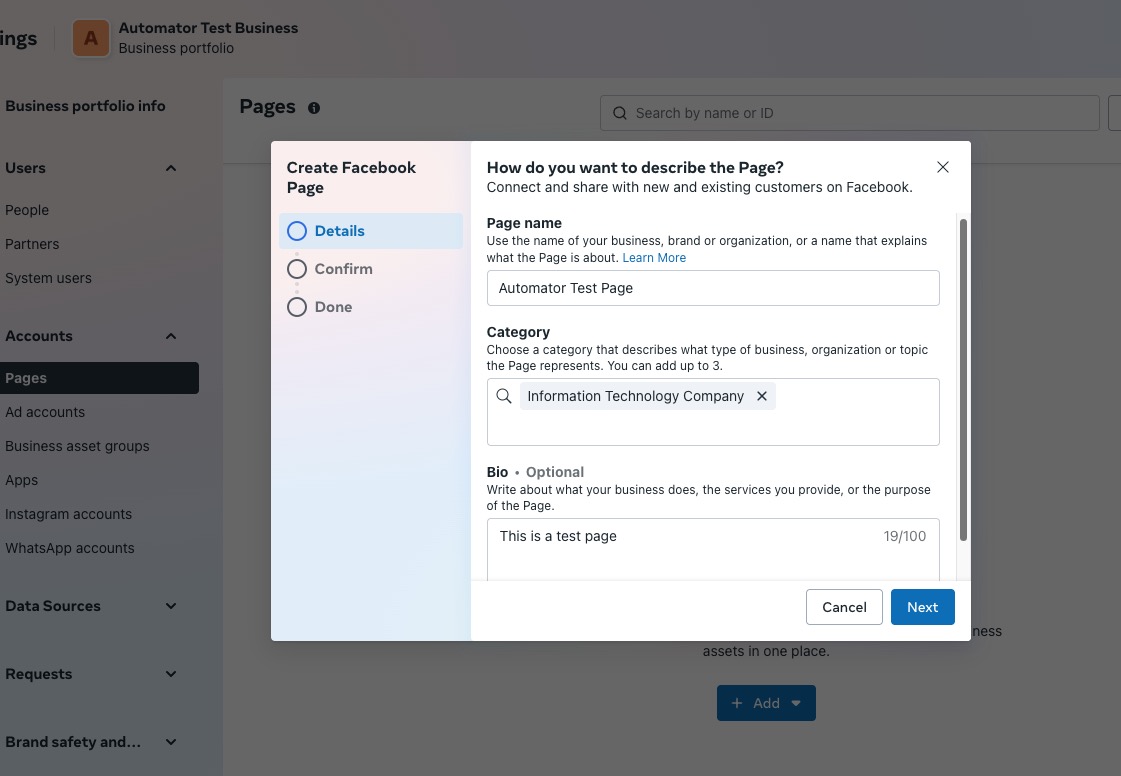
- On the confirmation screen, check that the Page is shown under your business portfolio, then create the Page.
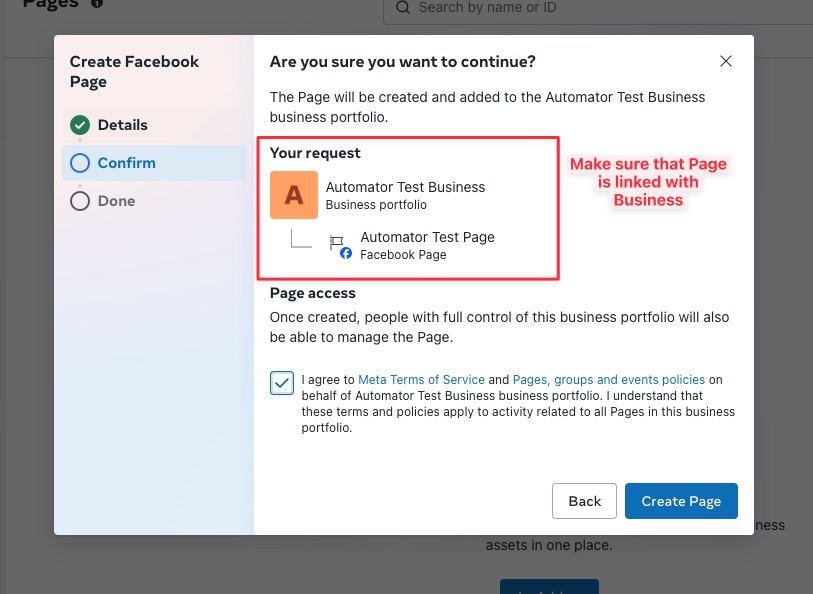
Step 3: Set up an ad account and assign access
Check whether your Page has an ad account linked. If it does not:
- In your business settings, go to Accounts > Ad accounts.
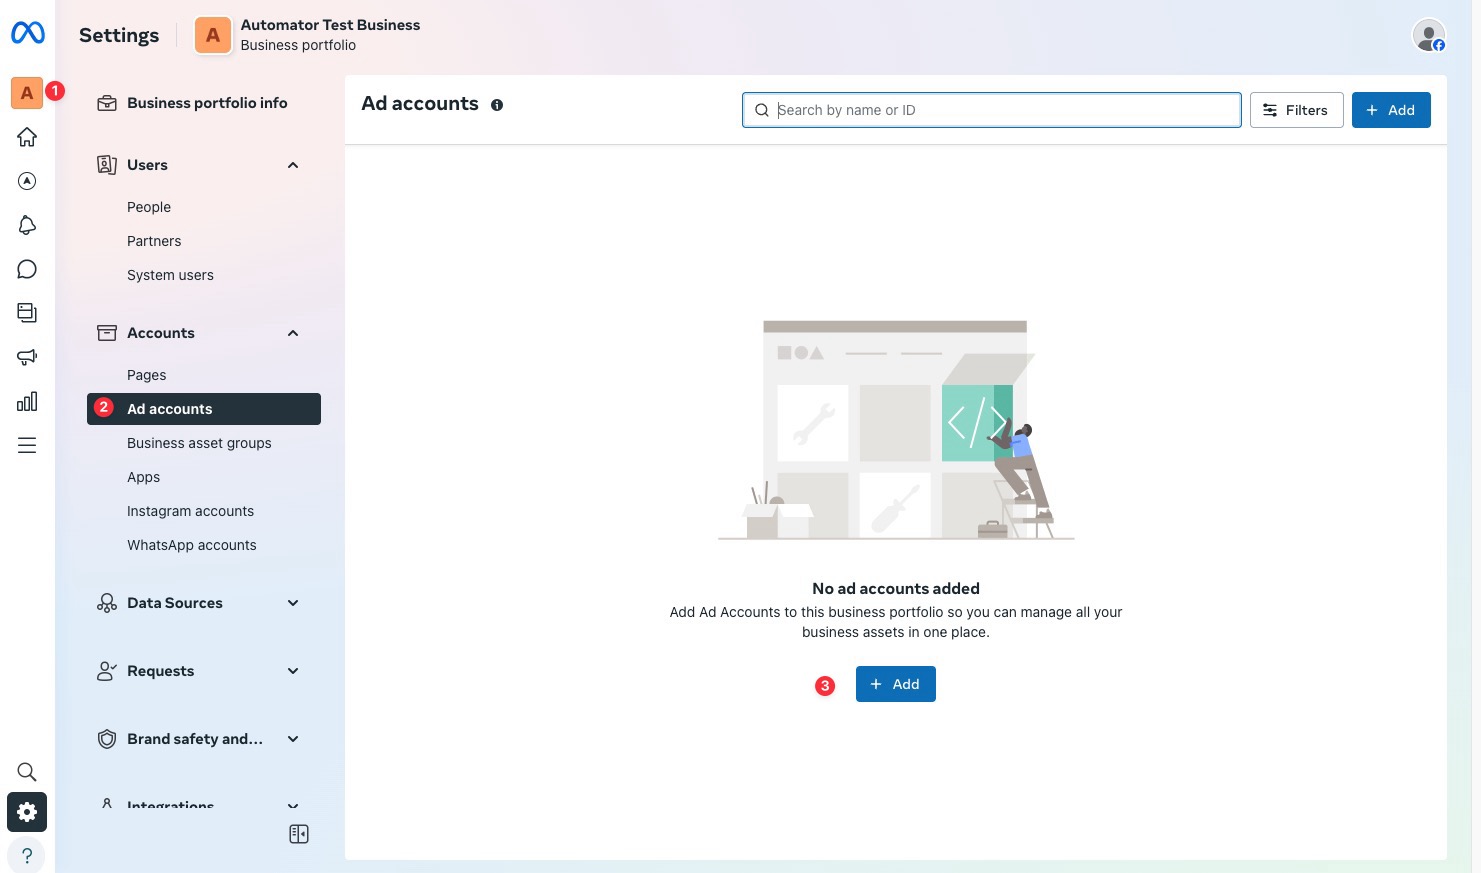
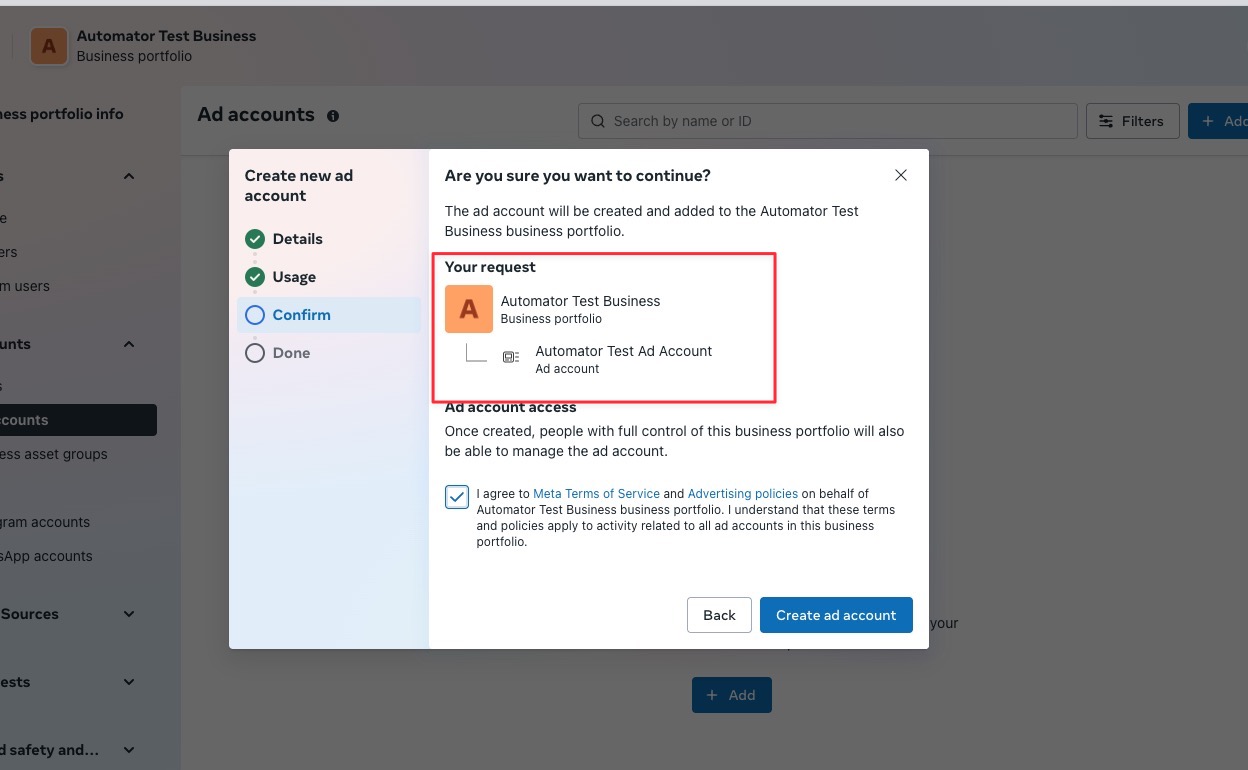
- Create a new ad account or add an existing one.
- Make sure the ad account is linked to your business and the correct Page.
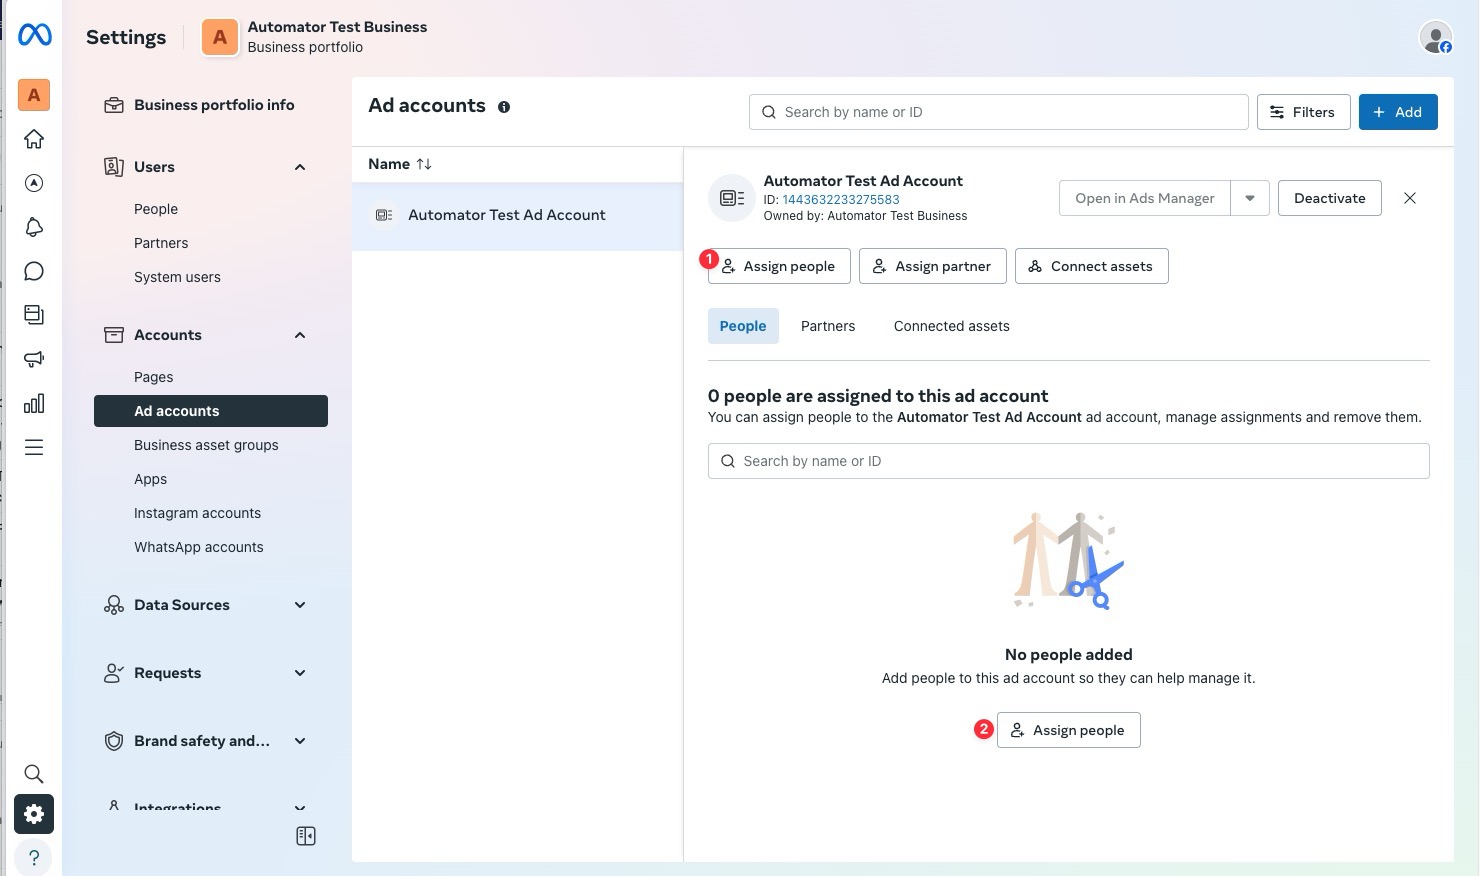
- Select the ad account and click Assign people.
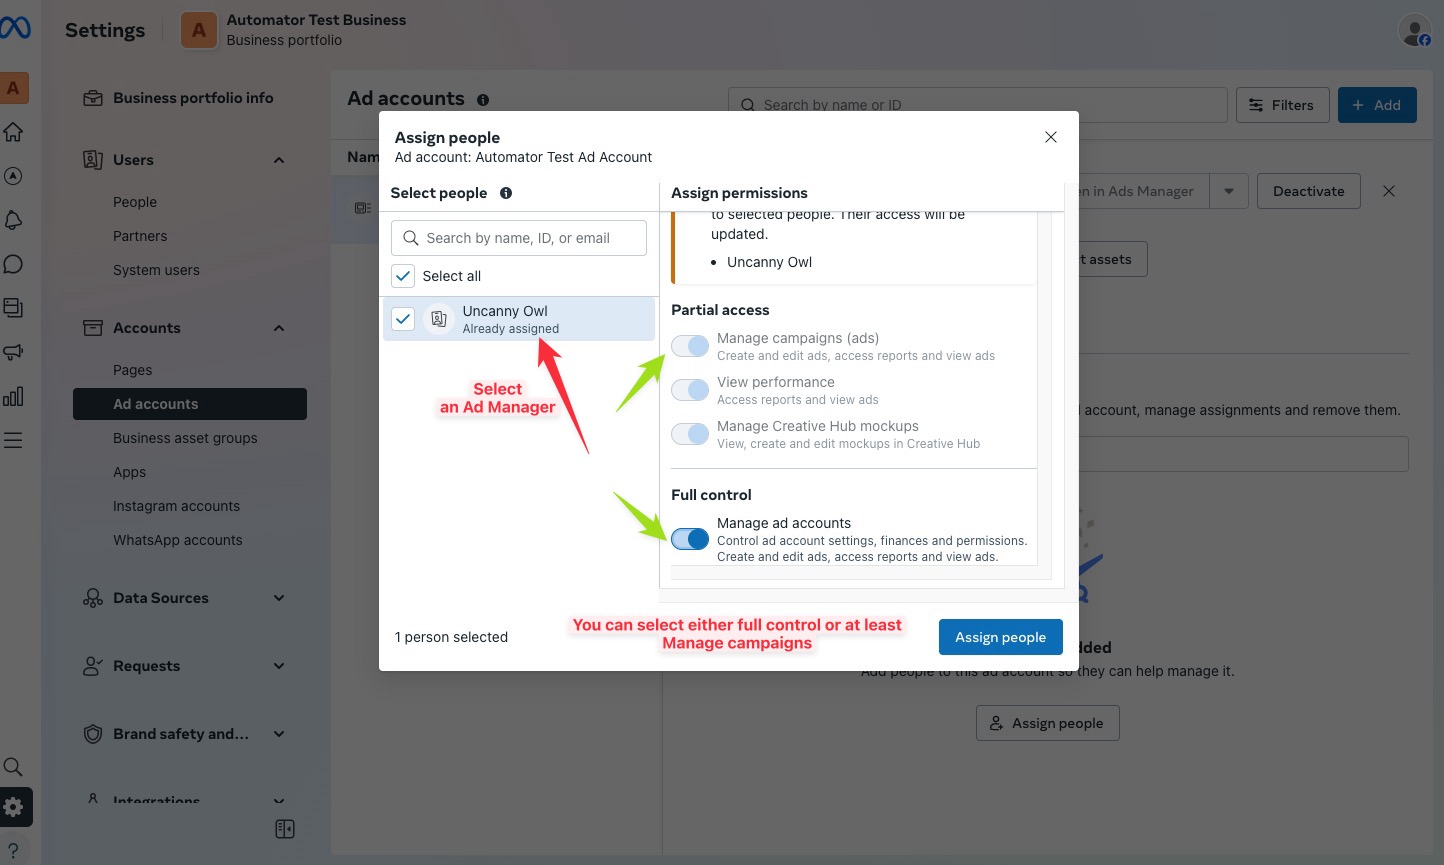
- Select a person (you or someone else) and give them at least the Manage campaigns permission, or full control, then click Assign people.
Step 4: Open Ads Manager and start a campaign
- Open the menu and select Ads Manager.
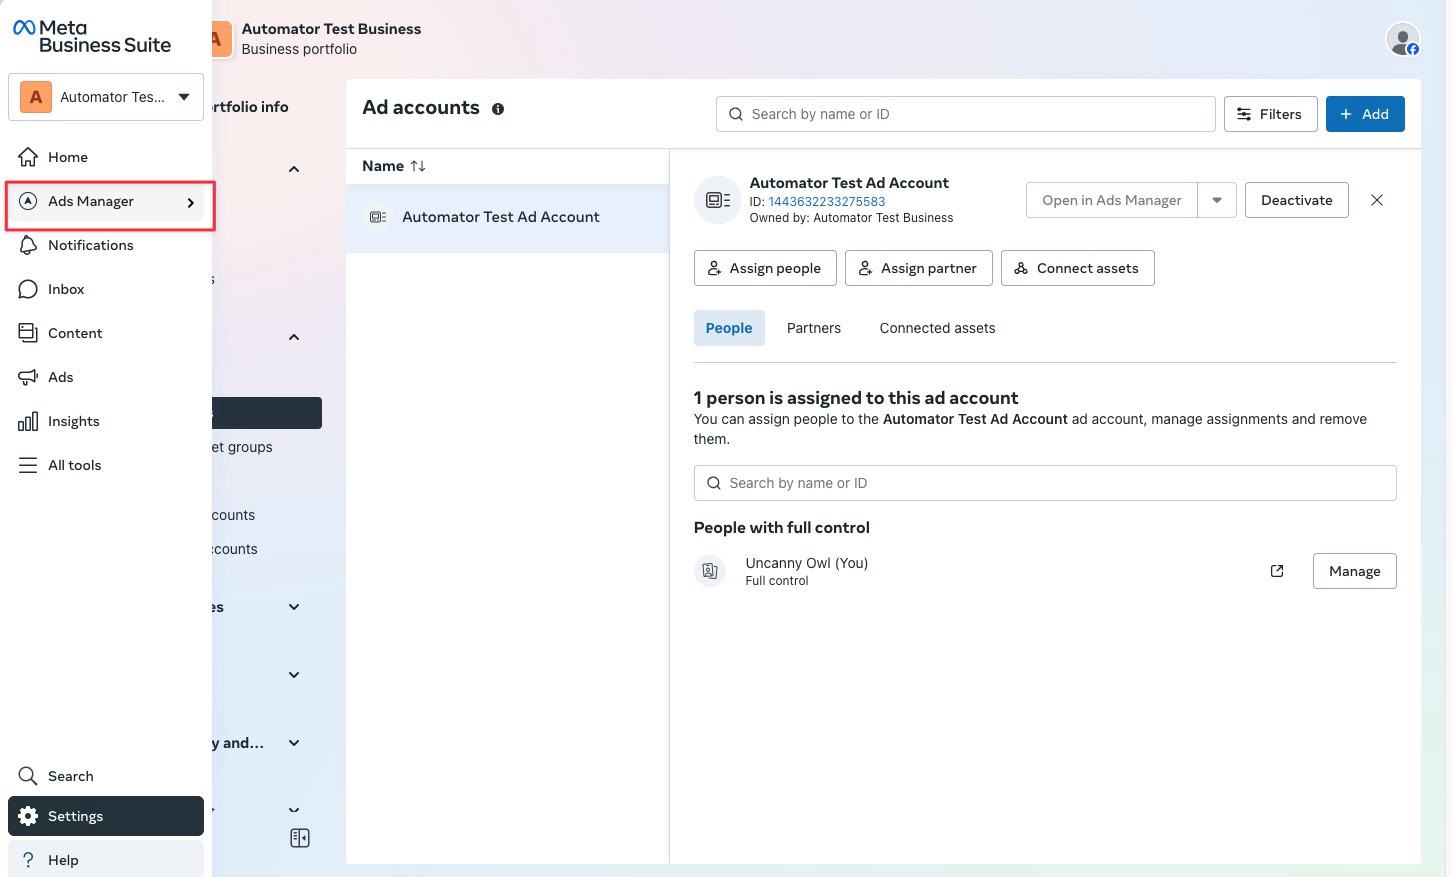
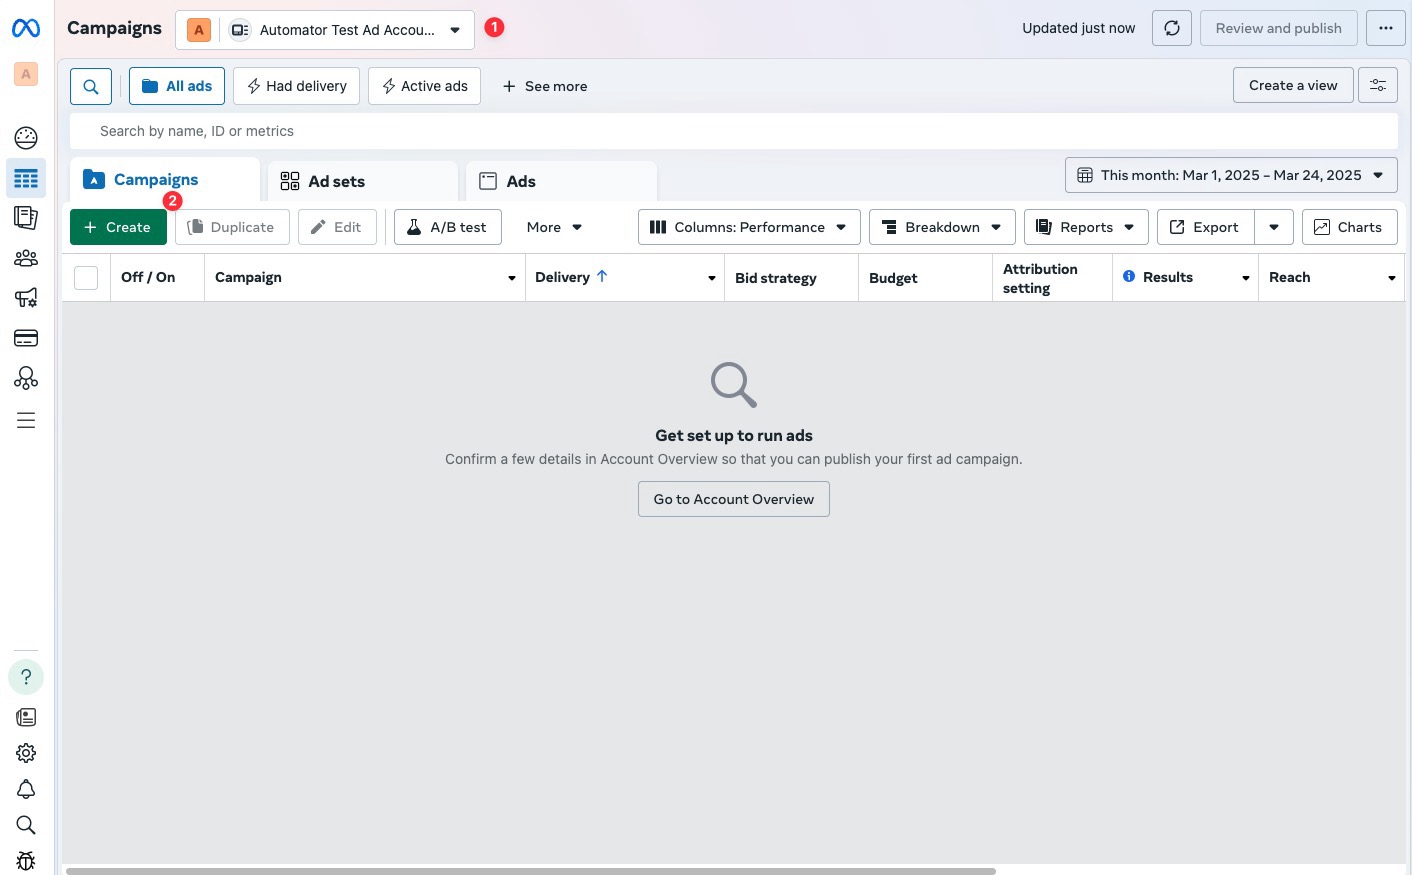
- Check that the correct business and ad account are selected at the top.
- Click Create to start a new campaign.
Step 5: Configure your Leads campaign
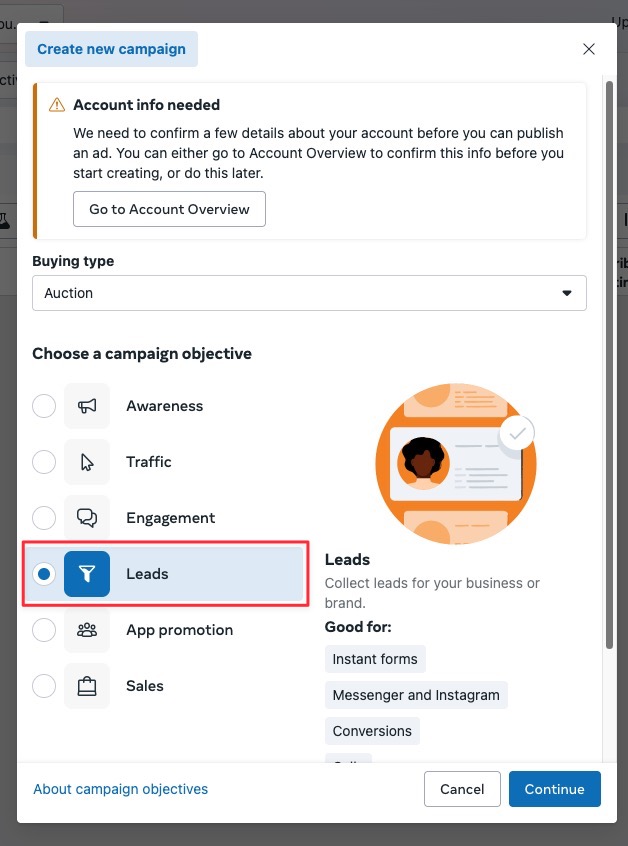
- Select Leads as the campaign objective.
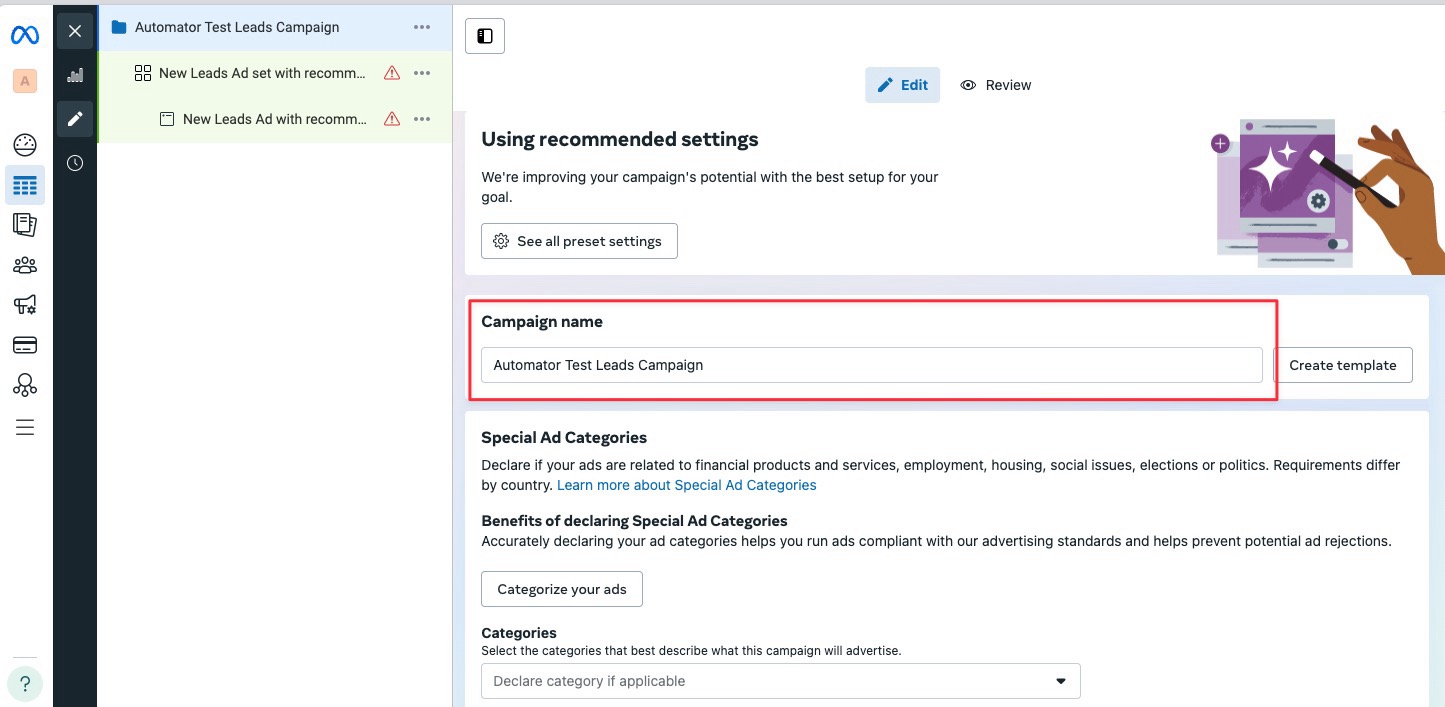
- Give the campaign a name you will recognize.
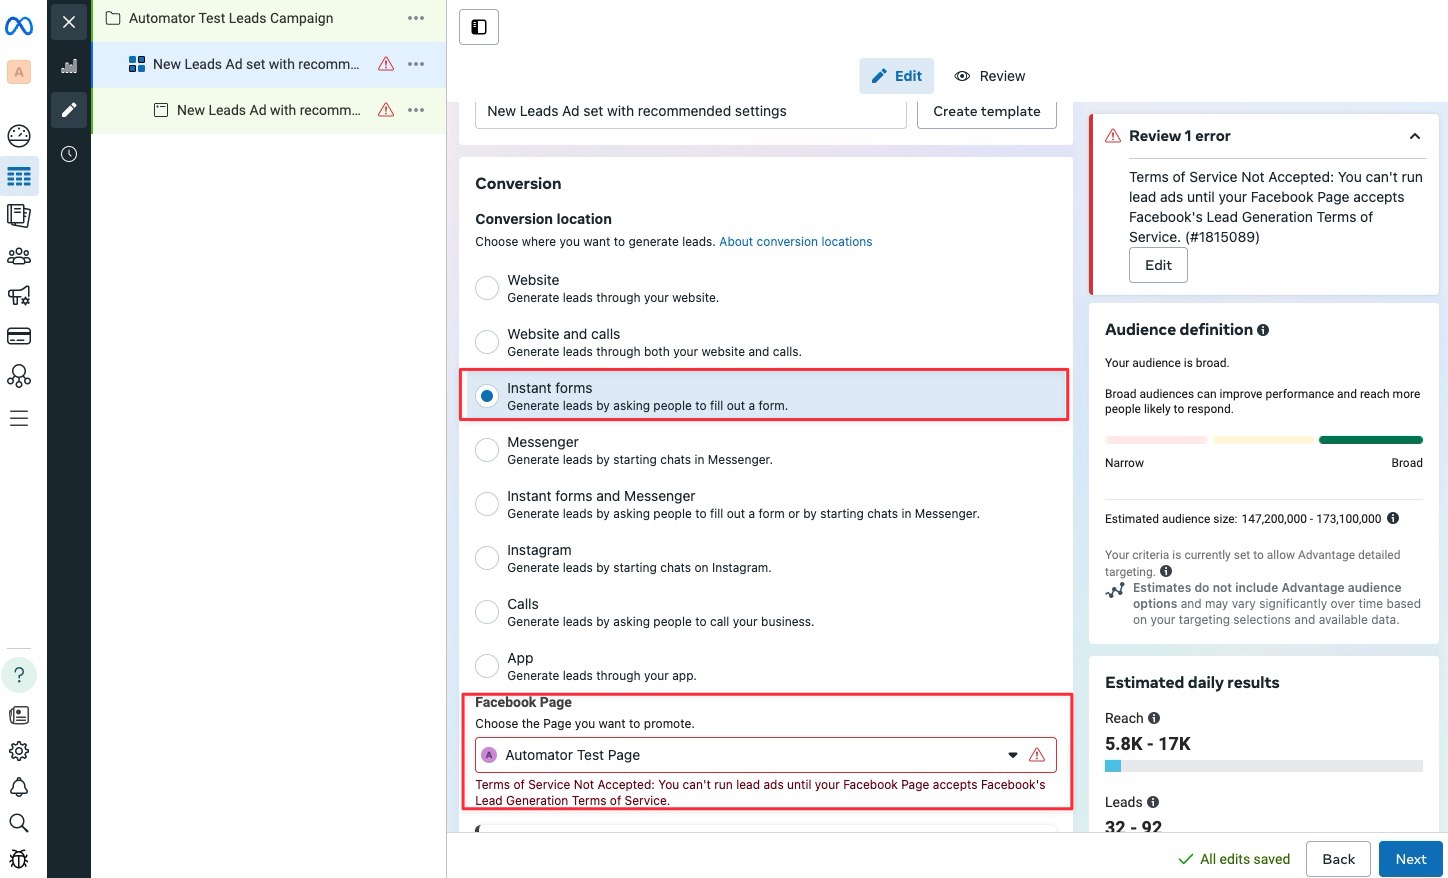
- Under Conversion location, select Instant forms.
- Choose your Facebook Page. If Facebook asks you to accept its lead generation terms for the Page, accept them.
- Adjust the budget, audience, and other settings as you need.
- Do not publish the campaign yet. Save it as a draft so it does not incur charges while you finish the setup.
Step 6: Create a Facebook lead form
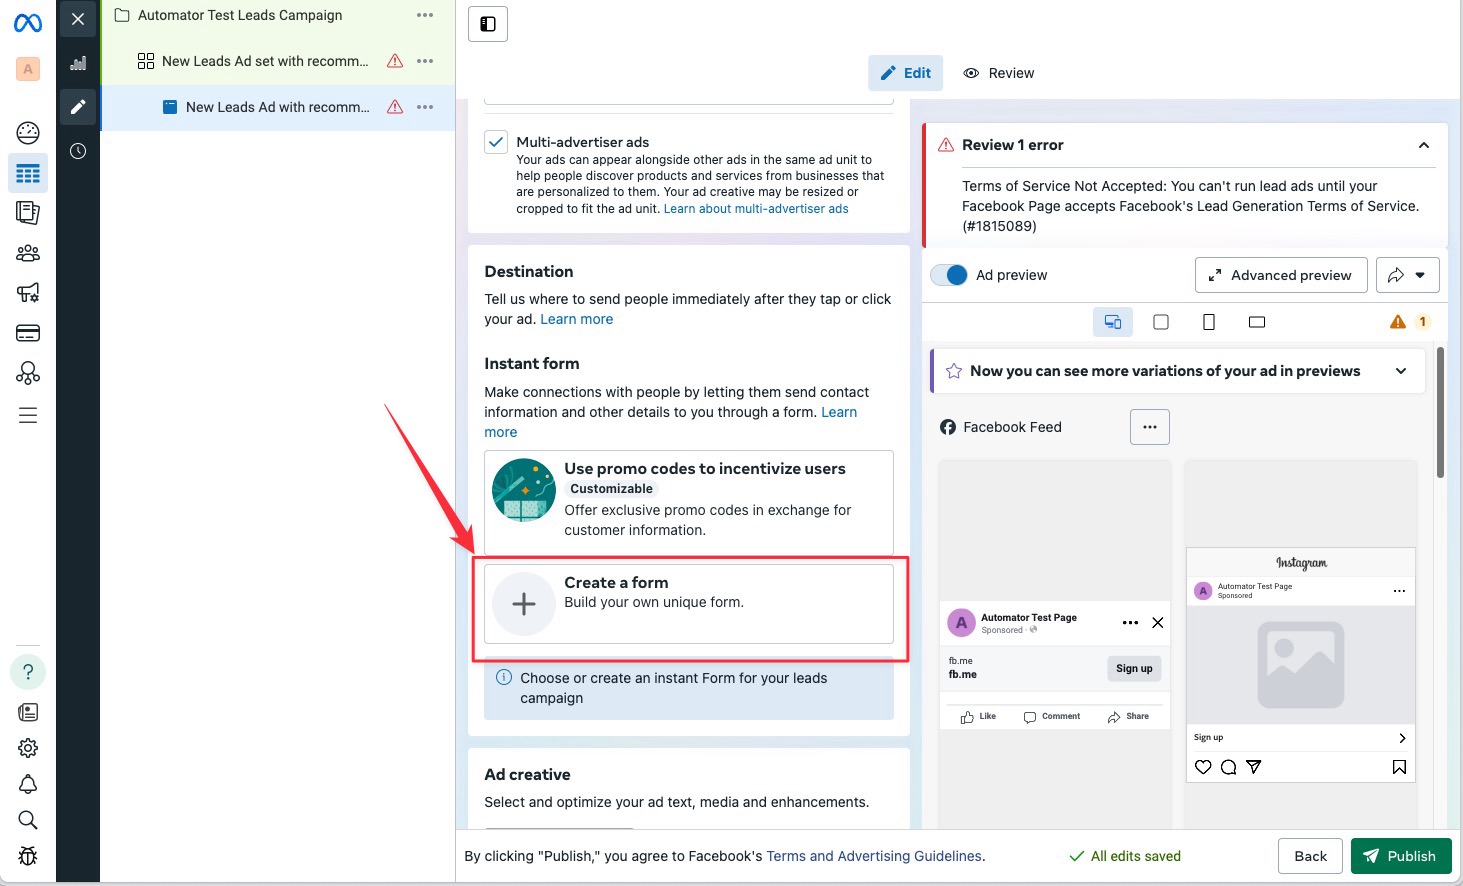
- In the ad section of the campaign, under Instant form, click Create a form.
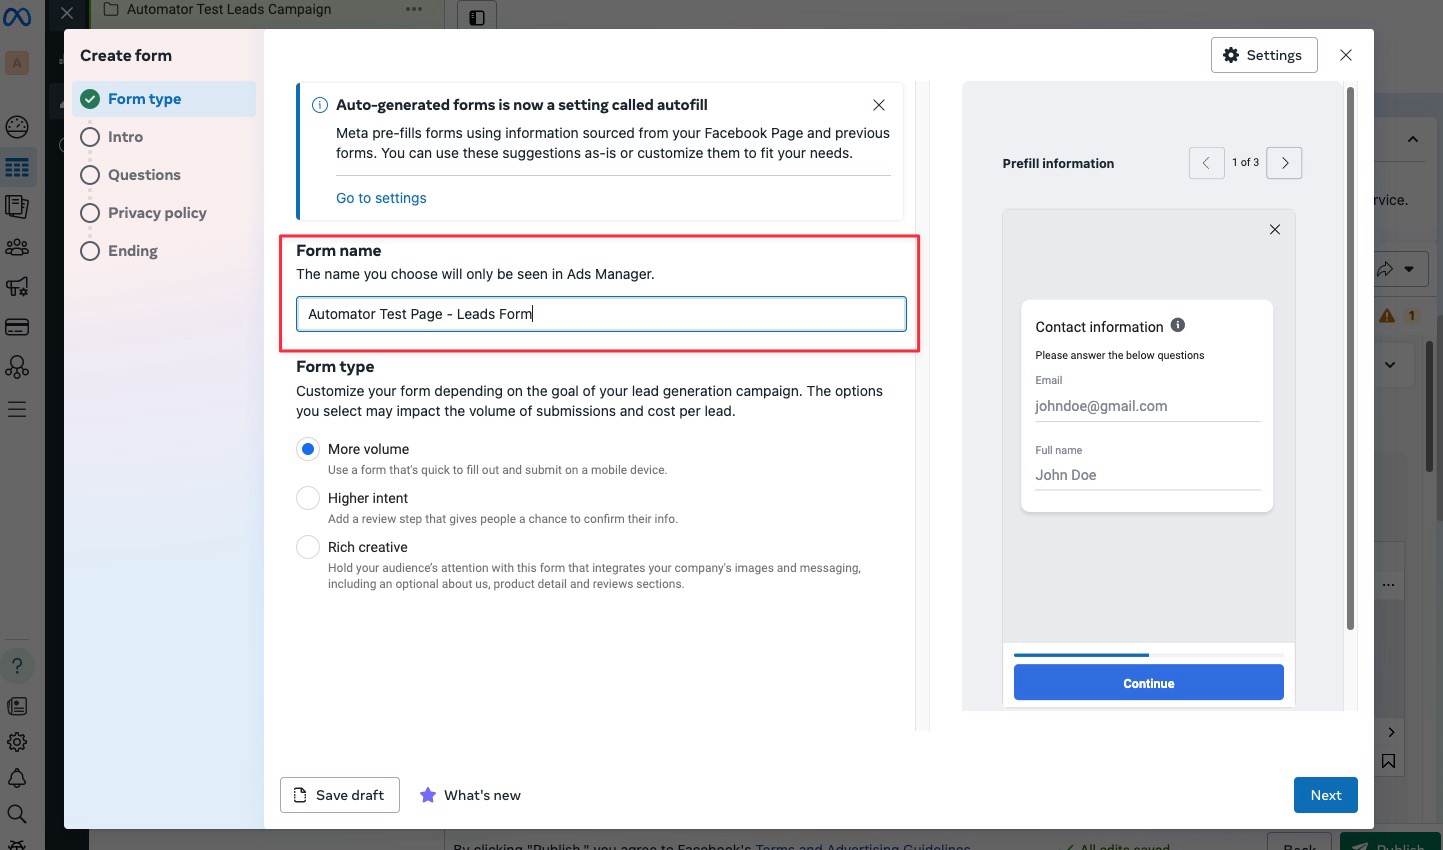
- Enter a name for the form.
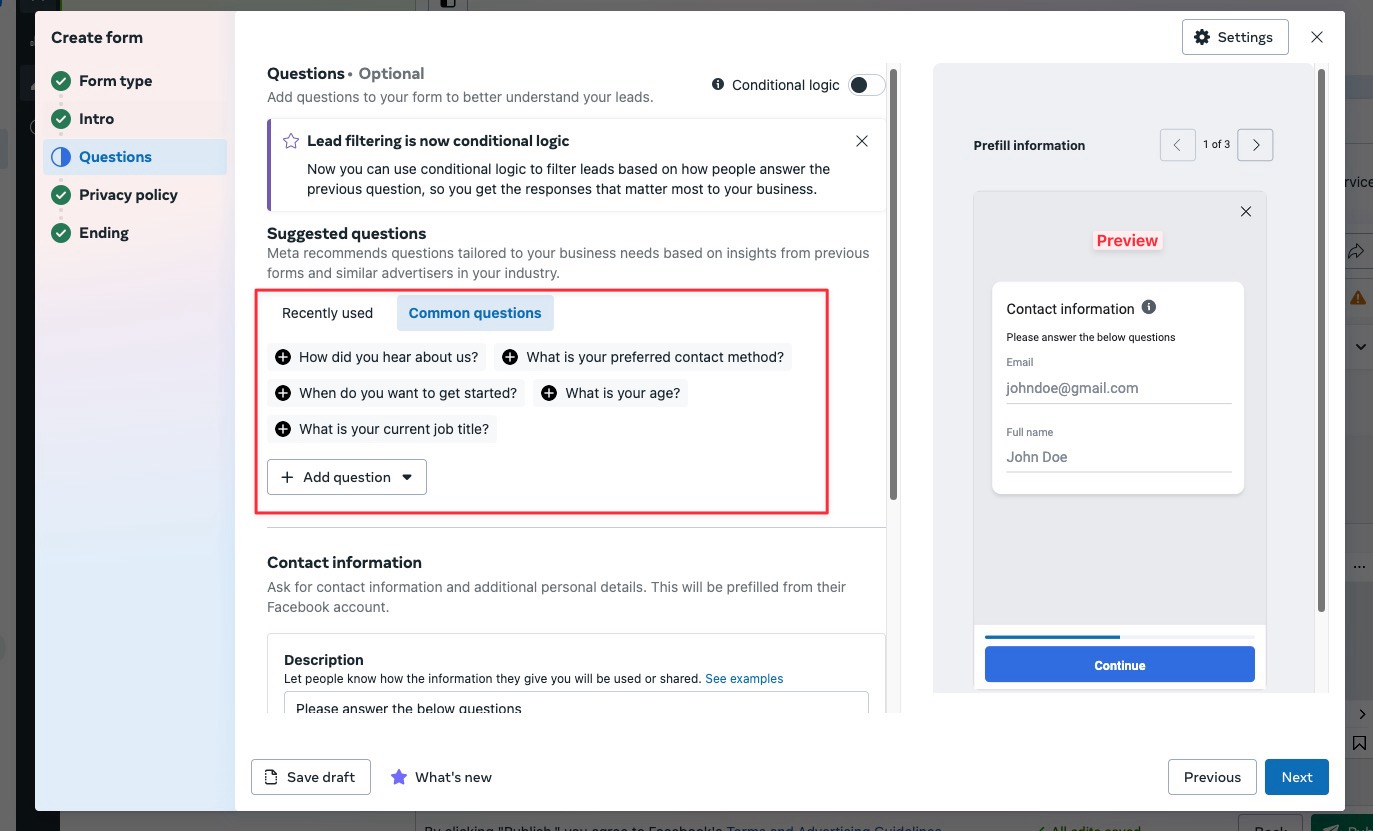
- Edit the questions to collect the information you want. Each question becomes a token in your recipe.
- Preview the form with the built-in preview.
- Enter your privacy policy URL.
- Set what the thank-you screen shows, or choose a link to send people to.
Step 7: Connect Facebook Lead Ads in Automator
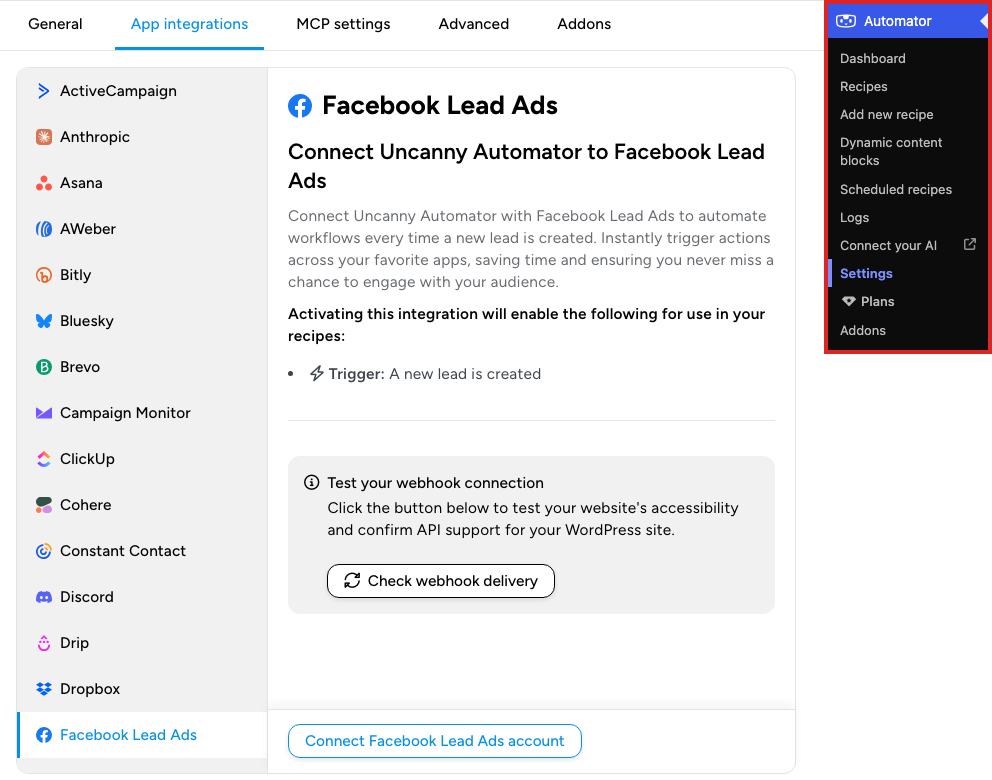
- In your WordPress dashboard, go to Automator > Settings > App integrations > Facebook Lead Ads.
- Click Connect Facebook Lead Ads account.
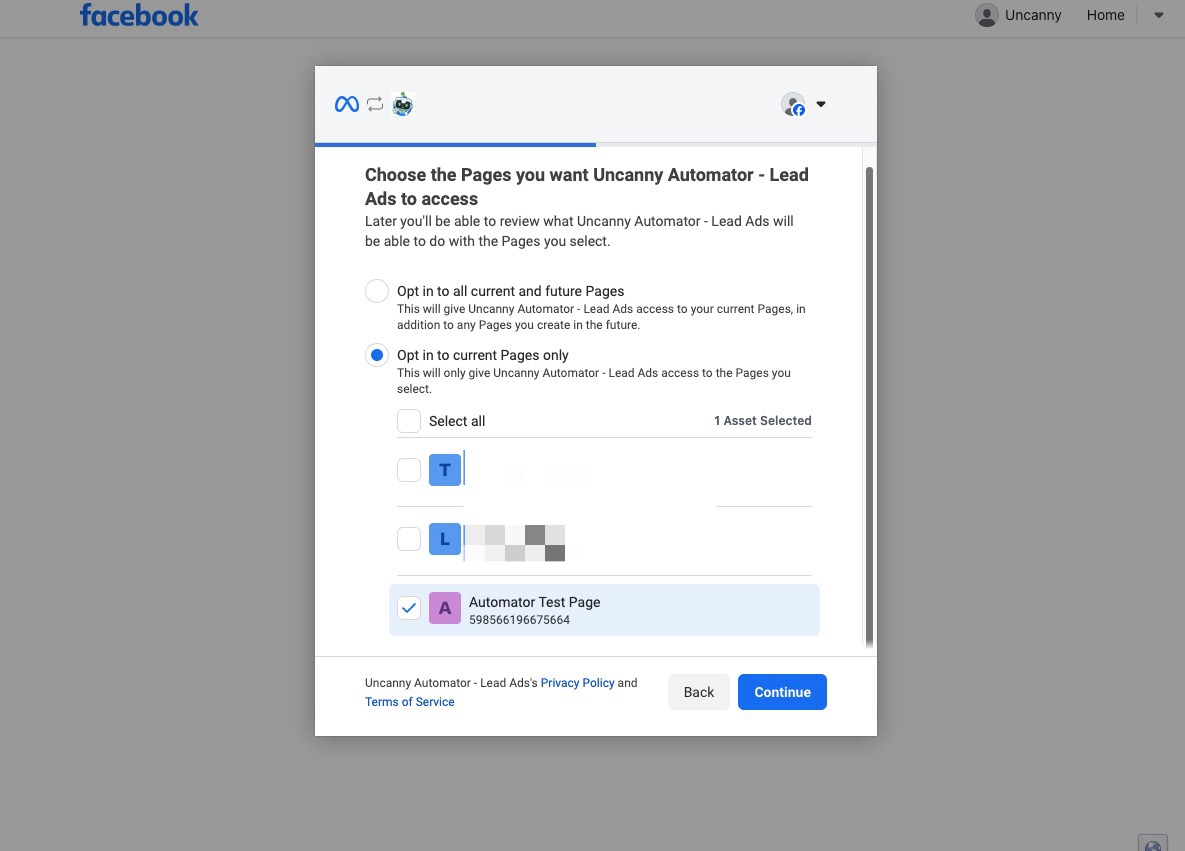
- When Facebook asks which Pages Uncanny Automator – Lead Ads can access, select the Page you use for the campaign and click Continue.
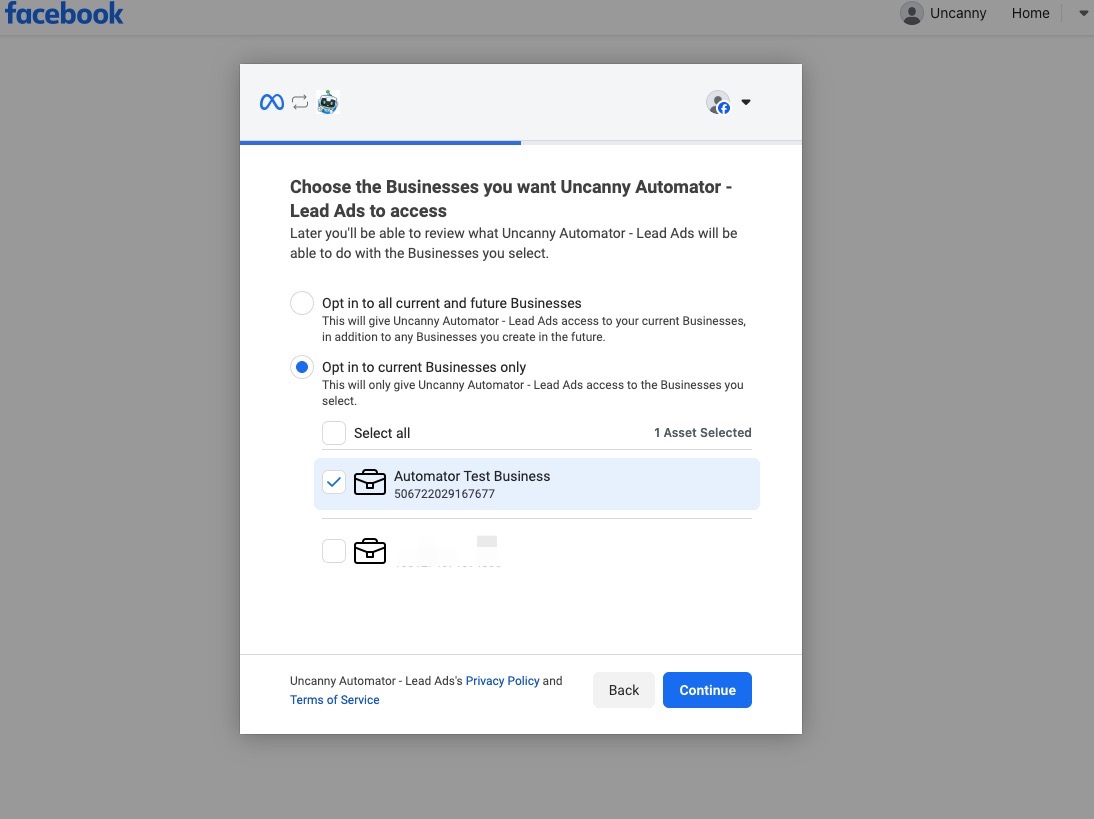
- On the next screen, select the business and click Continue.
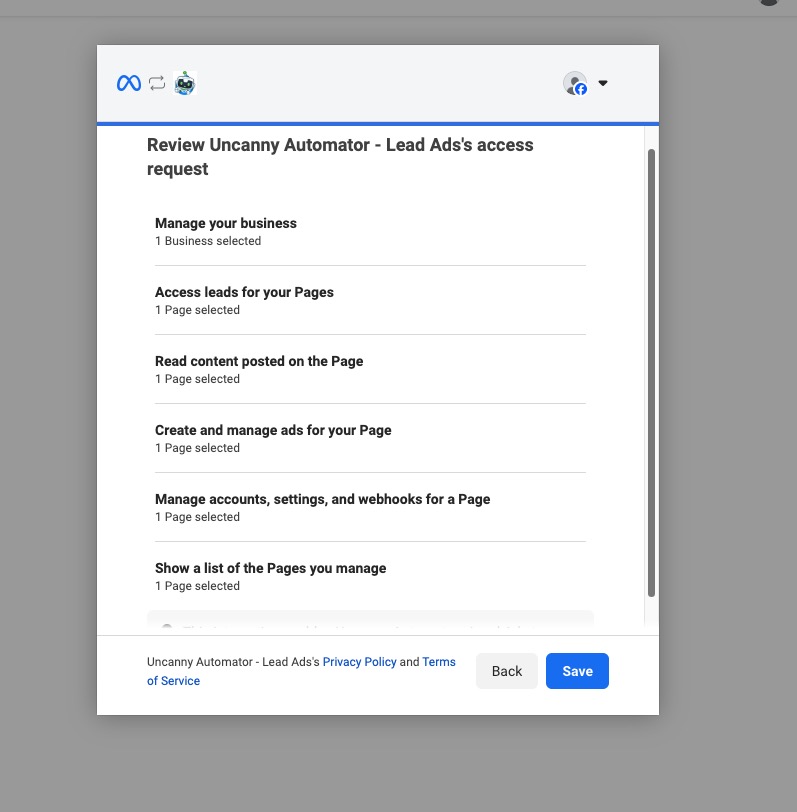
- Review the permissions Uncanny Automator – Lead Ads requests and click Save.
- Click Got it when Facebook returns you to your site.
- Under Connected pages, check that your Page is listed with the status Ready. Each Page shows its Page ID and how its leads are delivered, and Reverify checks the Page’s connection again.
- Under Test your webhook connection, click Check webhook delivery. The Automator Platform sends a test request to your site; “Webhook test successful” confirms your site can receive leads.
Until Facebook Lead Ads is connected, the recipe builder’s picker hides it while its Ready-to-use only switch is on.
Check app access in Facebook (optional)
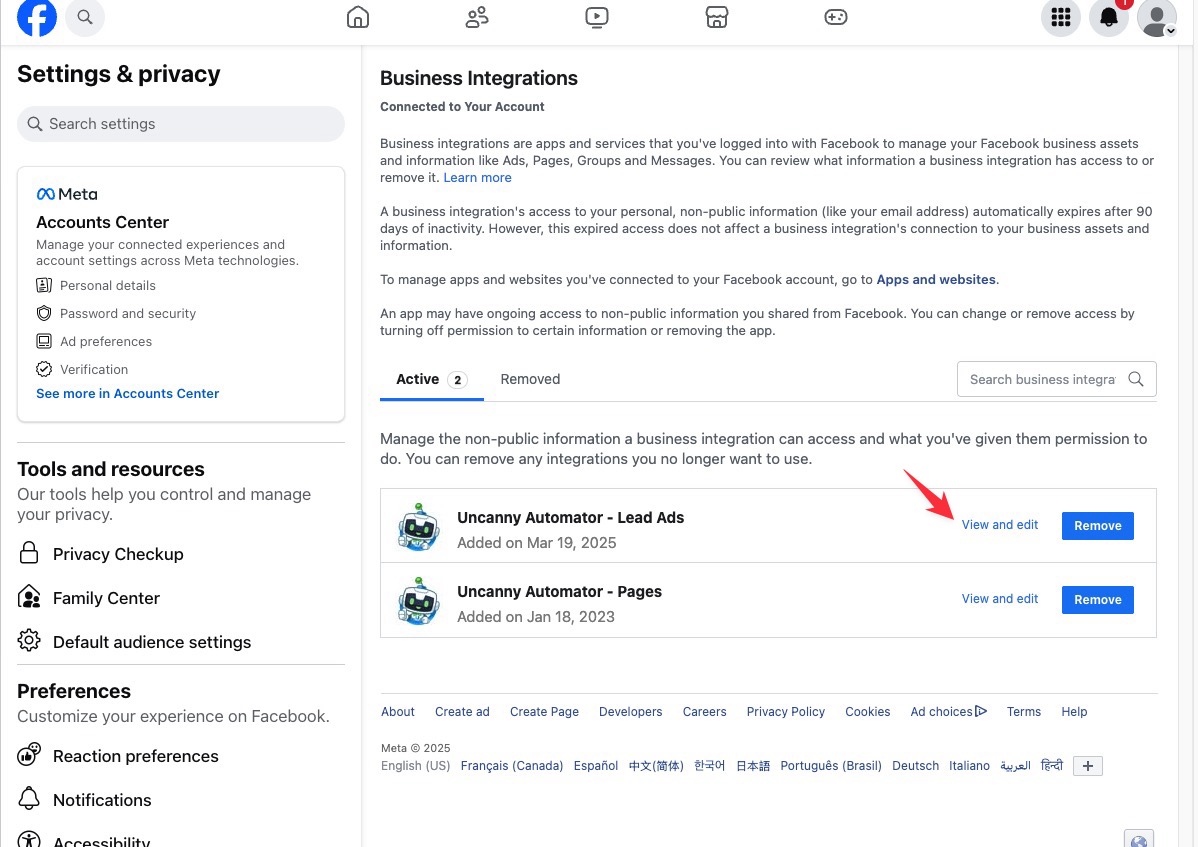
To confirm the connection from Facebook’s side, go to Facebook’s Business Integrations settings and check that Uncanny Automator – Lead Ads appears in the list of active integrations.
Step 8: Assign Uncanny Automator as a CRM
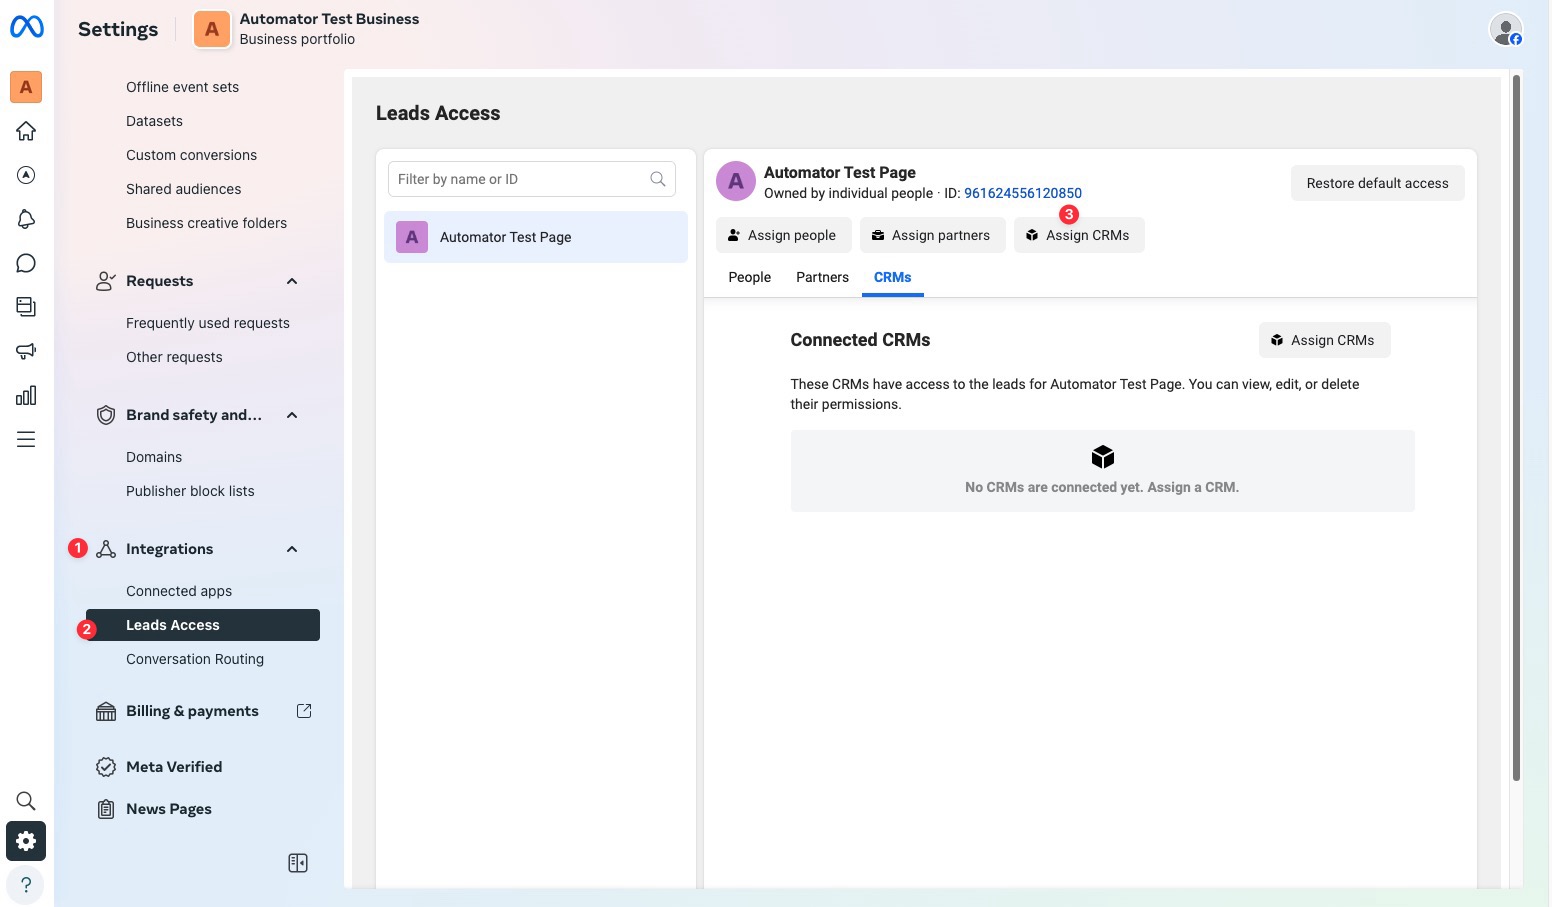
- Return to Facebook Business and select the same business and Page.
- Click Settings in the bottom left.
- Under Integrations, click Leads Access.
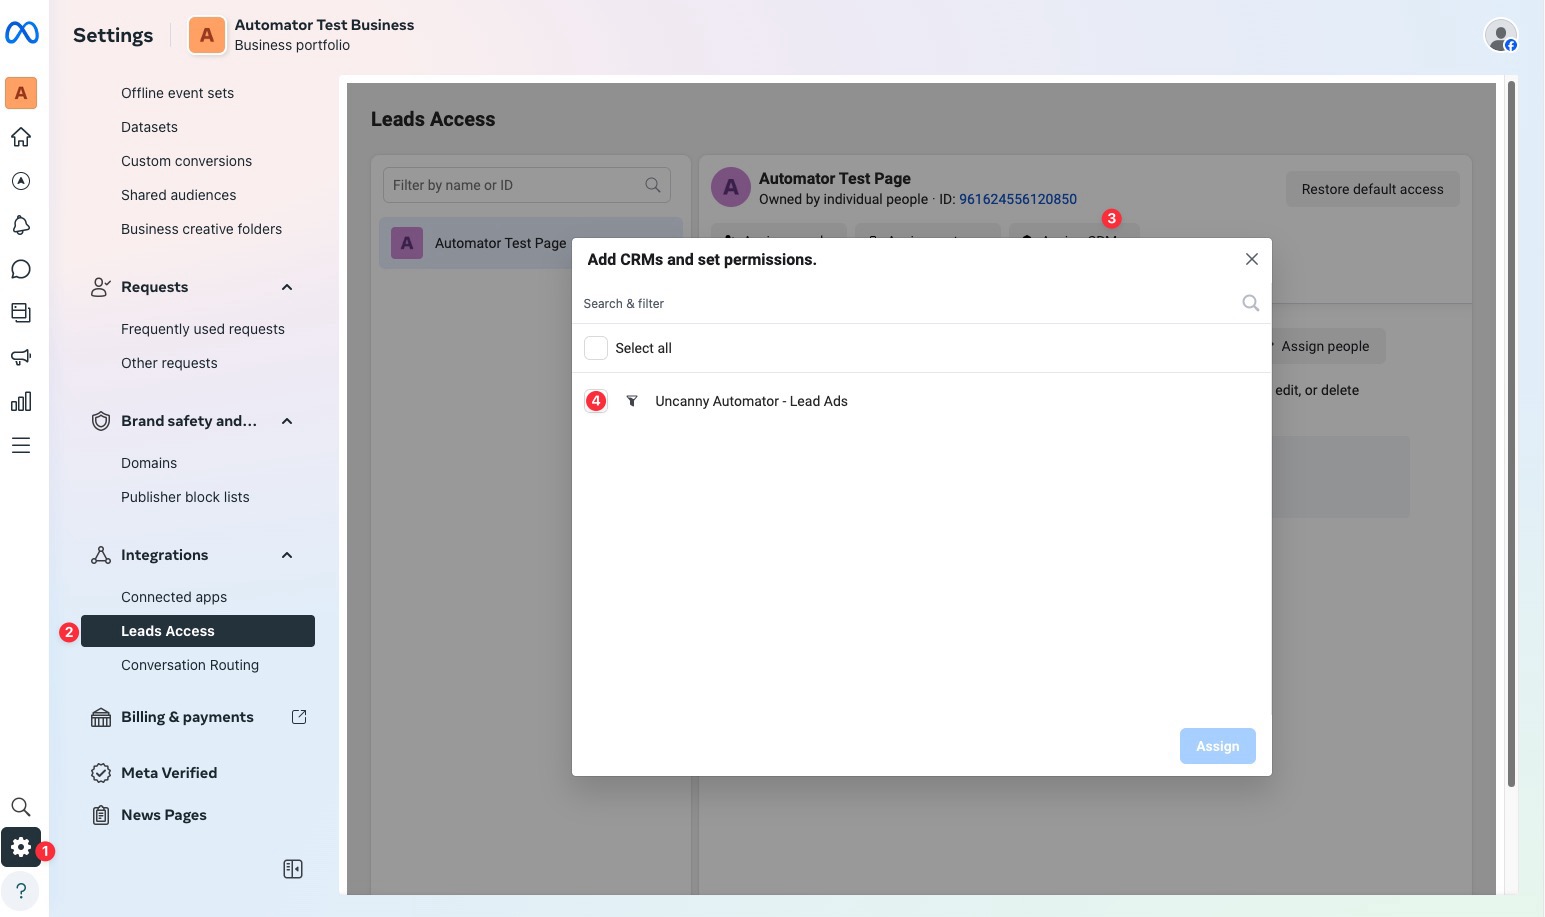
- Click Assign CRMs.
- Select Uncanny Automator – Lead Ads and click Assign.
Step 9: Create the recipe in Automator
A lead comes from Facebook, not from a visitor logged in to your site, so the Facebook Lead Ads trigger works only in a recipe of the Everyone type. In a Logged-in users recipe the picker shows it with the note “This trigger runs for everyone and cannot be used in a recipe for logged-in users.” See Recipe types: logged-in users and everyone.
- Go to Automator > Add new recipe, select Everyone, and click Confirm.
- Click Add trigger. In the picker, search for Facebook Lead Ads, select it, and select the trigger A new lead is created.
- In the Set up step, select your Page, then the Form. If a form you created a moment ago is missing, click Refresh options. Editing a form in Facebook gives it a new form ID, so select the form again here after any change to it.
- Click Save.
- Click + below the trigger and add the actions you want, such as sending an email or adding the lead to a mailing list. Insert the lead’s answers with the ∗ button at the end of a field; each form question is a token, alongside tokens such as Form ID, Page ID, and Created time (timestamp). If an action needs a WordPress user, set up the Run recipe as card; see Recipes for Everyone.
- Switch the recipe on with the Recipe on switch in the top bar.
Note: In a duplicated or imported recipe, the trigger fetches its form question tokens from Facebook when you switch the trigger On. If a copy’s question tokens are missing, check that its trigger is on.
Step 10: Send a test lead
Facebook’s Lead Ads Testing Tool creates a sample lead without running the campaign. Make sure the recipe is on before you send it.
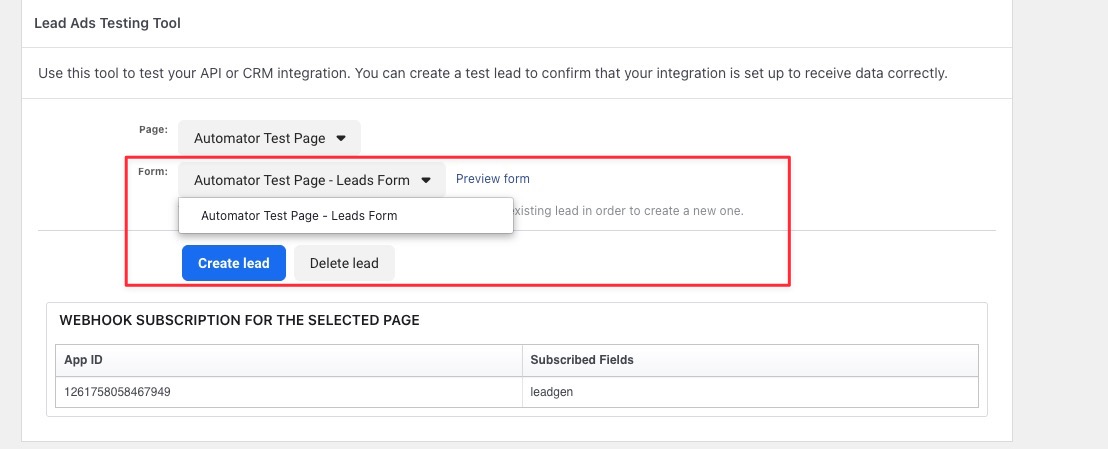
- Go to the Lead Ads Testing Tool.
- Select the Page you used in your campaign.
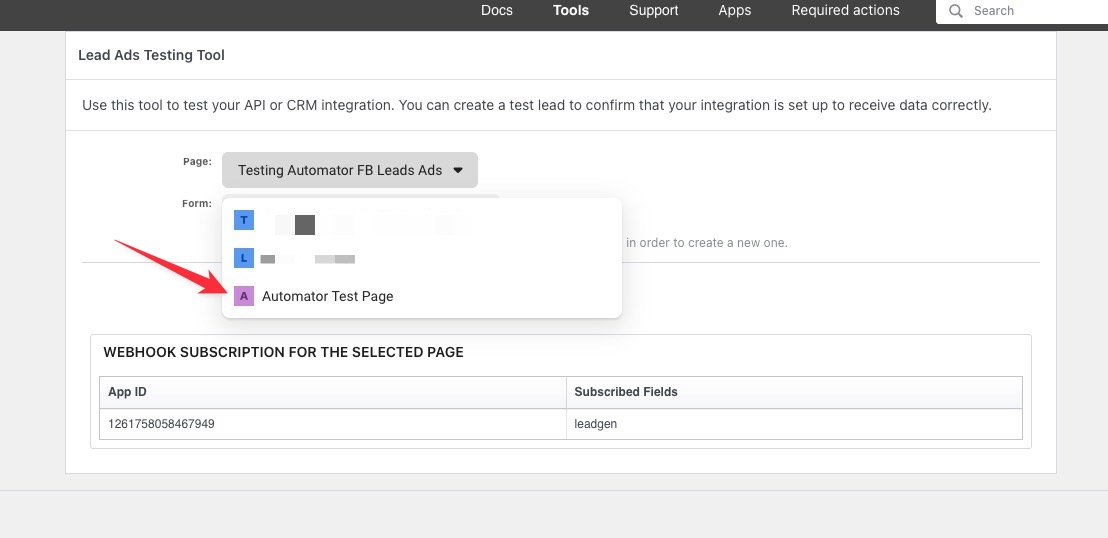
- Select the lead form you created.
- Click Create lead.
- Wait for the confirmation that the test lead was sent.
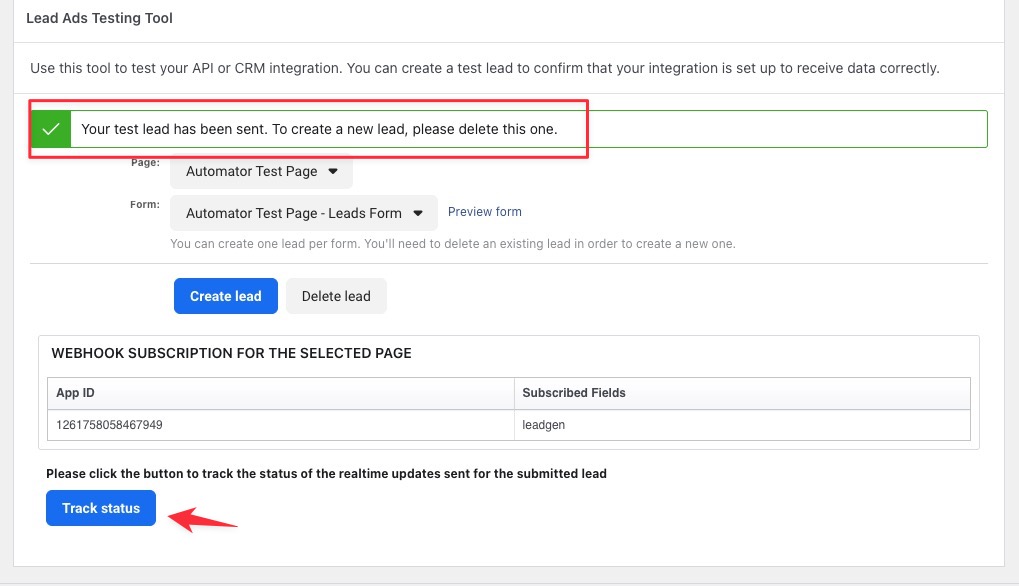
- Click Track status and check that the delivery shows the status success with HTTP code 200.
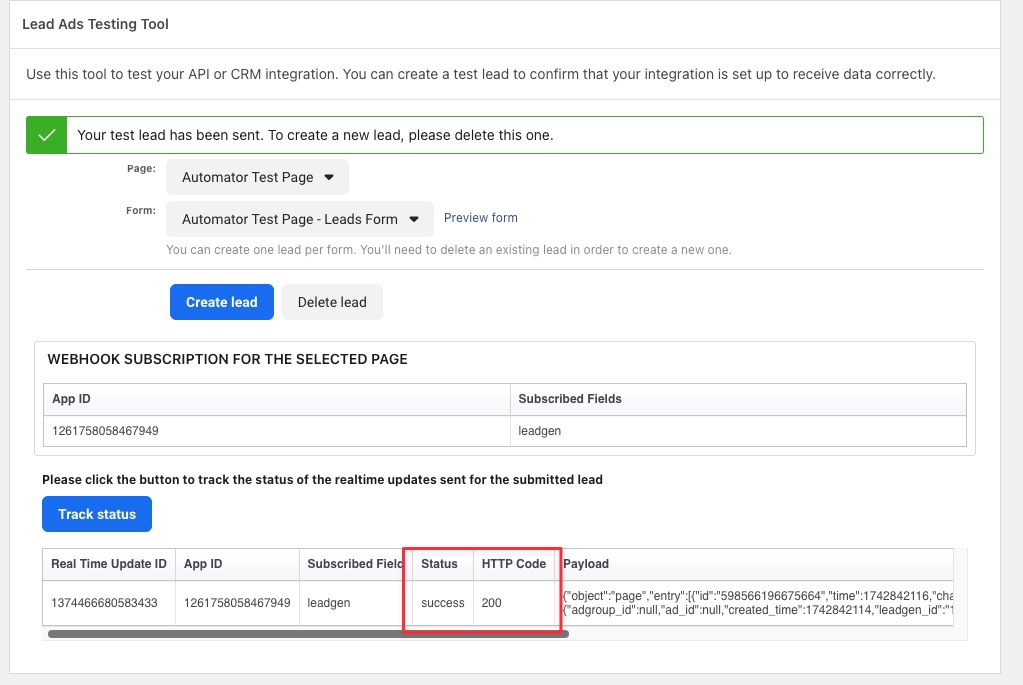
The tool creates one test lead per form. To send another, click Delete lead first.
Step 11: Confirm the lead reached Automator
- Open the recipe. In the sidebar, Details shows the number of Completed runs.
- Click View logs. Automator > Logs opens, filtered to this recipe.
- Click Details on the run. The dialog lists the trigger and each action with its status. Opening the trigger shows its Page and Form settings and when it ran, not the lead’s answers. To see the values a lead supplied, open an action that uses the lead tokens: its fields show the values that were filled in.
See Using Automator Logs for more on reading logs.
Troubleshooting
If the test lead does not produce a recipe run:
- Check that the Page, business, and ad account are linked to each other in Facebook.
- Check that you granted every permission when you connected.
- Check that Uncanny Automator – Lead Ads is assigned as a CRM under Leads Access.
- Check that the recipe is switched on and that its trigger uses the form you sent the lead from.
- If a Page under Connected pages asks you to reconnect Facebook, or is missing, disconnect, connect again, and select that Page when Facebook asks.
Related: Recipes for Everyone, Managing tokens, Finding integrations in the recipe builder, Facebook Pages

Comments (0)