

Uncanny Automator and Thrive Automator share most of their ideas: a trigger starts a flow, filters decide whether it continues, and actions do the work. This guide is for Thrive Automator users who are rebuilding their automations in Uncanny Automator. It compares the two plugins, maps Thrive’s terms to Automator’s, and shows how each building step works in the Uncanny Automator recipe builder.
There is no automated migration between the two plugins. Each automation is recreated as a recipe. A recipe is a deterministic automation: triggers, conditions and actions that run the same way every time. Most Thrive automations translate to a recipe with the same trigger, the same actions and a Filter block for each filter.
Uncanny Automator also includes integrations for the Thrive Suite plugins (Thrive Apprentice, Thrive Architect, Thrive Leads, Thrive Ovation, Thrive Quiz Builder, Thrive Theme Builder and Thrive Ultimatum), so recipes can start from events in those plugins.
How the two plugins compare
The table compares Thrive Automator with Uncanny Automator Lite (the free plugin) and Uncanny Automator Pro. Counts are rounded down and grow with each release.
| Thrive Automator | Uncanny Automator Lite | Uncanny Automator Pro | |
|---|---|---|---|
| Integrations | 39 | 200+ | 240+ |
| Triggers | ~40 | 450+ | 1,000+ |
| Actions | ~40 | 450+ | 850+ |
| Multiple triggers | Yes | Yes | Yes |
| Any/all trigger logic | Yes | Yes | Yes |
| Send emails | No | Yes | Yes |
| Recurring recipes | No | No | Yes |
| Scheduled recipes | Yes | No | Yes |
| Delayed and scheduled actions (Queue block) | Yes | No | Yes |
| Incoming webhooks | Yes | No | Yes |
| Outgoing webhooks | Yes | Yes | Yes |
| Loop block (bulk actions on users, posts, or imported data) | No | No | Yes |
| Import from CSV, XML, JSON and RSS | No | No | Yes |
| Magic Buttons and Magic Links | No | No | Yes |
| Generate random text and numbers | No | No | Yes |
| Database query | No | No | Yes |
| Formatter | No | No | Yes |
| Custom trigger on a plugin hook | No | No | Yes |
| Action tokens | No | Yes | Yes |
| Run code | No | No | Yes |
| QR code generator | No | No | Yes |
| Social media integrations | No | With app credits | Included |
| Google Sheets, Calendar and Contacts | No | With app credits | Included |
| AI integrations | No | With app credits | Included |
| Custom User Fields Addon | No | No | Plus and Elite plans |
| Restrict Content Addon | No | No | Plus and Elite plans |
| User Lists Addon | No | No | Plus and Elite plans |
If you have Uncanny Automator Lite, you’ll first need to connect your site to a free Uncanny Automator account, which gives you app credits to use with app integrations such as the social networks, Google and AI services. On a paid plan, app integrations are included. See What are app credits?.
What you can do in Uncanny Automator that Thrive Automator did not offer
- Automate emails — Send an email to anyone, with offers, coupon codes, notifications or confirmations, from any trigger. Put the email inside a Queue block to build a drip sequence that follows a purchase or a course enrollment.
- Post to social media — Push new blog posts to Instagram, Discord, X/Twitter, Facebook Pages and LinkedIn Pages.
- Power up forms, buttons and links — Use Magic Buttons, Magic Links or any supported form plugin to let logged-in users enroll in or leave courses, groups, events and webinars, create posts, generate content with AI, send a Slack message, unlock content, receive a coupon or earn an achievement. A form submission can start any action in the catalog.
- Import CSV, XML, JSON and RSS — Create posts, courses, lessons, pages, products and users from a file or a feed.
- Use AI inside recipes — Generate blog posts and pages, write excerpts for social media, and reply to comments and support requests with an AI integration.
- Run bulk operations with the Loop block — Add your existing users to a CRM, tag everyone who bought a specific product, export users or posts to a Google Sheet, add or remove users from courses, events, memberships and groups in bulk, or update many posts at once.
- Google Sheets — Turn registrations, sales and memberships into spreadsheet reports, and track course completions, progress and quiz results as they happen.
- Google Contacts — Use Google Contacts as a light CRM: push new users to it and label contacts when they buy a product or complete a course.
- Google Calendar — Create events and manage attendees from form submissions, lesson completions and purchases.
- Addons — Collect profile information with the Custom User Fields Addon, protect pages, posts and products with the Restrict Content Addon, and build mailing lists of users with the User Lists Addon.
- Developer features — Run custom PHP or JavaScript, call WordPress hooks, query the database, read and write user and post meta, send custom webhook responses, and pass data between actions with tokens.
Terminology
Most terms carry over. The biggest change is that automations are called recipes.
| Thrive Automator | Uncanny Automator |
|---|---|
| Automation | Recipe |
| Filter | Filter block, which holds one or more conditions |
| Delay | Queue block |
| Integration, Trigger category, Action category | Integration |
| Trigger | Trigger |
| Action | Action |
Building a recipe
Two general differences first:
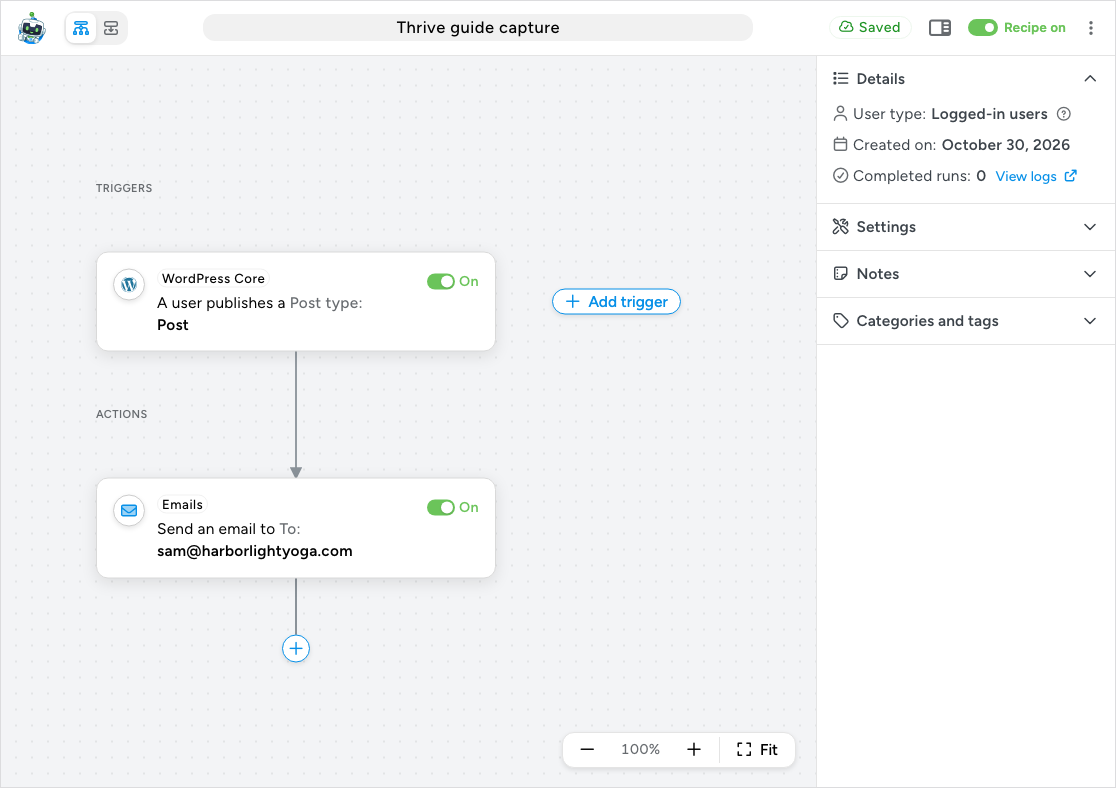
- In Thrive Automator, you must choose a trigger before you can add an action. In Uncanny Automator, you can add triggers and actions in any order; the canvas has a + Add trigger button in the TRIGGERS area and a + in the ACTIONS area from the start.
- In Thrive Automator, after choosing a trigger you can limit when it fires with specific criteria. In Uncanny Automator, those limits are part of the trigger sentence where the trigger supports them, for example A user submits a form with a specific value in a specific field.
To build a recipe:
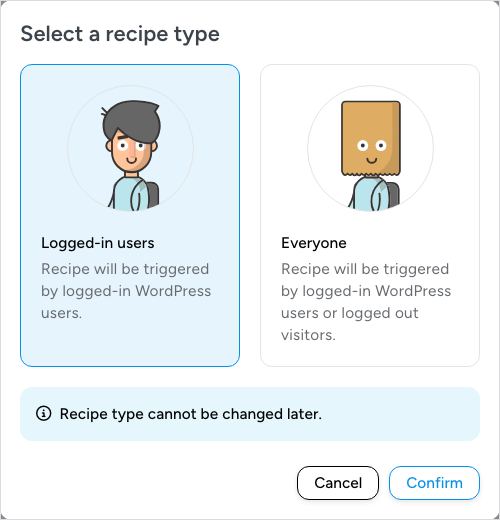
- Go to Automator > Add new recipe. The Select a recipe type modal asks for Logged-in users or Everyone; the type cannot be changed later. Choose one and click Confirm.
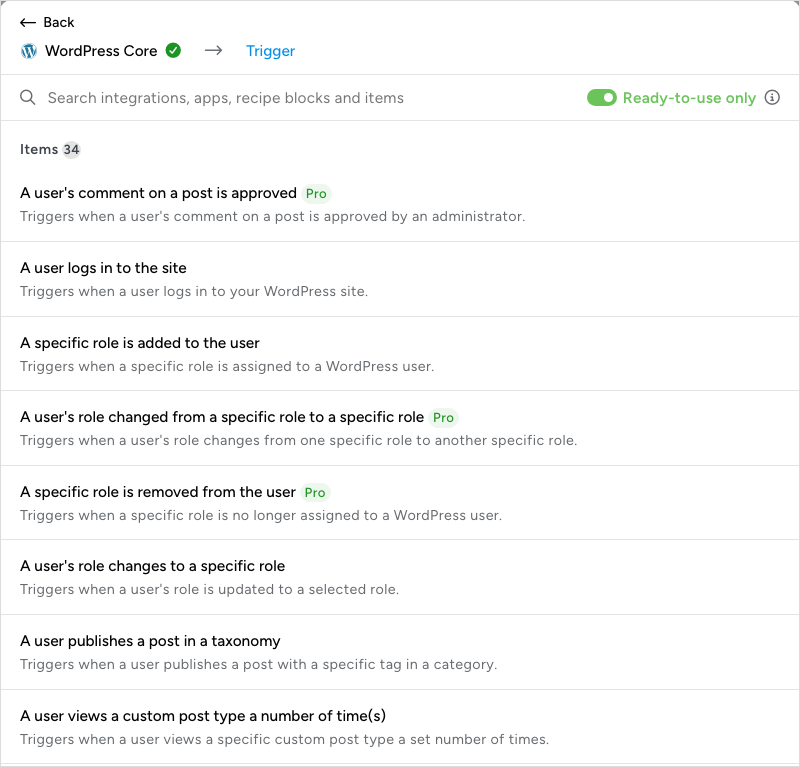
- Click + Add trigger. The picker opens: search for an integration or an event, or browse the suggestions, the integrations your other recipes use (Recently used integrations and Most used integrations, once you have recipes) and the All integrations list. Click an integration to see its triggers. The Ready-to-use only switch, on by default, hides integrations and items that need a plugin install, an app connection or a higher plan; turn it off to see everything.
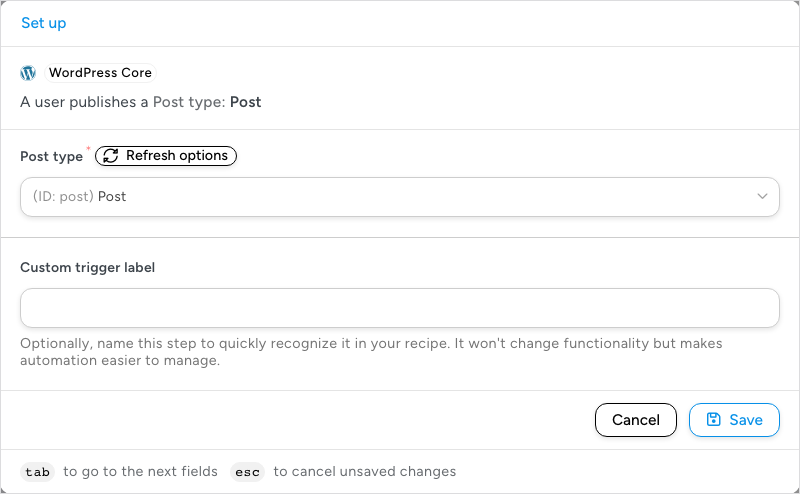
- Choose the trigger. The Set up step opens with the trigger sentence at the top, the editable part highlighted, and the fields below. Fill them in and click Save. Triggers that need sample data, such as incoming webhooks, also offer Test.
- Click the + under ACTIONS and choose an action the same way. Action fields accept tokens: click the ∗ button at the end of a field to insert data from the trigger (see Managing tokens). Click Save, or Test to run the action once with your values.
- Name the recipe in the title field and switch Recipe on in the top bar. There is no Save or Publish button: the builder saves every change as you make it, and the recipe runs as soon as it is on.
The full walkthrough is in Creating a recipe.
Recipe options
In Thrive Automator, the automation’s control panel sets how many times the automation runs per user or for all users and, in a multiple-trigger automation, whether a single trigger or all of them must fire.
In Uncanny Automator these options live in the builder’s right sidebar and on the canvas:
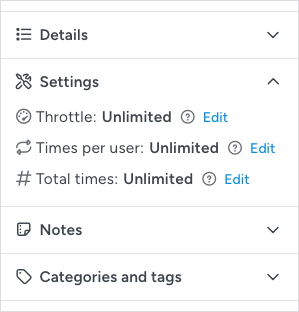
- Settings — Throttle limits how often the recipe can run within a period, Times per user limits how many times each user can complete it, and Total times caps the runs for everyone. Each has an Edit link. See Recipe settings: times per user, total times and throttling.
- Change trigger logic — appears as soon as a recipe has more than one trigger, and sets whether any trigger or all triggers must fire.
- Details — the recipe type, the creation date, the number of completed runs and a View logs link.
- ⋮ More actions — in the top bar: Duplicate recipe, Download recipe JSON, Move to trash.
Recipe types
The recipe type chosen in the Select a recipe type modal decides which triggers the recipe can use. Logged-in users recipes use triggers that need a known user, such as completing a course. Everyone recipes use triggers that anyone can fire, such as submitting a form, and ask you which user the actions should run as. The type cannot be changed later, so if you choose wrong, start a new recipe. See Recipe types: logged-in users and everyone.
Scheduled recipes
In Thrive Automator, scheduled automations were fired with a trigger under General > Specific Date and Time.
In Uncanny Automator, create an Everyone recipe and choose a trigger from the Schedule integration (requires Uncanny Automator Pro): Repeat every hour, day, week, month or year at a specific time, Repeat every weekday at a specific time, or Run on a specific date and a specific time. The two repeating triggers give you something Thrive Automator did not offer: recipes that run on a recurring schedule.
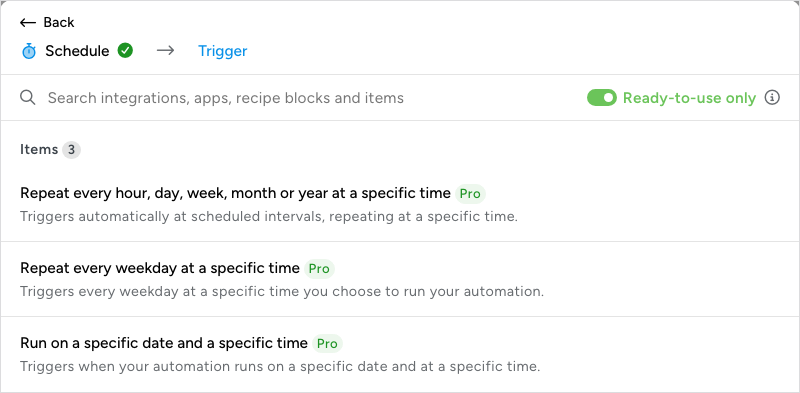
Pending scheduled runs are listed under Automator > Scheduled recipes, which appears in the menu while a live recipe uses a Schedule trigger. See Schedule.
Delayed and scheduled actions
In Thrive Automator, you can set an action to run after a delay of X minutes, hours, days, weeks, months or years by adding a delay before the action. The delay holds back every action after it.
In Uncanny Automator, delays and schedules are a Queue block (requires Uncanny Automator Pro). Add it from the Recipe blocks section of the picker, then add the actions to delay inside it. Its Wait mode offers three choices:
- Set time — an Amount and a Unit, counted from when the triggers complete.
- Schedule — a specific date and time.
- Use a token / custom value — a delay or date taken from a token, such as a date field in a form submission or a value from an incoming webhook.
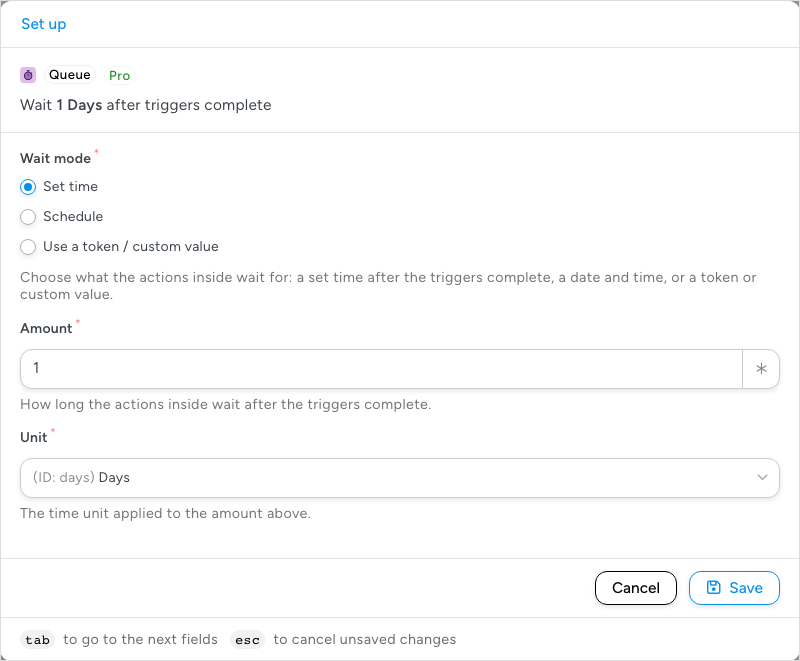
The Queue block differs from a Thrive delay in one important way: it does not pause the recipe. The actions inside the block are queued to run later and everything after the block runs immediately. Queued actions are listed under DELAYED ACTIONS at the bottom of the canvas. One block can hold any number of actions. See Queue block: delaying and scheduling actions.
Filters and conditions
In Thrive Automator, filters are added to the flow to control whether the automation continues. A filter either passes, and the automation continues, or it does not pass, and the automation stops. Filters are always in series: to run one action when a form field equals “A” and a different action when it equals “B”, you need two automations. Filters can only be combined with AND, so a filter can say “if A = 1 AND B = 2, then continue”.
In Uncanny Automator, conditions live in a Filter block (requires Uncanny Automator Pro), added from the Recipe blocks section of the picker. Each condition is a modifier on the block: click Add modifier and choose a condition from the picker. Some conditions come from integrations, so LearnDash conditions appear when LearnDash is installed. Condition match mode sets whether Any or All of the conditions must match.
The block has two paths, CONDITIONS MET and CONDITIONS NOT MET. An empty path reads “No items in this path yet” and shows a + Add button when you point at it. Actions in the first path run when the conditions match; actions in the second run when they do not. A filter in Thrive Automator stops the whole automation; a Filter block only decides which path runs, and anything after the block runs either way.
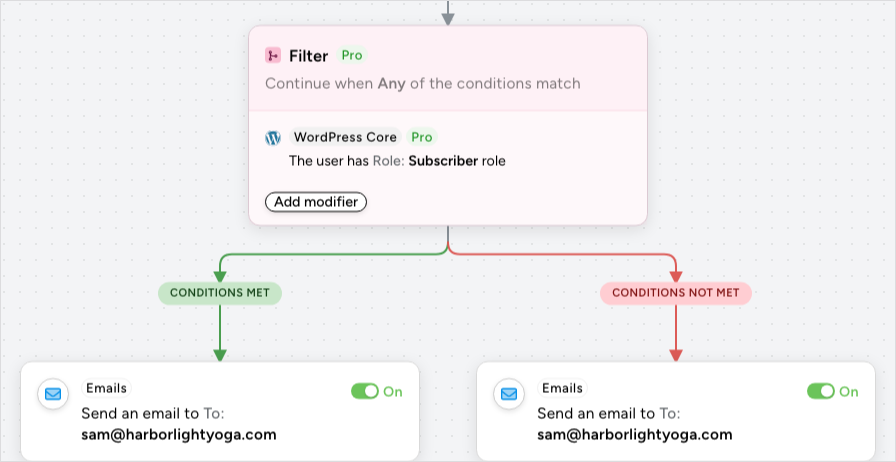
This is how branching works. A single Filter block handles “A or not A”; several Filter blocks in a row, or nested inside each other’s paths, handle a dropdown with many values. The classic example is a self-enrollment form: one recipe reads the course the user picked and enrolls them in it, with a Filter block per course. See Filter block and conditions.
Advanced data mapping
If you used Thrive Automator’s advanced data mapping, the same job is done with Filter blocks. Instead of a mapping such as “1 = the sales address, 2 = the support address”, add one Filter block per value and put the matching action in its Conditions met path:
- Filter block, condition “the field value is 1”: Conditions met path sends an email to the sales address.
- Filter block, condition “the field value is 2”: Conditions met path sends an email to the support address.
The value that would have been mapped is typed straight into the action’s field.
Connecting apps
In Thrive Automator, you connect apps from Thrive Dashboard > Thrive Automator > Apps > Add New Connection.
In Uncanny Automator, go to Automator > Settings > App integrations, choose the app and follow its connection steps. Each app has its own article in the knowledge base.
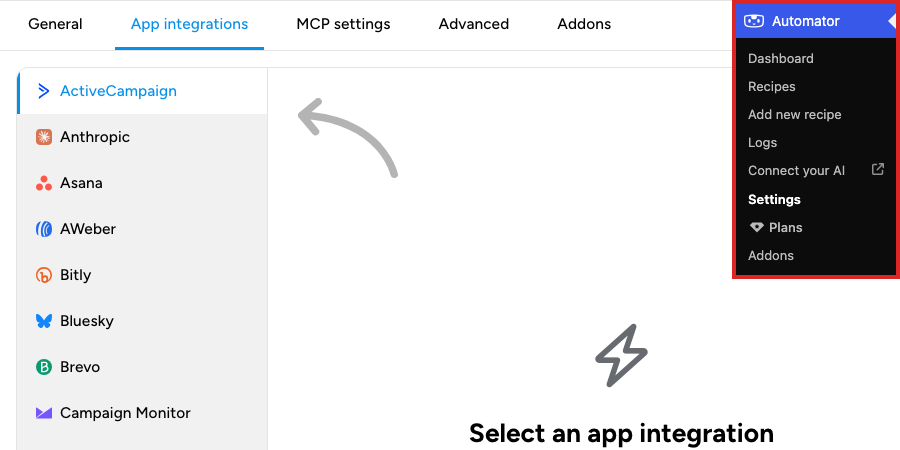
In the picker, an app that is not connected yet is hidden while Ready-to-use only is on. Turn the switch off to see it, then connect the app from Settings before you add its items to a recipe.
Can’t find something?
If you used a feature in Thrive Automator that you cannot find in Uncanny Automator, contact support and describe what the automation did. We will point you to the matching recipe.
Related: Creating a recipe, Recipe blocks: Filter, Queue and Loop, Managing tokens, Finding integrations in the recipe builder, What is Uncanny Automator?

Comments (0)