

A recipe runs the same way every time, but the data it handles changes with every run: the user who completed the course, the post that was published, the values typed into a form. Tokens are the placeholders that carry that data into your actions. Put a token in an action field and Uncanny Automator replaces it with the real value when the recipe runs, so one email action can greet every user by their own first name.
This article explains the kinds of tokens a recipe can use, how to insert a token from a field in the recipe builder, how to find the right token when a recipe has several triggers, and what to do when a token asks for extra information.
Types of tokens
The token picker sorts tokens into two tabs. From previous steps holds tokens produced by the items in the recipe. Global holds tokens that are available in every recipe.
- Trigger tokens — data captured by a trigger when it fires. When a form is submitted, the value of each form field is a trigger token, and so are the form title and the form ID. Every trigger has its own set of tokens, so if a trigger does not offer the value you need, a similar trigger from the same integration may.
- Action tokens — data produced by an action, available to the actions that run after it. An action that creates a post produces the new post’s ID and URL, which a later action can use to send a message or an email about it. Not every action produces tokens; the ones that create something (an order, a page, a user, a form entry) usually do.
- Loop tokens — in a recipe with a Loop block, actions inside the block see a section named Loop under From previous steps, with tokens for the item the loop is working on: for example User email and User first name in a Users loop, Post ID in a Posts loop, and Loop iteration plus one token per field in a Token loop.
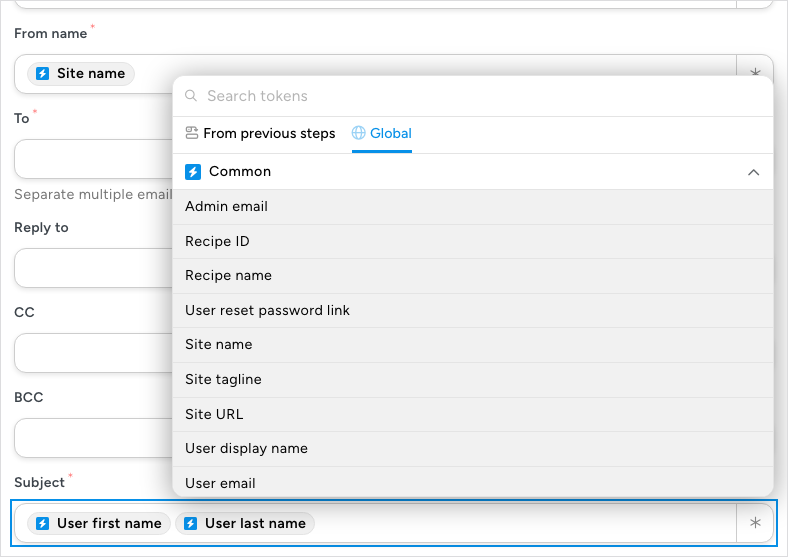
- Common tokens — data about the site, the recipe and the user the recipe runs for: Admin email, Site name, Site URL, Recipe name, User email, User first name, User last name, User display name, User role, User reset password link, and more. The user tokens need a user to resolve, so in a recipe for Everyone they fill in only after the Run actions as card is set up. The current date, time and Unix timestamp are global tokens too, in their own Date and Time group.
- Advanced tokens — tokens that read or compute something at run time: Post meta, User meta, Calculation and the recipe run counters. Most of them ask you for details before they are inserted (see Tokens that ask for more information below).
- Integration tokens — some installed integrations add their own global tokens that do not depend on a trigger, listed under the integration’s name on the Global tab, for example WordPress Core and LearnDash, and active addons such as User Lists and Restrict Content.
Adding a token to a field
Any field that accepts tokens has an asterisk button (∗) at its right-hand end. You will see it in the Set up step of a trigger, an action or a condition.
- In the recipe builder, click the action you want to edit. The Set up step opens with the action’s sentence at the top and its fields below.
- Click the ∗ button at the end of the field that should receive the token, for example Subject.
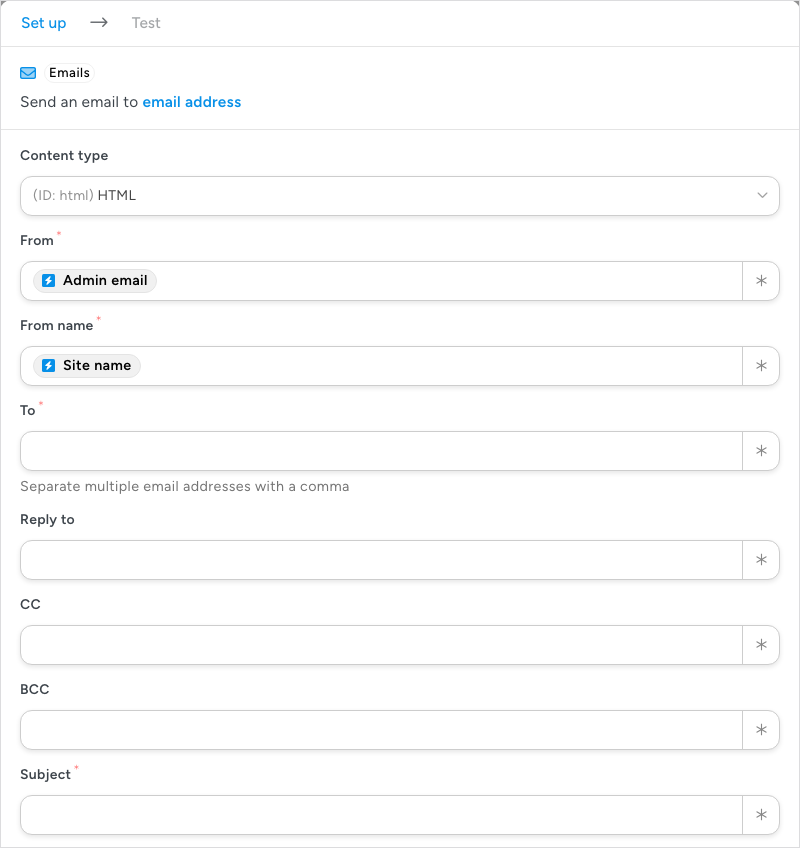
- The token picker opens on the From previous steps tab, with one collapsed section per trigger and action that comes before this field. Click a section to expand it and see its tokens. A trigger’s section starts with the values of its own fields, marked Field value (such as Post type), followed by the data it captures.
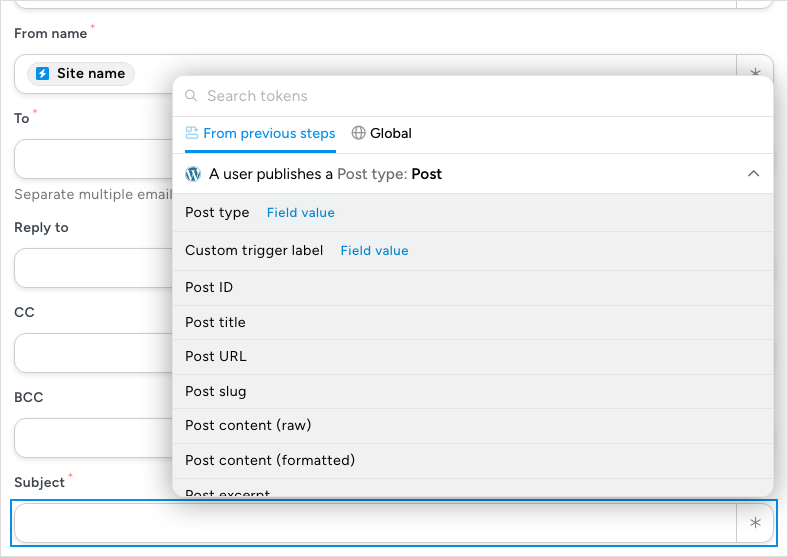
- Click a token to insert it. Click ∗ again to add another; you can mix tokens and typed text in the same field.
An inserted token appears in the field as a chip: a grey pill with the integration’s icon and the token’s name, such as User first name. A Subject field holding the first and last name tokens with a space between them sends an email whose subject is the recipient’s full name.
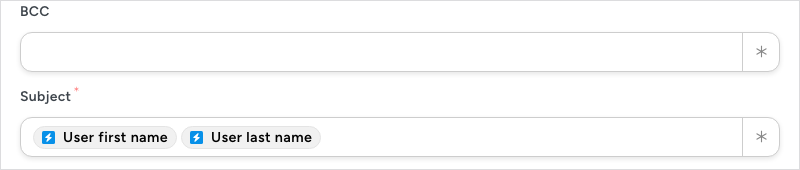
Behind the chip, the field stores plain text in double braces, such as {{user_firstname}} for the user’s first name or {{admin_email}} for the site’s admin email. You can type a token in that form yourself, and tokens pasted in that form turn into chips. Trigger and action tokens carry the ID of the item that produces them, so insert those from the picker rather than typing them.
When you have finished, click Save, or Test to run the action’s test first. A test does not replace tokens with real values: the Emails test states that placeholders such as {{user email}} are sent as they are. The tokens resolve when the recipe runs for real.
The Global tab works the same way: expand Common, Advanced, Date and Time or an integration’s section and click the token you need.
One field narrows the picker by itself: on a Loop block’s Token field, the picker lists only loopable tokens, the lists a Token loop can go through, on both tabs and in search. A tab with no loopable tokens is not shown. You can still type a token into that field by hand.
Finding the right token in a recipe with several triggers
On the From previous steps tab, every trigger and action has its own section, headed by the integration’s icon and the item’s sentence with the values you chose, for example A user publishes a Post type: Post. Two triggers from the same integration can read alike, so give each one a Custom trigger label in its Set up step: when a label is set, the section shows the label instead of the sentence.
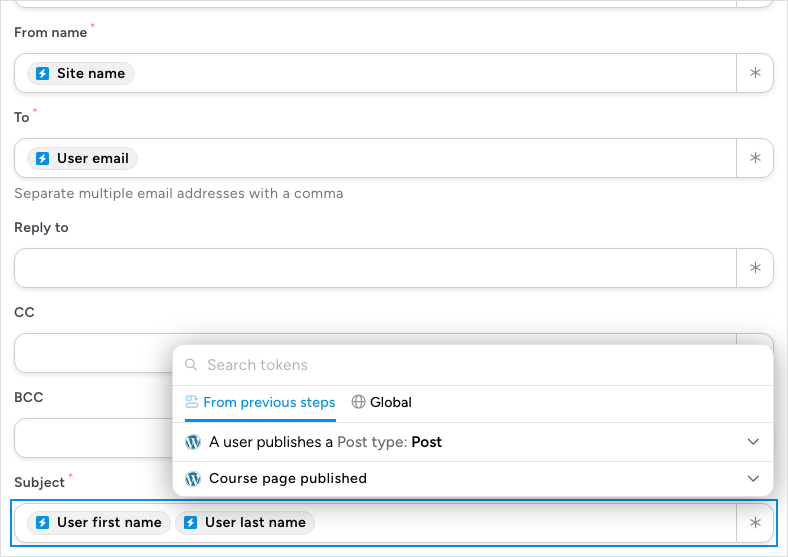
Three more ways to narrow the list:
- Search tokens — type part of a token’s name in the box at the top. From the third character, the tabs give way to a single Search results tab that covers both tabs, with each matching section open, and a small typo still finds the token.
- Type filter — on a field that expects an email address, such as the To field of Send an email or the email fields of the Run actions as dialog, an Email tokens only switch at the top of the picker shows only the tokens that hold an email address. The switch is off when the picker opens. Fields that take any text, such as Subject, do not show it.
- Type / in the field — typing a forward slash at the start of a field, or after a space, opens the picker in place and filters it as you keep typing. Click a token to replace what you typed, or press Escape to close the picker and keep the text. This works in text fields that take tokens, but not in the Visual tab of an email body.
Tokens come only from items that are switched on. If a trigger’s On switch is off, its tokens resolve to nothing. They stay in the picker so you can wire the recipe ahead of time, and that step’s section on the From previous steps tab warns “This step is off, so its tokens resolve to nothing. Turn the step on to use them.”
Tip: to insert every token from one section at once, hold Shift and click the section’s header. Each token is inserted with its name, its ID and the token itself, which is a quick way to see every value a trigger produces in an email from a real run. In an email body the section arrives as a table with Name, ID, and Value columns.
Tokens that ask for more information
Some tokens cannot be inserted until you tell Automator what to look up. The Post meta token, for example, needs to know which post to read and which meta key to return. When you choose a token like this, a small dialog opens with the fields it needs. Nothing is inserted until you fill them in and save; closing the dialog discards your entries.
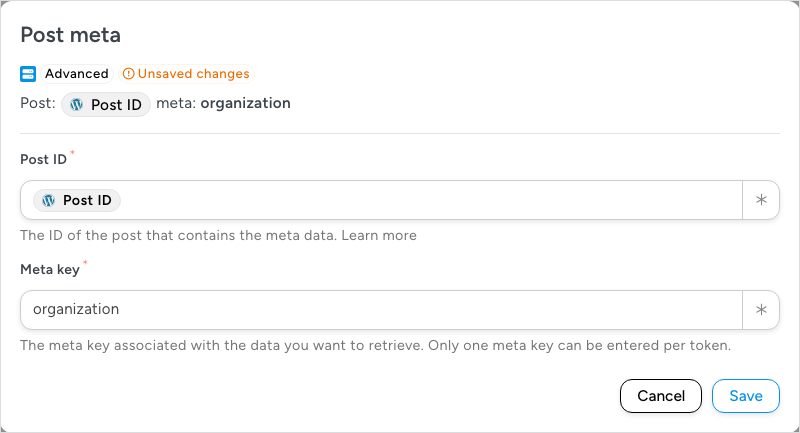
These fields accept tokens too, so dynamic data really can go anywhere. In the dialog above, Post ID holds the post ID token from the recipe’s trigger, so the token reads the post that fired the recipe, and Meta key holds a typed key such as organization, because the key is the same on every run. The inserted chip shows both choices. For more examples see Post meta tokens and User meta tokens.
Using action tokens
Action tokens pass data from one action to a later one. A recipe that creates a post and then announces it in Slack needs the new post’s URL in the Slack message; the Create a post action produces that URL as a token.
- Add the action that produces the data first, and set it up.
- Add the action that will use the data after it. Actions run in the order they appear on the canvas, so the producing action must sit above the receiving one.
- Open the receiving action, click ∗ in the field, and expand the producing action’s section under From previous steps.
You do not need to delay the receiving action. An action that uses another action’s tokens waits for that action to finish before it runs, even when the first one is an app action that finishes in the background.
Where to find the full token list for an integration
Each integration page on automatorplugin.com lists the tokens that every trigger provides, so you can check what a trigger offers before you build the recipe.
Related: Post meta tokens, User meta tokens, Calculations (math equations), Testing triggers and actions, Managing actions, Loop block: users, posts and tokens

Comments (0)