

The X / Twitter integration posts tweets from your WordPress site whenever there’s activity on it: share each new blog post, or post a link or photo when an admin or a user does something specific on your site. Once connected, the Post a tweet to X/Twitter action appears under X/Twitter in the recipe builder. This article covers the two ways to connect, adding the action to a recipe, and setting up your own X app.
If you have Uncanny Automator Lite, you’ll first need to connect your site to a free Uncanny Automator account, which gives you app credits to use with X / Twitter. On a paid plan, app integrations are included.
Important: Because of X’s API pricing, posting through the Uncanny Automator app (Quick connect) is limited to 5 tweets per license per day, and posting through your own X app (Custom app) to 100 tweets per license per day. The settings page shows each limit beside its connection method.
Connect X / Twitter
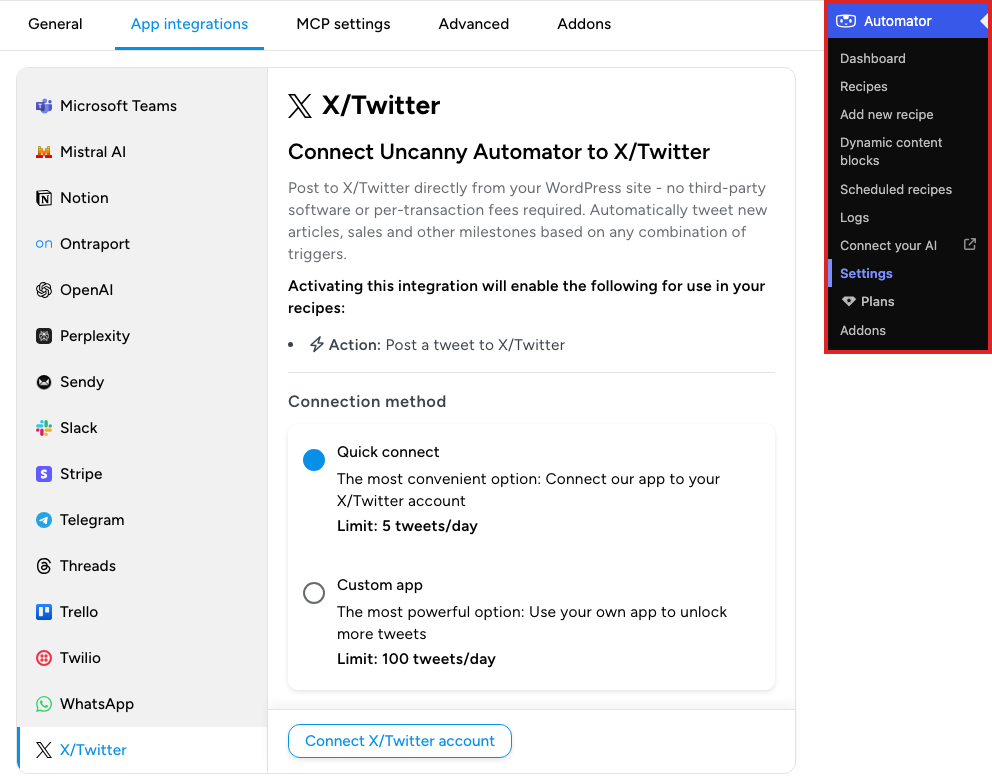
- In your WordPress dashboard, go to Automator > Settings > App integrations and select X/Twitter in the list.
- Under Connection method, leave Quick connect selected. It is selected until you change it and connects your X account through the Uncanny Automator app. If you need more than 5 tweets a day, choose Custom app instead and follow Use your own X / Twitter app below.
- Click Connect X/Twitter account.
- Sign in to your X account if asked, then click Authorize App to let Uncanny Automator post to your profile.
- You return to the settings page, which confirms “You have successfully connected your X/Twitter account.”
Until an account is connected, the recipe builder’s picker hides X/Twitter while its Ready-to-use only switch is on; see Finding integrations in the recipe builder.
Post a tweet from a recipe
- Open the recipe at Automator > Recipes, or create one from Automator > Add new recipe, and add its trigger; see Creating a recipe.
- Click the + at the end of the flow. In the picker, search for Twitter, select X/Twitter, and choose Post a tweet to X/Twitter.
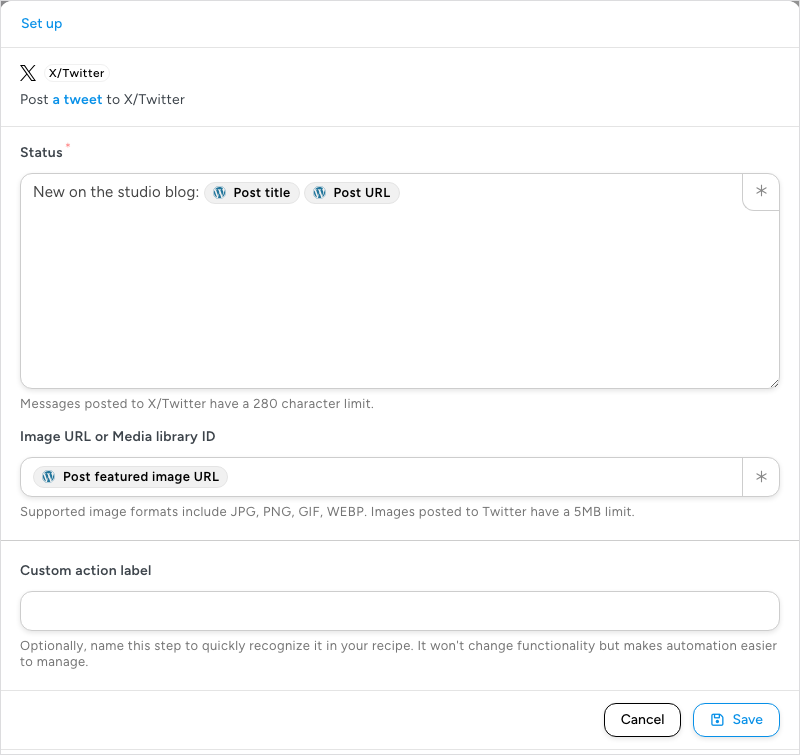
- In the Set up step, write the tweet in Status. Insert tokens with the ∗ button at the end of the field (the post title and URL, a course name, a form answer) so each tweet carries the data from the event that fired. Tweets are limited to 280 characters, including the values the tokens turn into.
- To attach a photo, enter its URL or media library ID in Image URL or Media library ID, or insert an image token. JPG, PNG, GIF, and WEBP images up to 5 MB are supported. Leave the field empty for a text-only tweet.
- Click Save.
Make sure the action is On, then switch Recipe on in the top bar. The action returns a Link to Tweet token that later actions can use, for example to post the link in Slack or save it to the post.
Use your own X / Twitter app
Quick connect is the most convenient way to connect, but X’s API costs keep its posting limit low. For heavier posting, connect with your own X developer app instead. The connection method can be chosen only while X/Twitter is disconnected, so if you connected with Quick connect, click Disconnect on the settings page first.
- In the X Developer Console, create an app. Any app works; you don’t need a special app type or access level.
- Open the app’s user authentication settings and set the app permissions to Read and write. The default is read-only, which cannot post.

- Set up the authentication settings as shown below, then save them.

- Copy the app’s API key, API key secret, access token, and access token secret from the Developer Console.
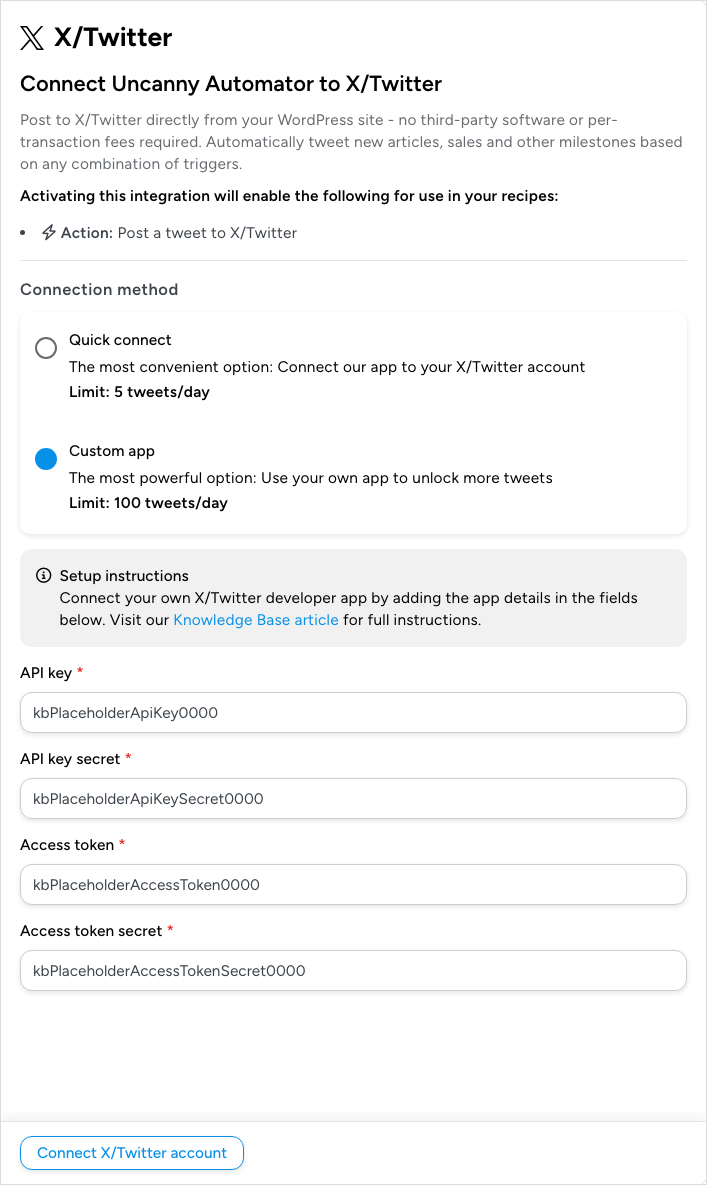
- In WordPress, go to Automator > Settings > App integrations > X/Twitter and select Custom app under Connection method.
- Paste the four values into API key, API key secret, Access token, and Access token secret, then click Connect X/Twitter account.
Related: Finding integrations in the recipe builder, Managing actions, Managing tokens

Comments (0)