Trying to figure out which AI tools are best for WordPress site owners? See why…
How to Connect WordPress to Mailchimp (In 4 Steps)
Email marketing can be a powerful tool for your online business, and Mailchimp can help you put this tactic into action. Connecting directly and regularly with your audience can enable you to keep them up to date and build stronger relationships. However, even with help from Mailchimp, you may struggle to find the time to execute your marketing plan as fully as you would like.
Fortunately, you can automate a good portion of your email marketing tasks using Uncanny Automator. By connecting WordPress to Mailchimp, you can add users to an audience, tag members, and even create and send a campaign.
In this post, we’ll give you a quick introduction to email marketing. Then we’ll show you how to connect WordPress to Mailchimp in four steps. Let’s go!
An Introduction to Email Marketing
Any email that you send to a customer or potential customer can fall under the umbrella of email marketing. You might use email marketing to send special offers, sale announcements, or advertise a new offering. Whatever you use it for, email is an easy way to connect with your audience.
In addition to keeping your current email list up to date, email marketing has some other benefits. An existing subscriber may forward your email to someone else in their network. This has the potential to grow your audience and increase brand awareness.
It’s also simple to measure the efficacy of your email campaigns. Keeping tabs on how your email marketing efforts are performing can help you to build better, more effective campaigns in the future. Mailchimp even provides an A/B testing feature with some plans:

Mailchimp also enables you to divide your audience into segments. This is helpful for more targeted messaging. For example, you might send a coupon code to subscribers who haven’t yet made a purchase.
Finally, email marketing is very affordable, especially when compared with other methods. You can get started with Mailchimp for free, and continue to use the free plan for your first 2,000 subscribers.
How to Connect WordPress to Mailchimp (In 4 Steps)
With the benefits of email marketing covered, let’s connect WordPress to Mailchimp for easy automation. First, you’ll need to have the Uncanny Automator and Automator Pro plugin installed, as well as a Mailchimp account set up.
Step 1: Connect Your Site to Mailchimp
The first step is to connect your website to your Mailchimp account to WordPress. From the WordPress admin dashboard, navigate to Uncanny Automator > Settings and click on the Mailchimp tab. (Remember, you’ll only see this option if you have Uncanny Automator Pro installed.) Then click on the Connect an Account button:

Selecting this button will bring you to a screen where you can either log into or create a Mailchimp account. If you already have your account set up, go ahead and log in:

The next screen will provide you with some information about connecting the Uncanny Automator app to your Mailchimp account. When you’re ready, you can click on the Allow button to continue:

This should bring you back to your WordPress dashboard, where you’ll see a success message:

Now that you’ve connected Mailchimp to your website, you can create some recipes.
Step 2: Add Tags to Users for Easy Organization and Automation
Tags are labels you can use to organize your Mailchimp contacts. Creating a recipe that adds tags to users helps trigger additional automations later on. For example, you may want to tag users who sign up for your list through a particular landing page so you can send them targeted offers.
To set up this recipe, you can start from the WordPress admin dashboard. Navigate to Automator > Add New. For recipe type, you can select Logged-in:

The options you see in the Logged-in triggers section will vary depending on the plugins you use. You can connect Mailchimp to a wide array of WordPress plugins, which determines which triggers are available. For this example, we’ll choose WordPress for the integration, and the A user is created trigger:

Next, you can click on the Add action button in the Actions section and choose Mailchimp as your integration. From the resulting list, select Add a tag to the user:

Now you can select the tag you’d like to add to the user. Since Mailchimp nests tags under audiences, you’ll also have to choose the appropriate audience:
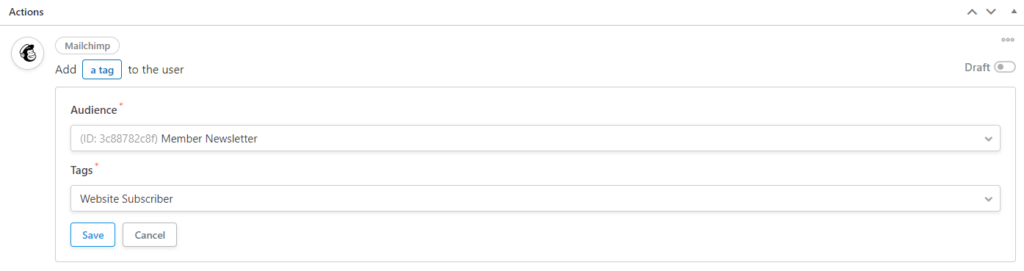
Once you’ve made your selections, you can click on the Save button. Finally, check the toggles next to the Triggers and Actions sections. They should be set to Live:

You can also automate removing a tag from a user. Let’s say your website subscriber has become an author, and you’d like to remove the Website Subscriber tag. You can use the A user’s role changes to a specific role trigger and select Author from the drop-down menu:

Under Actions, you can choose Mailchimp as your integration and then Remove a tag from the user. Similar to adding a tag, you’ll need to select the associated audience from the drop-down menu, and then the tag you’d like to remove:

Finally, you can click on the Save button and check to ensure that the toggles are in the Live position.
Step 3: Add a User to an Audience for Better Targeting
Segmenting your subscribers is a key aspect of effective email marketing. Mailchimp enables you to create Audiences for your different segments.
Once again, you can start by selecting WordPress as your integration, and A user is created in the Logged-in triggers section. Under Actions, choose Mailchimp and then Add the user to an audience:

Next, you can select which audience you’d like to add the user to with the Audience drop-down menu. You can also choose if the user needs to confirm whether they’d like to be added to your email list. It’s a good idea to set this to Yes, to be sure you’re complying with the CAN-SPAM Act:

You may also want to toggle the Update existing field to Yes. This way, if the user already exists in your email list, the automation won’t create a duplicate user. Instead, it will add the existing user to the new audience.
If you’re using groups, you can use this same recipe to change the group an existing subscriber is in using the drop-down menu. Replace All will remove the user from any current groups and add them to the group you specify in the text box. Add only adds the user to the new group without removing them from their present groups:

Finally, you can update the user’s language code. You can also determine how to merge fields for existing users. Finish by clicking on the Save button and checking your toggles.
Note that you can have multiple actions in a single recipe. So if you’d like to add a user to an audience and add a tag, you can do so with the same recipe. Simply click on the Add another action button:

You can also remove a user from an audience by following the same process and choosing to Unsubscribe the user from an audience as your action:
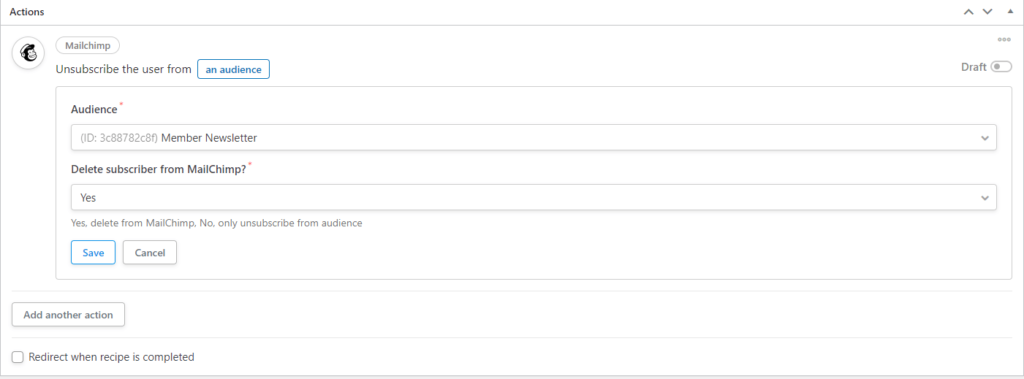
You can delete the user from Mailchimp using the corresponding menu. Otherwise, you can just remove the subscriber from the audience.
Step 4: Create and Send a Campaign
Another valuable recipe automates the sending of campaigns. You can use this recipe to share new blog posts with your subscribers immediately.
To set up this recipe, choose WordPress as your integration in the Logged-in Triggers section. Then select A user’s post is set to a specific status. From the drop-down menu, select Published:

In the Actions section, select the Mailchimp integration and Create and send a campaign as the action. Now you can create the content of the email right from this screen, including selecting the audience to receive the campaign:

If you have a template you’d like to use, you can select it from the Template menu. Otherwise, you can create your email in the Email Content field:

Finally, click on the Save button and check your toggles.
Conclusion
Email marketing can have big payoffs, but it’s also a lot of work to execute. By integrating Mailchimp with Uncanny Automator, you can free up some time to work on other aspects of your business.
Follow these steps to connect WordPress to Mailchimp:
- Connect your site to Mailchimp.
- Add tags to users for easy organization and automation.
- Add a user to an audience for better targeting.
- Create and send a campaign.
What kinds of automations are you excited to use Mailchimp for? Let us know in the comments section below!

Related Posts


Comments (0)