

The Loop block runs the actions inside it once for every item in a set: every user who passes your filters, every post of a chosen type, or every entry in a loopable token. It is one of the three recipe blocks in the Uncanny Automator 8.0 recipe builder and requires Uncanny Automator Pro. This article covers the three loop types, loop filters, the tokens available inside a loop, End loop, Filter blocks inside a loop, and how to follow a loop run in the logs.
A recipe without a loop acts on one user or one post: the one connected to the event that fired the trigger. A Loop block turns the same actions into a bulk operation. Typical uses are emailing everyone with a specific membership, enrolling every buyer of a product in a webinar, exporting every user who completed a course to Google Sheets, appending a disclosure to every blog post, or checking each product a customer has bought before. For step-by-step examples, see Bulk update users with a recipe and Bulk update posts with a recipe.
Important: There is no undo for the actions a loop runs. Test a new loop on a staging site, or on a small filtered subset of your users or posts, before running it on everything. If the recipe sends email, disable outgoing email on the staging site first.
Adding a Loop block
- Open the recipe and click the + at the end of the flow (or Add action in a recipe that has no actions yet).
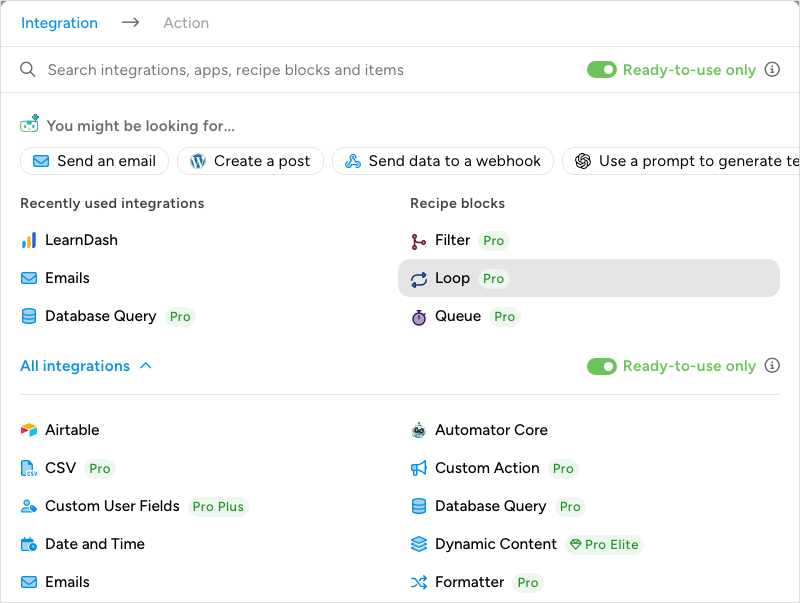
- In the picker, scroll to Recipe blocks and click Loop. You can also type “loop” in the search box; the block is listed under Blocks, above the Loop integration and its End loop item.
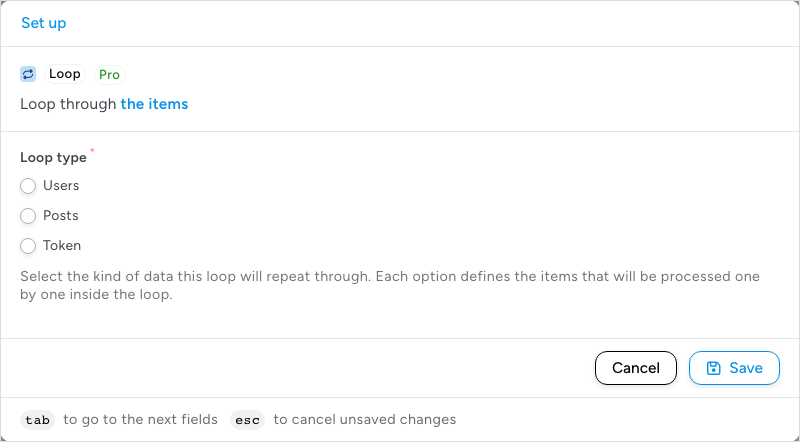
- In the Set up step, choose a Loop type: Users, Posts, or Token.
- Click Save.
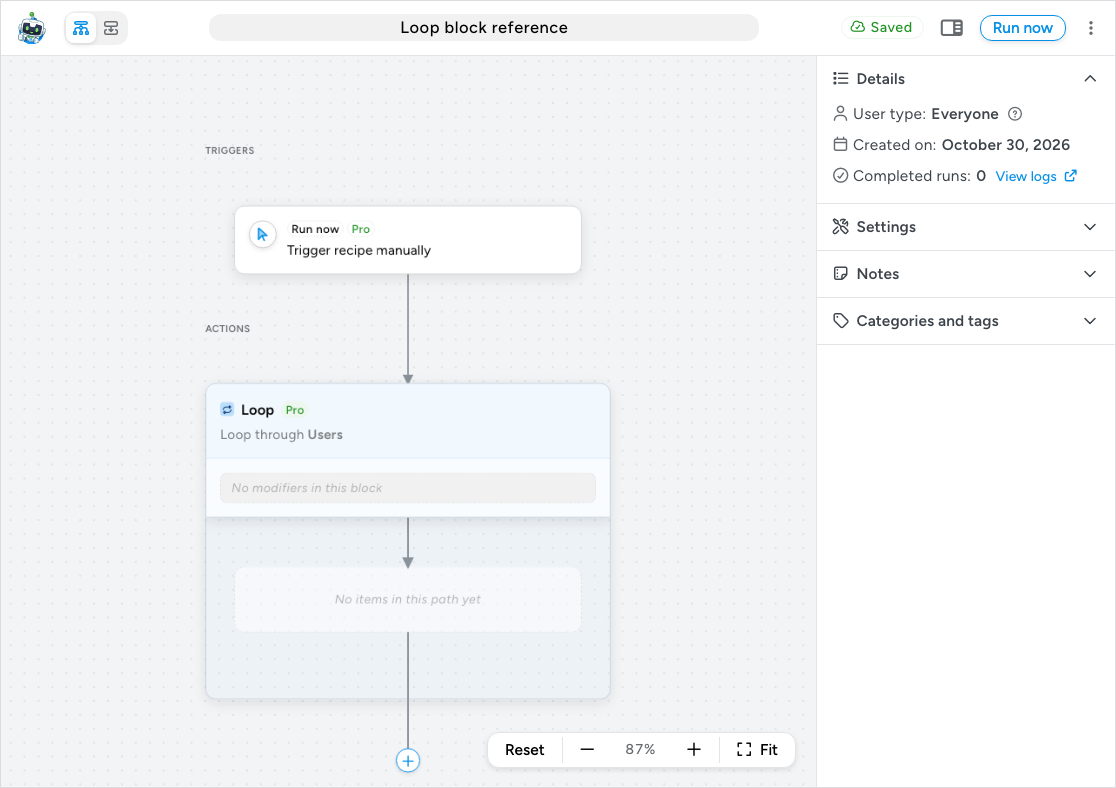
The block appears in the ACTIONS section as a frame. Its header reads “Loop through” with the chosen loop type, a modifiers row sits under it (it reads No modifiers in this block until you add a loop filter), and the path inside the frame holds the actions. Everything inside the frame repeats for each item; everything outside it runs once per recipe run. You can change the loop type later by clicking the block header. The block has no On / Off switch of its own; its ⋮ menu offers Duplicate and Delete, and the actions inside keep their own switches.
Loop type
Loop type decides what the loop repeats through. The Set up step describes it as “Select the kind of data this loop will repeat through. Each option defines the items that will be processed one by one inside the loop.”
- Users: the loop runs once for each WordPress user who passes the loop filters. Inside the block, actions that act on “the user” (add a role, enrol in a course, send an email to the user) act on the user of the current pass, not on the user who triggered the recipe.
- Posts: the loop runs once for each post that passes the loop filters. Posts include pages and every custom post type: products, courses, events, and so on. Choose the post type, status, and taxonomy terms with loop filters. Post actions need to be told which post to act on; pass the Post ID loop token into the action’s Post field (see Loop tokens below).
- Token: the loop runs once for each item in a loopable token. A loopable token holds a list rather than a single value: a user’s previous orders, the courses a user is enrolled in, the rows of a CSV file, the entries of an RSS feed. When you choose Token, a Token field appears with the help text “Enter the loopable token that contains the data you want to iterate through.” Click the ∗ button at the end of the field to pick it; the block’s sentence then reads “Loop through” followed by the token. The token picker on this field lists only loopable tokens. If the token returns a single value rather than a list when the recipe runs, the loop ends with the status Completed with errors and the message “The loop’s token didn’t return a list of items to loop through.”
Note: A Loop block cannot be placed inside another Loop block; the builder refuses it with “It’s not possible to add a Loop block inside another Loop block.” A Redirect action cannot be placed inside a loop either, because loops run in the background after the visitor has moved on, so a redirect inside a loop has nobody to redirect.
Loop filters
Loop filters decide which items the loop processes. In the 8.0 builder they are modifiers on the Loop block, shown in the row under the block header. A new loop has no filters: its modifiers row reads No modifiers in this block. Add your filters before you run the recipe. In a Users loop, make sure they leave out accounts the loop should never touch, such as administrators. The block does not add a role filter for you. This is the same for every loop type: a new Posts or Token loop also starts with no filters.
Two rules govern filters:
- A loop with no filters processes nothing. In the run log the Loop block’s status reads Completed with notice with the message “No users met the filter criteria.” (“No posts met the filter criteria.” for a Posts loop, “The provided loopable token did not yield any results.” for a Token loop), and no actions run. Every loop needs at least one filter, including a Token loop.
- When a block has several filters, an item must pass all of them. Filters narrow the set; they never widen it. Add as many filters as it takes to describe your target precisely, because fewer items means a faster loop.
Adding a loop filter
- On the Loop block, click Add modifier.
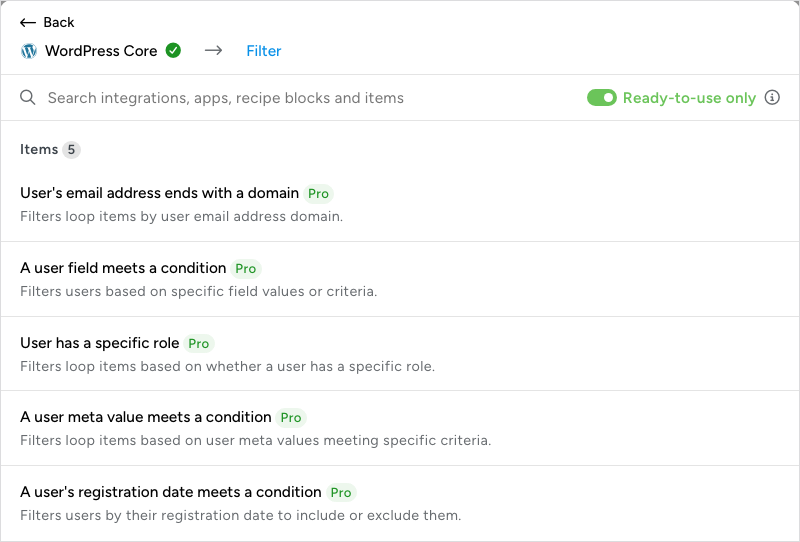
- In the picker, choose the integration, then the filter. With Ready-to-use only on, the list shows only the filters that fit the block’s loop type. With it off, the other filters are listed too but cannot be chosen; each says which loop type it applies to, for example “This filter applies when the loop iterates over posts.”
- In the Set up step, fill in the fields and click Save. The filter appears in the modifiers row as a sentence, for example “User Criteria: has Role: Subscriber”.
To change a filter, click it. To remove it, open its ⋮ menu, choose Delete, and confirm with Delete in the Delete modifier dialog. The same menu offers Duplicate.
Filters for a Users loop
The WordPress integration provides these filters. The wording is the filter’s sentence as the picker shows it:
- User’s email address ends with a domain: enter the domain, for example a company domain, to target one organisation’s accounts.
- A user field meets a condition: compare a core profile field (ID, Display name, User email, User login, User nice name, User registered, User status, User URL) with a value using is, is not, contains, does not contain, greater than, less than, greater than or equal to, or less than or equal to. Use ID with is to test a loop on a single user.
- User has a specific role: the Criteria field sets has or does not have, and Role lists the site’s roles (Subscriber is selected to start with).
- A user meta value meets a condition: compare a user meta key’s value with a value.
- A user’s registration date meets a condition: target users who registered before, after, or on a date.
The Uncanny Automator integration adds Users of a recipe in a status, which targets users whose run of another recipe ended in a given status. Many other integrations add user filters of their own when their plugin is active: LearnDash (enrolled in a course or group, completed a course, lesson, topic, or quiz, course progress, certificate earned), WooCommerce (purchased a product), WooCommerce Subscriptions and Memberships, MemberPress (active membership), Easy Digital Downloads, BuddyBoss and BuddyPress (profile field value, group membership), Paid Member Subscriptions, The Events Calendar (attendees, check-ins, RSVPs), and others. The User Lists and Restrict Content addons add filters for list membership and access levels. Open Add modifier and browse the integration to see what is available on your site.
Filters for a Posts loop
- A post is a specific type of post: the Post type field. Add this first; it is how the loop knows whether to work through posts, pages, products, or courses.
- A post has / does not have a specific status: Published, Draft, Pending, Private, and the other statuses registered on the site.
- A type of post has / does not have a term in a taxonomy: fields for Post type, Condition, Taxonomy, and Term, for example posts in one category or products with one tag.
- A post has / does not have a specific meta key: useful for finding posts that are missing a field, such as an SEO description.
- A post’s meta value meets a condition: compare a meta key’s value with a value.
- A post’s field meets a condition: compare a core post field (ID, post_author, post_date, post_title, post_content, post_status, post_name, post_parent, menu_order, comment_count, and the rest) with a value.
- The author of a post is / is not a specific user: enter a user ID, email address, or username.
- A specific type of post’s date meets a condition: choose Published date or Modified date (local or GMT), then Before, After, On, Year, Month, or Day, and a date. An optional Date modifier such as “-1 month” shifts the date, which is how you find posts not updated for a year.
- A post comment count meets a condition
- A post has / does not have a featured image
- A post is / is not password protected
Other integrations add post filters when active: WooCommerce (order status, orders between dates or IDs), Yoast SEO and Rank Math (SEO field is empty, SEO score), The Events Calendar (events by status, venue, organiser, category, or date range), and others.
Filters for a Token loop
- The item is not empty: keeps only items that contain data. The plugin describes it as “Filters out empty items from the loop, keeping only items that contain data.” It works on lists of single values, such as a list of names, as well as lists of records; a single value that is blank or 0 counts as empty. This was the default filter on a 7.x token loop. The 8.0 builder does not add it, so add it yourself: a Token loop with no filters processes nothing.
- The item meets a condition: choose which part of the item to test in Item, a Criteria (is, is not, contains, does not contain, is greater than, is greater than or equal to, is less than, is less than or equal to, starts with, does not start with, ends with, does not end with), and a Value.
Adding actions inside the loop
- Click + Add inside the Loop block’s frame. An empty frame reads “No items in this path yet”.
- Choose the integration and the action in the picker, then set it up as you would any action. Use Save or Test in the usual way. A test does not run on a loop item: as the Test step says, “Token values are not replaced during tests. Placeholders like {{user email}} are sent as-is.”, so loop tokens are sent as their placeholders.
Actions inside the loop run once for each item that passes the filters. Actions outside the loop run once per recipe run. You can add several actions to one loop; they run in order for each item.
How an action knows which item to work on depends on the loop type. In a Users loop, actions that act on the user pick up the loop’s user automatically. In a Posts loop, the action’s Post field would otherwise point at a fixed choice, so select Use a token/custom value in that field, click the ∗ button, and insert the Post ID token from the Loop section of the token picker. In a Token loop, the right action depends on what the items are: if they are courses you might reset course progress, if they are products you might check for a related purchase and send an email. Either way, the item’s data reaches the action through loop tokens.
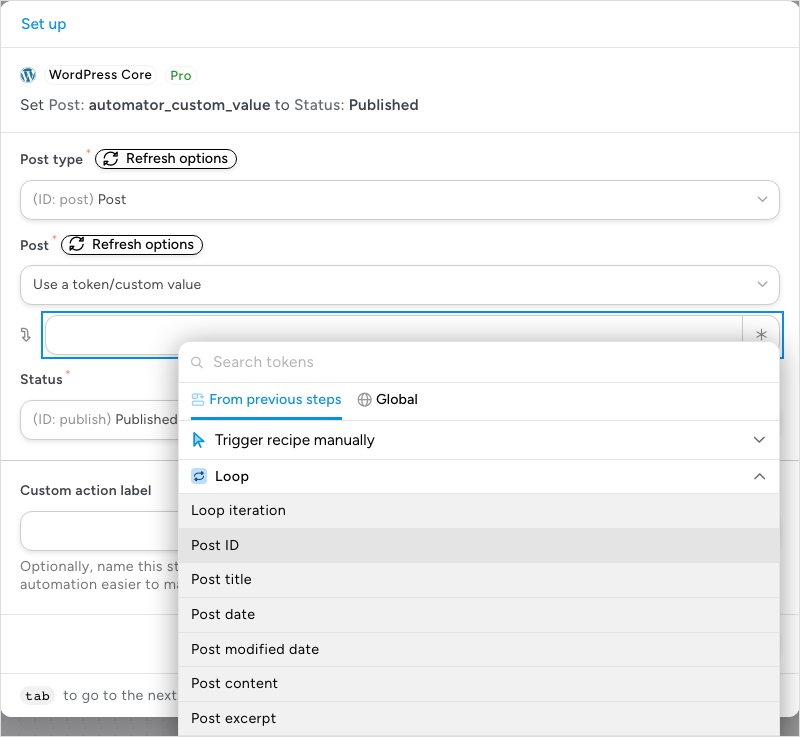
Important: In Set a post to a status, the Post field starts at All posts. Inside a loop, leaving it there would update every post rather than the current one, so always switch it to the Post ID loop token.
Loop tokens
Inside a Loop block, the token picker’s From previous steps tab gains a Loop section with tokens for the current item, starting with Loop iteration. Which other tokens appear depends on the loop type:
- Users loop: User ID, User username, User email, User display name, User first name, User last name, User role, User reset password URL, User locale. User reset password URL creates a new password reset link for the user when an action uses it, and that link replaces any reset link the user was sent before.
- Posts loop: Post ID, Post title, Post date, Post modified date, Post content, Post excerpt, Post status, Post type, Post URL, Post slug, Post author ID, Post author first name, Post author last name, Post author display name, Post author email, Post author URL, Post featured image ID, Post featured image URL.
- Token loop: the fields of the item. For products these are tokens such as the product ID and name; for courses, the course ID and name; for a CSV row, its columns.
- Every loop: Loop iteration, a counter that goes up by one with each item the loop processes. The first item is 1. Combine it with a Filter block and End loop to stop after a set number of items.
Important: Trigger tokens keep their meaning inside the loop. A First name token from a “user logs in” trigger returns the first name of the user who logged in, whether you use it inside or outside the block. To personalise an action for the user of the current pass, use the loop’s User first name token instead. This distinction is what makes loops useful: one email action, addressed to the loop’s User email and greeting the loop’s User first name, sends a personal message to every user the filters select.
Ending a loop early
End loop is an item of the Loop integration. You add it inside a path like an action, and when it runs, the loop stops: no further items are processed and the recipe continues with whatever follows the Loop block. The picker describes it as “Runs to exit the current loop and continue with the next step in your automation” and notes that “End loop can only be used inside a Loop”; outside a loop it is greyed out.
On its own, End loop would stop the loop on the first item, so it belongs inside a Filter block within the loop, in the CONDITIONS MET path. The loop then runs until an item meets the condition. One pattern: a Filter block with the condition A token meets a condition on the Loop iteration token, so the loop processes a set number of items and then ends.
- Inside the Loop block, add a Filter block from the picker’s Recipe blocks and give it the condition that should end the loop.
- In the Filter block’s CONDITIONS MET path, click + Add, search for “end loop”, and click End loop under Items. It is the Loop integration’s item, and its Set up step has only a Custom action label, so click Save.
- Add any action that should run on the last item before End loop, or leave End loop as the only item in the path. Once a path holds an item, its + Add button is replaced by a + that appears when you point at the line between items: use it to place an action above or below End loop.
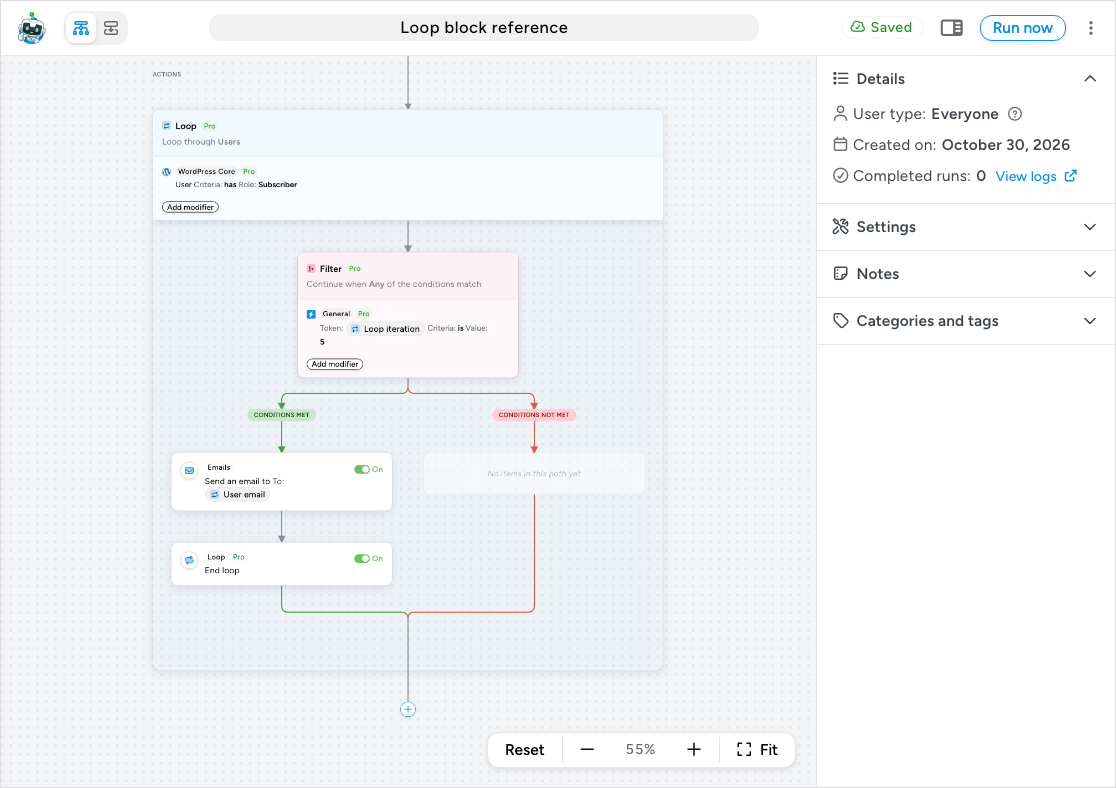
The loop checks for End loop after every item, so no further item is processed once End loop has run.
Filter blocks inside a loop
A Filter block inside a Loop block checks its conditions for each item. Items that meet the conditions take the CONDITIONS MET path; the rest take CONDITIONS NOT MET, which can hold its own actions or stay empty. This replaces the per-action filters of the 7.x builder: where you once set a filter on each action, you now wrap the actions in one Filter block.
Use loop filters for anything you can decide before the loop starts (role, post type, membership), because they shrink the set the loop has to work through. Use a Filter block inside the loop for decisions that need the item’s data at run time or that split the items into two groups with different actions. A LearnDash example: a loop filter selects users enrolled in a course, and a Filter block inside sends one email to users who completed it and another to users who did not.
Queue blocks can also sit inside a loop to delay the actions for each item. Each item’s queued actions run later with that item’s loop tokens. On the canvas, the Queue block appears in the loop’s path as a marker with a View button, and its actions are listed in the DELAYED ACTIONS section at the bottom of the canvas.
Running the recipe
Any trigger can start a recipe that contains a loop, so a loop can respond to events (when a product is published, update every related post) as well as run on demand. Two Pro triggers suit bulk jobs:
- Run now (the Run now integration, “Trigger recipe manually”): the top bar shows a Run now button in place of the Recipe on / off switch. Clicking it runs the recipe immediately and opens the log of that run. See Run Now.
- Schedule triggers: “Run on a specific date and a specific time”, “Repeat every weekday at a specific time”, and “Repeat every hour, day, week, month or year at a specific time”. See Schedule.
The recipe’s Times per user and Total times settings count recipe runs, not the items a loop processes. See Recipe settings: times per user, total times and throttling.
Reading loop runs in the logs
There are three ways to open the log of a run:
- Click Run now in the top bar. The builder opens the log of the run that started.
- In the builder sidebar, under Details, click View logs.
- Go to Automator > Logs. On the Recipe tab, find the run and click Details.
The run log shows the recipe as a flow. The Loop block carries a status strip: the block’s status (In progress, In progress with errors, Paused, Cancelled, or a completed status), a counter of items finished out of the total with a percentage, a progress bar, the start and end time, and the elapsed time. While the loop is running, the strip offers Pause, Resume, and Cancel.
- Pause holds the loop; Resume continues it from there. Like Cancel, Pause is checked every 25 items, so a few more items can finish after you click it.
- Cancel stops the loop. Items not yet processed are dropped and the block’s status becomes Cancelled. The loop checks for a cancel every 25 items, so up to 25 more items can be processed after you click Cancel.
- Click View details on an action inside the loop to open its Action details panel. The Iterations section lists one entry per item with its status, labelled with the user’s or post’s ID and name (or the token item’s value), so you can trace a problem to one user or post. An entry that failed shows the reason above its properties when you open it. Use Search iterations to find one.
While a loop is running, the recipe is locked: the builder does not accept edits and the Run now button is disabled until the run finishes.
If Uncanny Automator Pro is not active when the recipe runs, the Loop block does not run. In the run log the block and the run both read Completed with errors; click View details on the block and its Notes row reads “This block did not run because Uncanny Automator Pro is not active.”
Performance and background processing
- Loops run as background processes in batches. The batch size and timing adapt to your server and cannot be set by hand. Loops are designed to be light, but a loop over thousands of items does use server resources, and how much varies from host to host.
- Because the loop runs in the background, actions outside the loop usually finish before the loop does. There is no “after the loop completes” step. If an action must run after the loop, put it in a Queue block with a wait long enough for the loop to finish.
- How long a loop takes depends on the number of items, the number of filters, the number and type of actions inside it (an app action that calls an external service is slower than a WordPress action), and the server.
- App actions such as Google Sheets or Mailchimp are subject to the receiving service’s rate limits. If a very large loop fails part-way through on an app action, split the work into smaller loops with narrower filters.
- A loop runs on the items that exist when it starts. Users registered or posts created after that moment are not included.
Moving from User, Post and Token loops
In Uncanny Automator 7.x, Add ▾ in the Actions panel offered three separate items: User loop, Post loop, and Token loop. In 8.0 they are one Loop block added from the picker’s Recipe blocks, with the former loop kind chosen as Loop type. Loop filters are the same filters, now shown as modifiers on the block and added with Add modifier. The per-action filters that the User Loops article described are now a Filter block inside the loop. End loop is new. Existing recipes with loops were converted to Loop blocks automatically; open one to see its filters and actions in the new layout. The conversion keeps each loop’s ID, so its filters and the loop tokens used in its actions carry over unchanged.
Related: Recipe blocks: Filter, Queue and Loop, Filter block and conditions, Queue block: delaying and scheduling actions, Bulk update users with a recipe, Bulk update posts with a recipe, Run Now, Using Automator Logs, Managing tokens.


Comments (0)