

Uncanny Automator 8.0 replaces the WordPress edit screen you built recipes on in 7.x with a full-width recipe builder. A recipe is a deterministic automation: triggers, conditions, and actions that run the same way every time, and that has not changed. Every recipe you built in 7.x opens in the new builder with the same triggers, actions, tokens, and settings, and keeps running while you learn the new layout. This guide maps each control from the old builder to its new place, then covers what the new builder adds.
The new builder at a glance
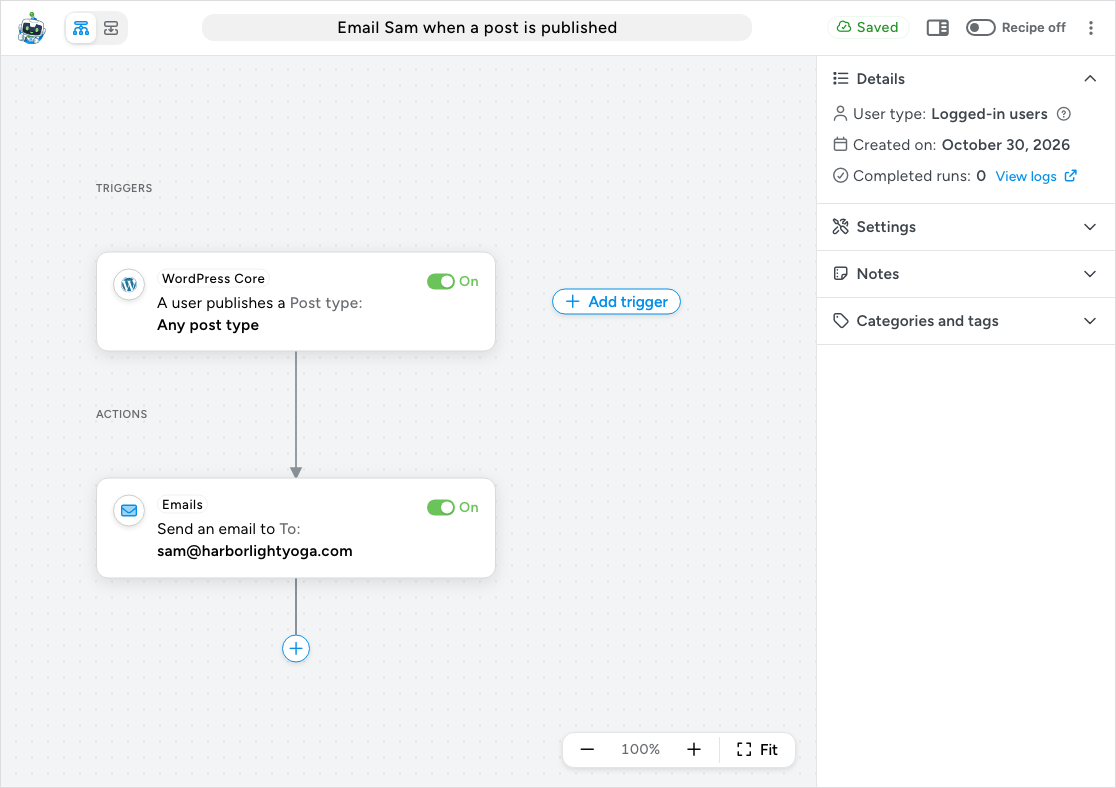
If you built recipes in 7.x, the builder opens in List view the first time: your triggers, then your actions and blocks, stacked in one column, the closest layout to the builder you knew. Click Diagram view at the left of the top bar to see the recipe as a canvas with TRIGGERS at the top and ACTIONS below, nodes joined by lines, and a + at the end of the flow. The builder remembers the view you pick, for every recipe and for the recipe logs. Someone who had not created a recipe on the site starts in Diagram view, and the screenshots in this guide show Diagram view. The top bar holds the Diagram view and List view switcher, the recipe title (Name your recipe), the autosave status (Saved or Saving…), the sidebar toggle, the Recipe off / Recipe on switch, and the ⋮ More actions menu. The right sidebar holds four panels: Details, Settings, Notes, and Categories and tags. Diagram view and List view explains the two views and the canvas controls.
What moved where
Use this table when you reach for a control you knew in 7.x and cannot find it. The left column describes the old builder; the right column names the control that replaces it and links the article that covers it in full.
| In the old builder | In the new builder |
|---|---|
| The recipe type (Logged-in users or Everyone) was chosen inline on the new recipe screen. | Clicking Automator > Add new recipe opens the Select a recipe type modal. Choose Logged-in users or Everyone and click Confirm. The modal notes that the recipe type cannot be changed later. See Recipe types: logged-in users and everyone. |
| The Live / Draft toggle in the Recipe sidebar decided whether the recipe ran. | The Recipe off / Recipe on switch in the top bar. A new recipe starts as Recipe off, so you can finish building before anything runs. Switch it on when the recipe is ready. Switching it on checks the recipe first: at least one trigger and one action must be On, the required fields of every item and block in use must be filled in, and an Everyone recipe that needs a user must have its Run recipe as card set. If anything is missing, This recipe can’t go live yet lists what to fix. A title is not required. |
| Clicking Save or Update on the WordPress edit screen stored your changes. | Nothing. Every change saves as you make it; the top bar shows Saving… and then Saved. There is no Save, Update, or Publish button. |
| Add trigger and Add action opened a grid of integration icons inside the card, then a searchable list of triggers or actions. | + Add trigger and the + at the end of the flow open the picker, a modal with a search box, a Ready-to-use only switch, suggestions, groups built from the recipes already on your site (Recently used integrations and Most used integrations), Recipe blocks when you add an action, and an expandable All integrations list. Pick the integration first, then the trigger or action. See Finding integrations in the recipe builder. |
| A trigger’s or action’s fields appeared inline in its card, and you clicked Save on the card. | The fields open in a modal with two steps, Set up and Test. The Set up step shows the sentence with the editable part highlighted, the fields, and a Custom trigger label or Custom action label. Finish with Save, or with Test on items that have a Test step. The ∗ button at the end of a field still opens the token picker. See Creating a recipe. |
| Each trigger and action had its own Live / Draft switch, and a new item started as Draft. | Each trigger and action has its own On / Off switch on its node, and a new item is On when you add it. The recipe does not run anything until Recipe on is switched on, so there is no need to hold items in an off state while you build. Each node also has a ⋮ menu (Duplicate, Delete) and a drag handle. See Managing triggers and Managing actions. A recipe that is on skips any trigger or action that is Off, as 7.x did with Draft items, and switching off the last trigger or action that is On switches the recipe off too. |
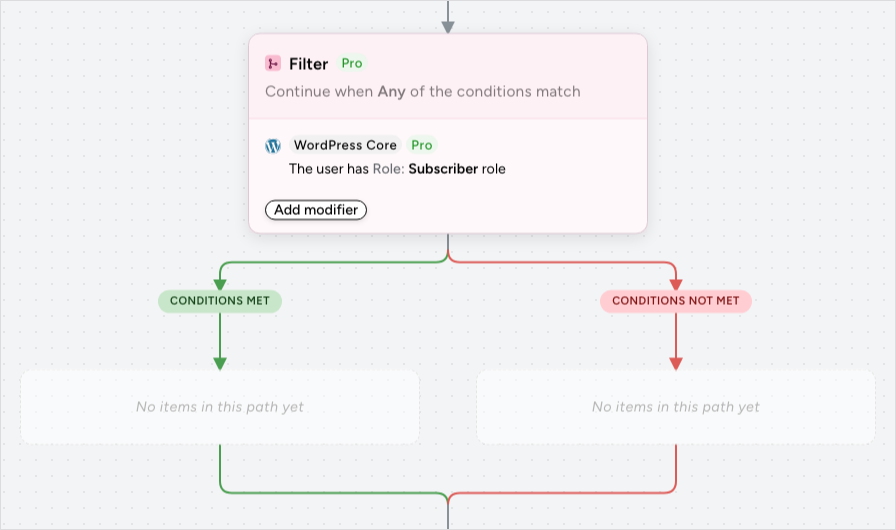
| Filter (under the Add menu) created a conditions group that held several actions; the actions ran only when the conditions matched. Requires Uncanny Automator Pro. | The Filter block, added from the picker’s Recipe blocks. Conditions are modifiers inside the block (Add modifier), and Condition match mode sets whether Any or All must match. The block has two paths, Conditions met and Conditions not met. Still requires Uncanny Automator Pro. See Filter block and conditions. |
| The Delay button on an action card (“Delay or schedule this action”) set a delay or a schedule for that one action. Requires Uncanny Automator Pro. | The Queue block, added from the picker’s Recipe blocks. Its wait mode is Set time, Schedule, or Use a token / custom value, and one block holds any number of actions. The behaviour is the same as the old delay and schedule. Still requires Uncanny Automator Pro. See Queue block: delaying and scheduling actions. |
| User loop, Post loop, and Token loop (under the Add menu) were groups that held several actions, with loop filters on the group. Requires Uncanny Automator Pro. | One Loop block with a Loop type of Users, Posts, or Token. Loop filters are modifiers on the block, and the End loop item exits the loop early. Still requires Uncanny Automator Pro. See Loop block: users, posts and tokens, Bulk update users with a recipe, and Bulk update posts with a recipe. |
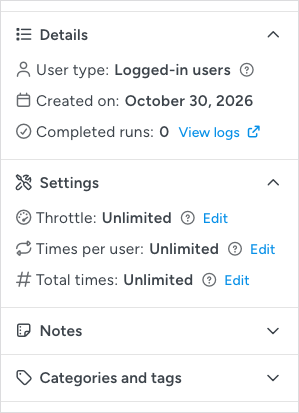
| The Recipe sidebar listed Throttle, Times per user, Total times, User type, Created on, and Completed runs. | Two sidebar panels. Details shows User type, Created on, Completed runs, and a View logs link. Settings shows Throttle, Times per user, and Total times, each with an Edit link. See Recipe settings: times per user, total times and throttling. |
| The trash, duplicate, and export icons sat in the Recipe sidebar. | The ⋮ More actions menu in the top bar: Run now, Duplicate recipe, Download recipe JSON, Move to trash, and Ask Uncanny Agent. |
| Recipe notes, Recipe category, and Recipe tag were metaboxes below the Recipe sidebar. | The Notes and Categories and tags panels in the sidebar. Categories and tags are also managed at Automator > Settings > General > Recipe categories and Recipe tags. |
| The Redirect when all triggers are completed checkbox sat at the bottom of the Actions panel. | Removed. To redirect the user, add the Redirect integration’s action to the recipe. See Working with redirects. |
| Get samples (webhook triggers) and Capture hook data (Plugin Actions) fetched sample data so you could pick tokens. | The trigger’s Test step, on triggers that need sample data. Click Test, start the test, and fire the event; the builder listens for it and captures the sample. See Testing triggers and actions. |
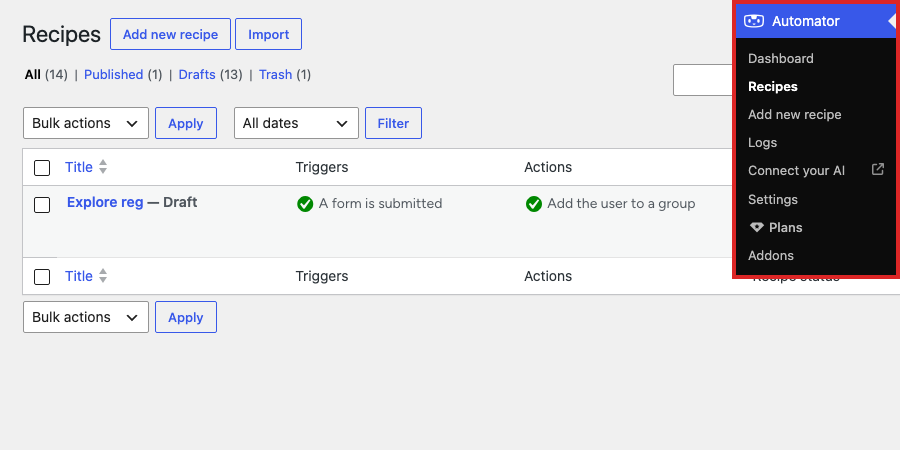
| Automator > All recipes | Automator > Recipes. The recipes list itself is unchanged. |
| Automator > Categories and Automator > Tags | Automator > Settings > General > Recipe categories and Recipe tags, or the Categories and tags panel in the builder sidebar. |
| Automator > All integrations | No longer in the menu. Browse and search integrations in the picker while you build. See Finding integrations in the recipe builder. |
| Automator > App integrations | Automator > Settings > App integrations. The connection steps for each app are the same. |
| Automator > Status | Automator > Dashboard, then View full status. See Setup wizard and dashboard. |
The sidebar is where most of the old Recipe panel went. Click a panel’s heading to expand or collapse it; the Settings panel shows the current value of each limit next to its Edit link.
The Automator menu is shorter than before. It now reads Dashboard, Recipes, Add new recipe, Logs, Connect your AI, Settings, Plans, and Addons. Setup wizard appears until a Pro license is active or the site is connected to a free account, Scheduled recipes appears only while a live recipe uses a Schedule trigger, and an active addon can add its own entry.
What the new builder adds
The sections below cover what you could not do in 7.x, or could only do in a roundabout way.
Branching with Conditions not met
In 7.x a conditions group ran its actions when the conditions matched and otherwise did nothing. The Filter block has two paths: Conditions met runs when the conditions match, and Conditions not met runs when they do not. One recipe can now send a welcome email to subscribers and a different email to everyone else, where before you needed two recipes or two filters. An empty path reads “No items in this path yet”; point at it and a + Add button appears in its place, which opens the picker for that path. Blocks nest to any depth, so a Filter block can sit inside a Loop block or inside another Filter block’s path. Recipe blocks: Filter, Queue and Loop explains how blocks, modifiers, and paths fit together.
The Queue block
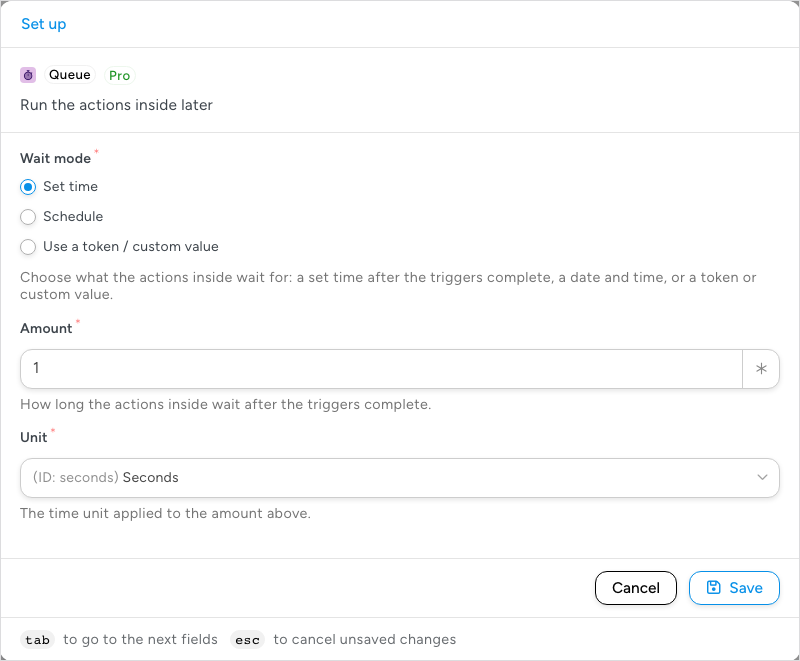
The Queue block is the old delay and schedule under a new name, and it behaves exactly as they did: the actions inside the block are queued to run later, and the rest of the recipe runs immediately. The recipe does not pause at the block. Choose a Wait mode of Set time (an Amount and a Unit after the triggers complete), Schedule (a date and time), or Use a token / custom value. Where the old delay was set one action at a time, one Queue block holds any number of actions, so a reminder email and a follow-up tag can share a single wait. Queued actions are listed under Delayed actions at the bottom of the canvas.
Testing triggers and actions
Every trigger and action is edited in a Set up step where you fill in the fields. Items that can be tested (the Emails action, every outgoing webhook action including Zapier, Make and the other webhook-based apps, incoming webhooks, and the Plugin Actions trigger) add a Test step and a Test button beside Save: Test opens the test, and Save saves the item as it is. Every other item finishes with Save alone.
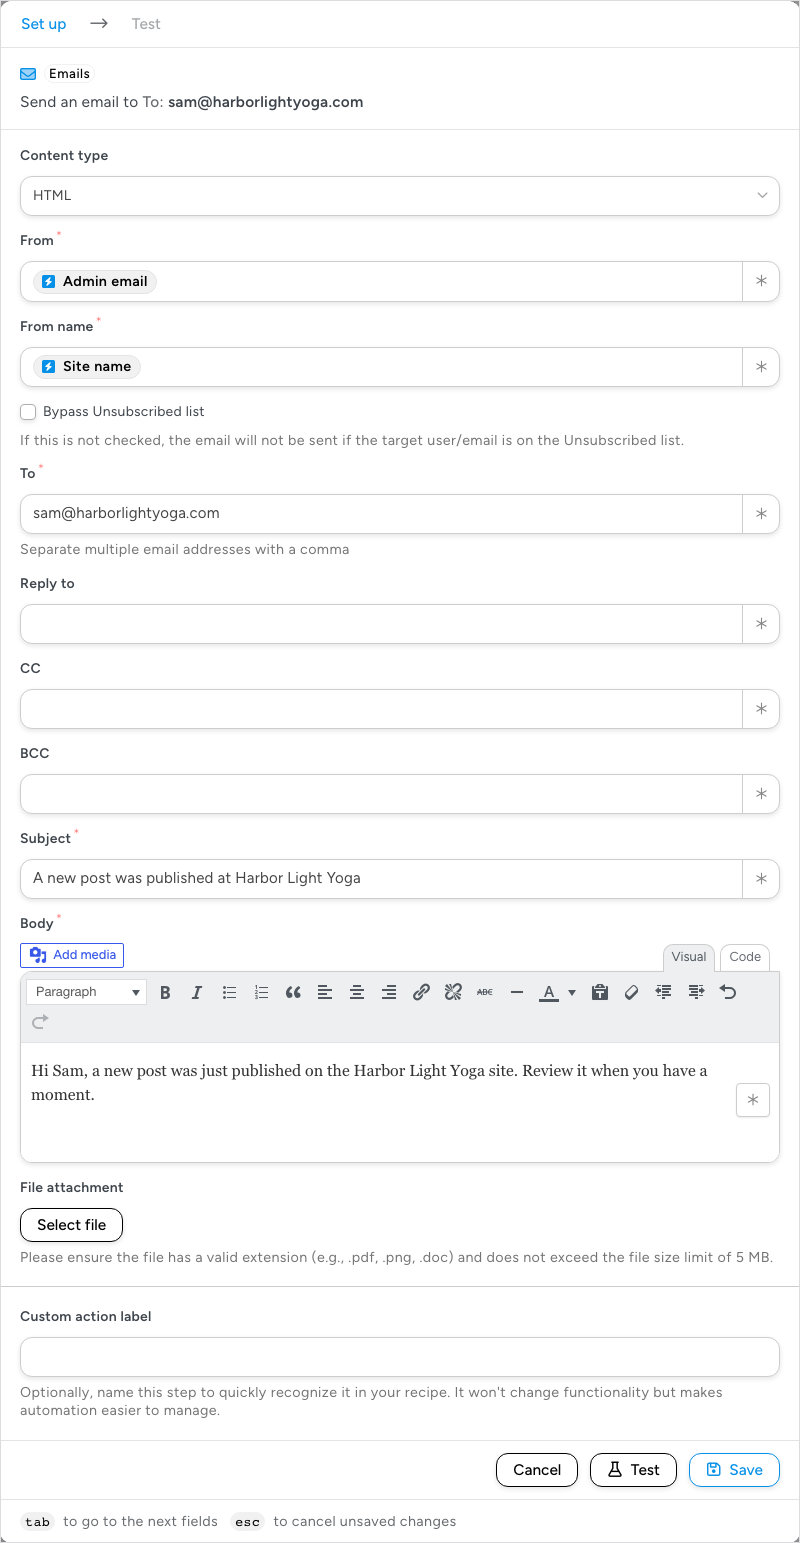
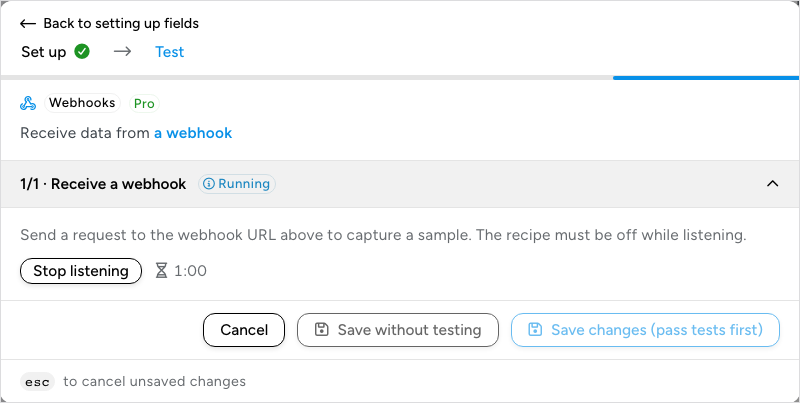
An action test runs the action with the values you entered; for the Emails action the Test step offers Send test email, with an Email address field and a Send email button. A trigger test listens for the event: start the test, then fire the event (for a webhook trigger, send a request to its webhook URL). While it listens, the test shows Running, a countdown from 1:00, and a Stop listening button, and the recipe must be switched off. Save changes (pass tests first) stays unavailable until the test passes. The trigger test replaces Get samples on webhook triggers and Capture hook data on Plugin Actions. The example below is the Webhooks trigger Receive data from a webhook, which is available in Everyone recipes only. Full detail in Testing triggers and actions.
The Ready-to-use only filter
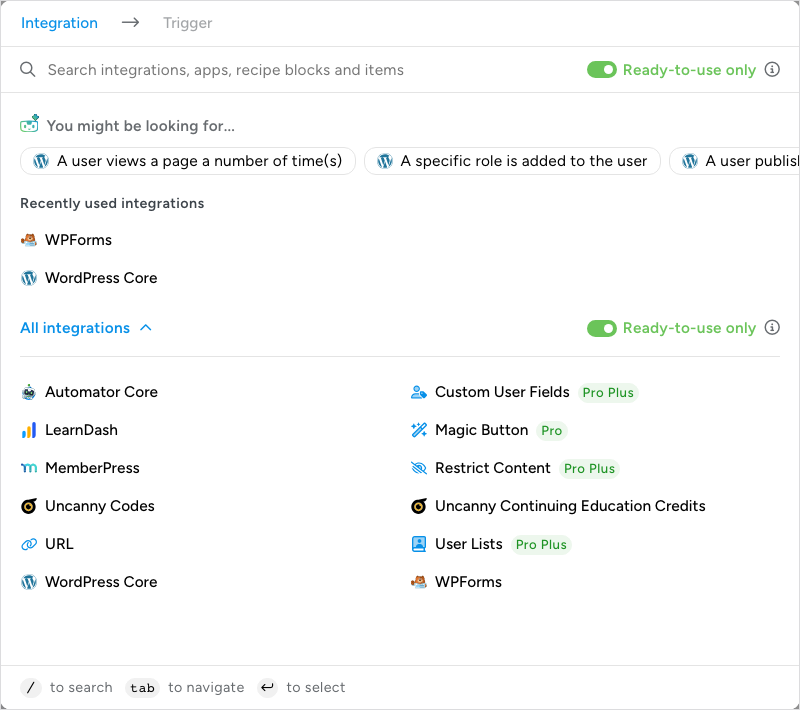
The picker opens with Ready-to-use only switched on, which hides integrations and items that need a plugin install, an app connection, or a higher plan, so everything you see can go straight into the recipe. Switch it off to see the full catalogue: items that need Uncanny Automator Pro are marked Pro, plugins that are not installed on the site are marked Not installed, and installed plugins that are switched off are marked Not active. The search box covers integrations, apps, recipe blocks, and individual triggers and actions in one place. See Finding integrations in the recipe builder.
Uncanny Agent in the builder
Uncanny Agent, the AI assistant built into Uncanny Automator, is available from inside the builder. Triggers, actions, blocks, and validation messages offer Ask Uncanny Agent and Fix with Uncanny Agent, the ⋮ More actions menu offers Ask Uncanny Agent for the whole recipe, and Suggest title, beside the title field while the recipe has no title, names it for you. These options appear only on sites where Uncanny Agent is available, for administrators, and while at least one Uncanny Agent launcher is switched on under Automator > Settings > Uncanny Agent.
Things that did not change
- Recipes — every recipe, its type, and its settings carry over as they were. The recipes list at Automator > Recipes is the same table with the same Edit, Trash, Duplicate, Export, and Clear activity logs links and the same Import button.
- Triggers and actions — the sentences, the fields, and the integrations behind them are the same; only where you edit them moved.
- Tokens — the ∗ button, the token picker, and the
{{token}}syntax are unchanged. See Managing tokens. - Logs — Automator > Logs keeps its Recipe, Trigger, and Action tabs and adds an AI activity tab.
- App connections — the steps to connect Slack, Google Sheets, Mailchimp, and every other app are the same at Automator > Settings > App integrations.
- Everyone recipes — recipes for logged-out visitors still choose which user the actions run as. The card now sits between TRIGGERS and ACTIONS; see Recipes for Everyone.
Related: Creating a recipe, Diagram view and List view, Recipe blocks: Filter, Queue and Loop, Installing Uncanny Automator, What is Uncanny Automator?, Guide: Uncanny Automator for Thrive Automator users


Comments (0)