These post-course automations turn LearnDash course completions into a growth stream—for your learners and your…
How to Connect WooCommerce to Slack
Connect WooCommerce to Slack so you can receive live updates from your e-commerce store and streamline your workflows.

If you’ve been looking for the simplest way to connect WooCommerce to Slack, then congratulations! You’ve clicked on the right link. Uncanny Automator is the fastest, no-code solution for all of your WordPress integrations.
As an e-commerce business owner, you know how important it is to stay connected to your customers. Slack and WooCommerce are two of the most popular tools used by businesses to communicate with their teams and manage their online stores. By connecting the two platforms with Uncanny Automator, you can receive automated notifications about your online store in real-time.
In this blog post, we’ll show you how to connect WooCommerce to Slack with Automator so you can receive e-commerce notifications about your orders, customers, product reviews and so much more!
p.s. Make sure to read through to the end of the article for some bonus Slack and WooCommerce integrations using OpenAI!
Introduction to Uncanny Automator
Whenever you’re wondering, “How do I connect this WordPress plugin to the other one?” just think of Uncanny Automator—it’s the #1 no-code WordPress automation plugin. With Automator, you can create powerful recipes (i.e. combinations of triggers and actions) that save you time and money and improve your workflows.
For Slack and WooCommerce users, Automator offers 50+ triggers and actions and as many potential combinations as you can dream up. Enhance your WordPress website’s functionality and get instant notifications about anything happening in your digital store. Create seamless workflows with WooCommerce and Slack that help you process orders and guide your customers through your sales funnel and beyond.
In the next section, we’ll show you how to download Uncanny Automator (for FREE) and walk you through the seven simple steps to connect Slack to WooCommerce.
Connect Slack to Automator
Connecting WooCommerce to Slack with Uncanny Automator only takes a few clicks—and even fewer minutes. More importantly, it requires no code or programming knowledge because of Automator’s user-friendly and intuitive interface. Follow these simple steps and start automating your e-commerce notifications.
Step 1: Download Uncanny Automator
To connect Slack to WooCommerce, you’ll need to download the Uncanny Automator plugin. From your WordPress Admin Sidebar, navigate to Plugins > Add New. In the search bar, type in “uncanny automator” then press Enter on your keyboard. The Uncanny Automator plugin will be the first search result. Click Install Now then Activate.

To use Automator’s app integrations such as Slack, you’ll either need a paid plan or app credits. Fortunately, Automator offers all new users complimentary app credits so they can try out premium app integrations before making a financial commitment.
To register your account and redeem your app credits, head to Automator > Settings in your WordPress Admin Sidebar after downloading the free plugin. Under the General tab, click on License then Connect your site and follow the prompts.

Step 2: Connect Your Slack Workspace to Automator
Once you’ve redeemed your credits or purchased a license, you can connect your Slack account to Automator. From your WordPress Admin Sidebar, navigate to Automator > Settings. Click on the App integrations tab and scroll down to Slack. Next, click on Connect Slack workspace and follow the prompts to complete the connection.

For Automator to post notifications in Slack channels, you’ll need to add the bot that you created to those channels. To do this, open up your Slack workspace and navigate to Apps > Uncanny Automator. Open the app window by clicking on the title, then click Add this app to a channel.

Connect WooCommerce to Slack in 5 Steps
Uncanny Automator integrates your various plugins and apps using recipes. These recipes allow events in one plugin or app to trigger events in another plugin or app. One of the most common WooCommerce and Slack integrations involves sending Slack notifications to various teams based on events in your WooCommerce store. Follow these steps to connect WooCommerce to Slack and notify your sales team whenever a user completes an order.
Step 1: Create a New Recipe
From your WordPress Admin Sidebar, navigate to Automator > Add New. A pop-up window will appear in a new screen where you can select your recipe type. We’re creating a recipe that runs on users who are registered with our site. As such, we’ve selected Logged-in users.

Step 2: Name Your Recipe
It’s good practice to give your recipe a title that makes it easy to recognize at a glance. For example, you might name your recipes based on the applications and plugins involved. Alternatively, you can name your recipes based on the workflows that they automate. We’ve named this recipe WooCommerce Order Completion Updates because we’re creating a recipe that will notify us via Slack messages whenever a user’s order status is set to Completed.
Step 3: Configure Your Trigger(s)
In the Triggers panel, from the menu of available integrations, click WooCommerce.

From the drop-down list that appears, select your desired trigger. For our recipe, that’s A user completes, pays for, lands on a thank you page for an order with a product.

Automator will prompt you to fill out the fields highlighted in blue. For our recipe, we selected completes in the first field and any product in the second field. There’s also a number field where you can specify the number of times a user must satisfy the trigger before it fires. When you’re finished, your trigger should look like this:

Step 4: Configure Your Action(s)
Next, you’ll get to define your action. This is where you can customize the Slack message that you want to receive whenever a certain event takes place in your WooCommerce store.
In the Actions panel, click on Add action. From the menu of available integrations, click on Slack.

From the drop-down list, select Send a message to a channel.

Automator will prompt you to select a Slack channel and draft the message you would like to send. You can customize the message using tokens (i.e. dynamic pieces of data pulled from across your website and even from within recipes). To use tokens, click on the asterisk in the Message field.

For WooCommerce alone, Automator has dozens of tokens for everything ranging from order data to product details and more. We’ve drafted a simple example of a Slack message using both tokens and static text.

After you’ve configured your message, click Save. Your action should look like this:

Step 5: Go Live!
You’re almost done connecting Slack to WooCommerce. The only thing left for you to do is toggle your new recipe from Draft to Live and let the notifications stream in!

Here’s the Slack message from our earlier example once a user completed their transaction.

Now that you know how to connect WooCommerce and Slack, you can create powerful productivity-boosting automations of your own. In the next section, we’ll get you started with some of the Slack and WooCommerce recipes that our users say they find most beneficial. And we’ll throw in a few extra recipes at the end that are sure to boost your marketing and customer service workflows.
Popular WooCommerce and Slack Integrations
With these WooCommerce and Slack automations, you’ll be able to stay connected to your e-commerce store no matter where you are. Whether you want to receive Slack notifications about low inventory in your WooCommerce store or you want to create Slack channels for high-valued accounts, there’s an Automator recipe for you.
Stay on top of your WordPress business and ensure that everything is running smoothly. Streamline communication and collaboration between your teams, manage orders, track sales, and receive important notifications.
Note, in this section, we’ll be using some Automator Pro features that your complimentary app credits won’t unlock for you if you’ve downloaded the free version of Automator. If you want to try out some of the Pro features that we’ll be showcasing here (including more powerful WooCommerce triggers) you can still do so without making any commitments.
Click here to purchase Automator Pro and gain full access to all of the features without credit limits. Automator also offers a 14-day money back guarantee so trying out more powerful automations comes at no risk. Imagine how much time you can save in 14 days!
Without further ado, here are just a few ways that you can integrate WooCommerce and Slack with Uncanny Automator.
1. Create High-Valued Customer Slack Channels

Your most valued customers deserve nothing but the best service you can provide to them. With the recipe pictured above, Automator will create dedicated Slack channels for high-value and/or high-volume customers so your sales team has a central location for their communications related to that account. Help your sales and fulfillment teams with their account management goals so that they can continue delivering excellent service to your highest-valued customers.
Notice that our recipe has two triggers. At the top of the Triggers panel, we can decide to run the recipe if All of the triggers are satisfied or if Any of the triggers are satisfied. Using multiple triggers can help you integrate more of your favorite plugins and applications into your workflows.
2. Order Status Updates

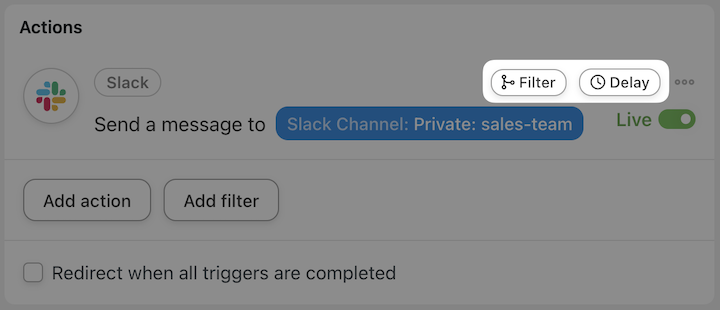
Speaking of your sales and fulfillment team. With the recipe above, our sales team can keep track of our customers’ order status via Slack messaging to ensure that our sales funnel is running smoothly. We’ve added both a filter and a delay to our recipe so that our sales team will only receive a Slack message about the order if it is taking longer than it should. Adding filters and delays to your recipe is easier than you might think—once again, no code!
To add a filter or a delay to one of your actions, simply hover over the action and click on Filter or Delay.
While filters and delays are one of Automator’s more advanced features, they’re nothing you can’t master yourself in just a few steps. If you want to learn more about filters and delays, click on the links. You can find even more recipe customization options by checking out our handy Knowledge Base.
3. Inventory Updates and Notifications

Staying on top of inventory is a full-time job for any WooCommerce store owner. With the recipe above, however, you can send direct Slack messages to your purchasing manager whenever a customer places a new order for a product with low inventory. We used a filter in addition to a token in our Slack action so that it would only run if the inventory of our chosen product dropped below a certain threshold.

WooCommerce and Slack + OpenAI and ActiveCampaign
With 100+ integrations, there’s no reason that you have to stop at integrating Slack and WooCommerce. Uncanny Automator allows you to connect all of your favorite apps and plugins so you can automate your workflows, save time and reduce costs. Whatever your WordPress automation and integration needs, Automator is the simplest and most cost-effective solution. Once you’ve gotten the hang of creating your own powerful WooCommerce and Slack workflows, try adding these recipes into the mix.
4. Integrate WooCommerce and Slack with Your CRM

Tagging your customers in your CRM is simple enough. But, oftentimes, removing tags isn’t as straightforward, resulting in your customers receiving marketing materials that no longer apply to them. With the recipe above, we’re able to remove tags that we’ve added to customer emails in ActiveCampaign if/when they cancel an order. Our sales team will receive an automated Slack message so that they can investigate the order cancellation in real-time and try to recover the sale.
5. Integrate WooCommerce and Slack with OpenAI’s GPT

Product reviews provide a great opportunity for you to boost engagement with your customers. But with so many customer reviews pouring in, it’s not always possible to respond in a timely manner. Unless, of course, you had some help from AI. In the recipe above, we’re using Automator’s OpenAI integration to generate quick responses to our customer reviews as they come in. We then send those responses along with the original review to the correct Slack channel or user so that they can edit the response and start meaningful conversations with customers.
While this is definitely an advanced WordPress automation, Automator’s user-friendly interface makes it simple to set up.

Here’s the Slack message that our sales team received when a user left a positive review of one of our products.

Keep Automating and Integrating
Now that you know how to connect WooCommerce to Slack (and so much more), there’s no telling what delicious, time-saving recipes you’ll cook up next. What are some of the WooCommerce and Slack triggers or recipes that you want to see? Let us know in the comments section below. Until then, keep automating and integrating!

Related Posts


Comments (0)