Trying to figure out which AI tools are best for WordPress site owners? See why…
How to Connect BuddyBoss to Zapier (In 4 Steps)
If you run an online classroom or membership site, you probably find yourself spending a lot of time and energy keeping your community organized. While it could help to outsource those tasks, that’s not always an option. Fortunately, you may be able to take back some of your time through automation.
In this post, we’ll introduce you to BuddyBoss and Zapier. Then we’ll show you how to connect these apps using our Uncanny Automator plugin. Let’s get started!
An Introduction to BuddyBoss and Zapier
BuddyBoss is a platform that enables you to build an online community with your WordPress site. You can use it to create membership programs or teach online courses. This solution provides plenty of customization options, and even includes gamification features:
 You can use the Zapier dashboard to establish automation through connected apps. After creating a free Zapier account, you can build ‘Zaps’. These are automated workflows made up of ‘actions’ and ‘triggers’:

Actions are performed automatically each time the relevant triggers occur. They can include anything from sending an email to creating a row in a spreadsheet.
By connecting BuddyBoss to Zapier, you can streamline some of your website’s most repetitive tasks. Using our Uncanny Automator add-on, you can set up a Zap that triggers from a webhook, and then performs the desired action. For example, when a user gains a new follower, you could trigger a Zap that sends the user a notification email.
How to Connect BuddyBoss to Zapier (In 4 Steps)
Now that we’ve introduced you to BuddyBoss and Zapier, let’s look at how to connect these two tools in just four steps. We’re assuming that you already have Uncanny Automator Pro installed. If not, you’ll want to do that before jumping into the steps below.
Step 1: Create a Zap
To start, you’ll want to create a Zap with a webhook. In your Zapier account, select Make A Zap:

In the left-hand menu, select Webhook. For your Trigger Event, choose Catch Hook. This tells Zapier to wait for a signal from Uncanny Automator:
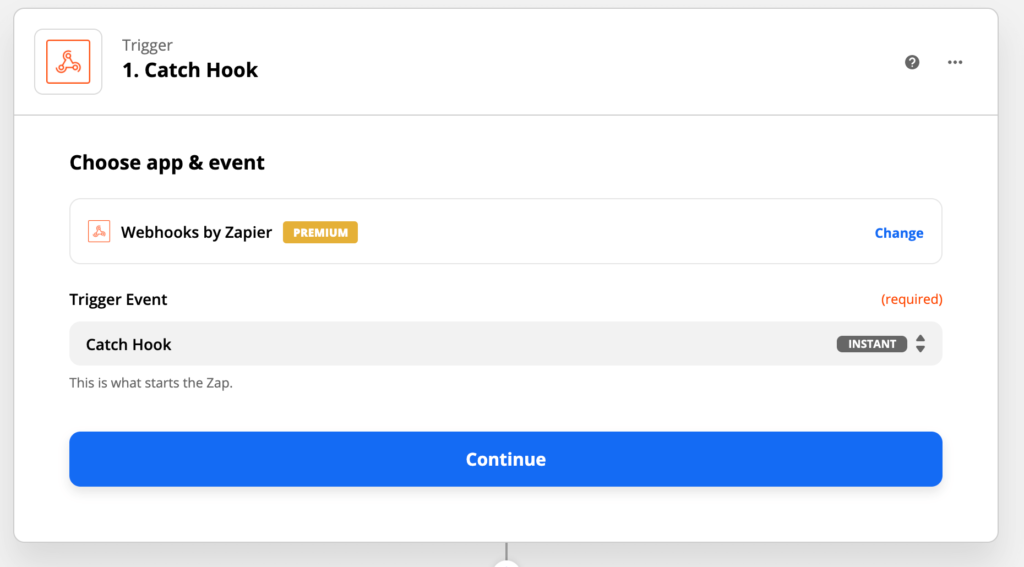
You can then click on Continue, and Zapier will display a webhook URL. We’ll be returning to this zap in a later step, so it’s a good idea to leave Zapier open in a separate tab.
Step 2: Install the BuddyBoss Plugin
Next, you’ll need to install and activate the BuddyBoss plugin. The BuddyBoss platform consists of a plugin and a theme. We’ll be using the former, but the latter is entirely optional:

In your WordPress dashboard, navigate to Plugins > Add New > Upload Plugin. You can then select Choose File:

Locate and upload the BuddyBoss file. Once the upload is complete, click on the Activate link. For further installation guidance, you can refer to the BuddyBoss getting started documentation.
Step 3: Connect BuddyBoss to Zapier
With BuddyBoss installed, you’re ready to start creating recipes. From your WordPress dashboard, navigate to Automator > Add new.
Next, you can select either Logged-in or Anonymous as your recipe type. Logged-in recipes are only triggered by logged-in users, while anonymous recipes can be triggered by anyone. Just be aware that you cannot change the recipe type later:

After giving your recipe a descriptive title, choose BuddyBoss as your integration. You’ll then see a list of available triggers:

Click on your desired trigger, and activate this section’s slider so that it turns green. You can use this integration to create a wide range of recipes.
As an example, we’ll create a workflow that triggers every time a user activates their BuddyBoss account via email. This user’s information will then be recorded to a third-party application, such as a spreadsheet:

To get started, click Add action. You can then select Zapier from the integrations list:

Select Send data to Zapier webhook. It’s now time to paste your Zapier webhook into the URL field:

As part of this recipe, you’ll pass data between WordPress and Zapier. This data is organized into key/value pairs. The key represents the data’s label; for example, you might use the label First Name. The value is typically dynamic content, such as the first name of the person who’s just activated their account.
You can specify a dynamic value using tokens. To start, you’ll need to enter a text label in the Key field:

For Values, you‘ll typically pass dynamic data. To use a dynamic value, click the Value field’s * symbol and then select Common:

You can then choose from the available values, such as User_firstname. Here, we’re passing Zapier the first name of each new user, and labeling this value First Name. To make this recipe live, click on Save followed by the Draft / Live slider in the upper-right corner.
Step 4: Create Your Action in Zapier
To put the finishing touches on your automation workflow, switch back to the Zapier tab and select Continue. At this point, you may want to test your trigger:

Assuming that this test was successful, click on Continue again. You can then specify the action that Zapier should perform every time this workflow is triggered. For example, you can log the new user’s details in a spreadsheet, by choosing a relevant application such as Microsoft Excel:

Next, you’ll select the specific action that Zapier should perform. For example, you might add this user’s information to a new row. You can then click on Continue. At this point, you might have to perform some additional configurations, depending on your chosen application:

Finally, click the on/off slider. Your automated workflow is now live!
Conclusion
Automating some of your tasks can save you time and enable you to serve your customers better. Fortunately, it’s not difficult to use Uncanny Automator to connect BuddyBoss to Zapier.
Simply follow these four steps:
- Create a zap.
- Install the BuddyBoss plugin.
- Create your recipe using Uncanny Automator.
- Create your action in Zapier.
What sort of recipes are you excited to create with Zapier and BuddyBoss? Let us know in the comments section below!

Related Posts


Comments (0)