Looking for the best WordPress automation plugin? We compare 7 top automation tools on pricing,…
How to Connect ActiveCampaign to WordPress (Beginner’s Tutorial)
Connect ActiveCampaign to your WordPress website with Uncanny Automator. This is a must-have WordPress integration for anyone who wants to up their marketing automation game!
Are you trying to connect ActiveCampaign to WordPress? Of course you are! That’s how you ended up here. And lucky you did.
Whether you’re brand new to ActiveCampaign and WordPress or an email marketing wizard, you’ll love this guide.
In this step-by-step tutorial, we’ll show you how to create a next-level ActiveCampaign and WordPress integration with Uncanny Automator.
Whether you’re just getting started with importing your WordPress users into ActiveCampaign or polishing off your segmentation by auto-tagging contacts based on WooCommerce purchases or LearnDash course completions. This is the integration you’ve been looking for!
So let’s get started.
Introduction
In this guide, we’ll show you how to create a complete ActiveCampaign integration for WordPress. Follow the steps in this tutorial to learn how to import your WordPress users into ActiveCampaign, tag your ActiveCampaign contacts based on their activity on your WordPress website and even manage your lists.
And that’s just the beginning.
Make sure to read through to the end to learn how to reverse this integration! We’ll show you how to make changes in WordPress based on changes in ActiveCampaign.
Why Connect ActiveCampaign to WordPress with Automator
ActiveCampaign is a popular (and powerful) CRM with must-have features for marketing automation, including segmentation tools, split testing and lead scoring. Needless to say, connecting ActiveCampaign to WordPress combines the power of a leading CRM with the versatility of the best CMS.
But to pull off this powerful integration, you’ll need an equally powerful tool. Enter Uncanny Automator.

Automator is the #1 automation and integration tool for WordPress websites. Don’t believe us? Maybe these features will convince you.
- Affordability: Unlike other automation and integration tools on the market, Automator doesn’t charge you a per automation fee. In other words, the more you automate and integrate, the more you save!
- Ease-of-Use: Automator packs tons of features (filters, scheduled/delayed actions, dynamic data, bulk recipes, etc.) into a user-friendly, no-code click-and-play interface. After you make your first recipe (which we’ll walk you through), you’ll be an Automator expert!
- Support: Automator doesn’t have a 5-star rating for nothing. With a library’s worth of support documents and a team of expert developers, Automator users can always get the answers they’re looking for.
- Versatility: Workflow automator. App and plugin integrator. Custom fields editor. Metadata manager. Content restrictor. And, well, you get the idea. Automator is a jack of all trades and master of most!
- Integrations: Automator has 238 integrations with more always in the works. This means that you can connect ActiveCampaign to all of your favorite apps and plugins.
Convinced yet? Get your Automator license so you can follow along.>>>
How to Tag WordPress Users in ActiveCampaign
In this section, we’ll take you through connecting ActiveCampaign to WordPress with the help of an example; adding a tag to a user in ActiveCampaign for passing a quiz.
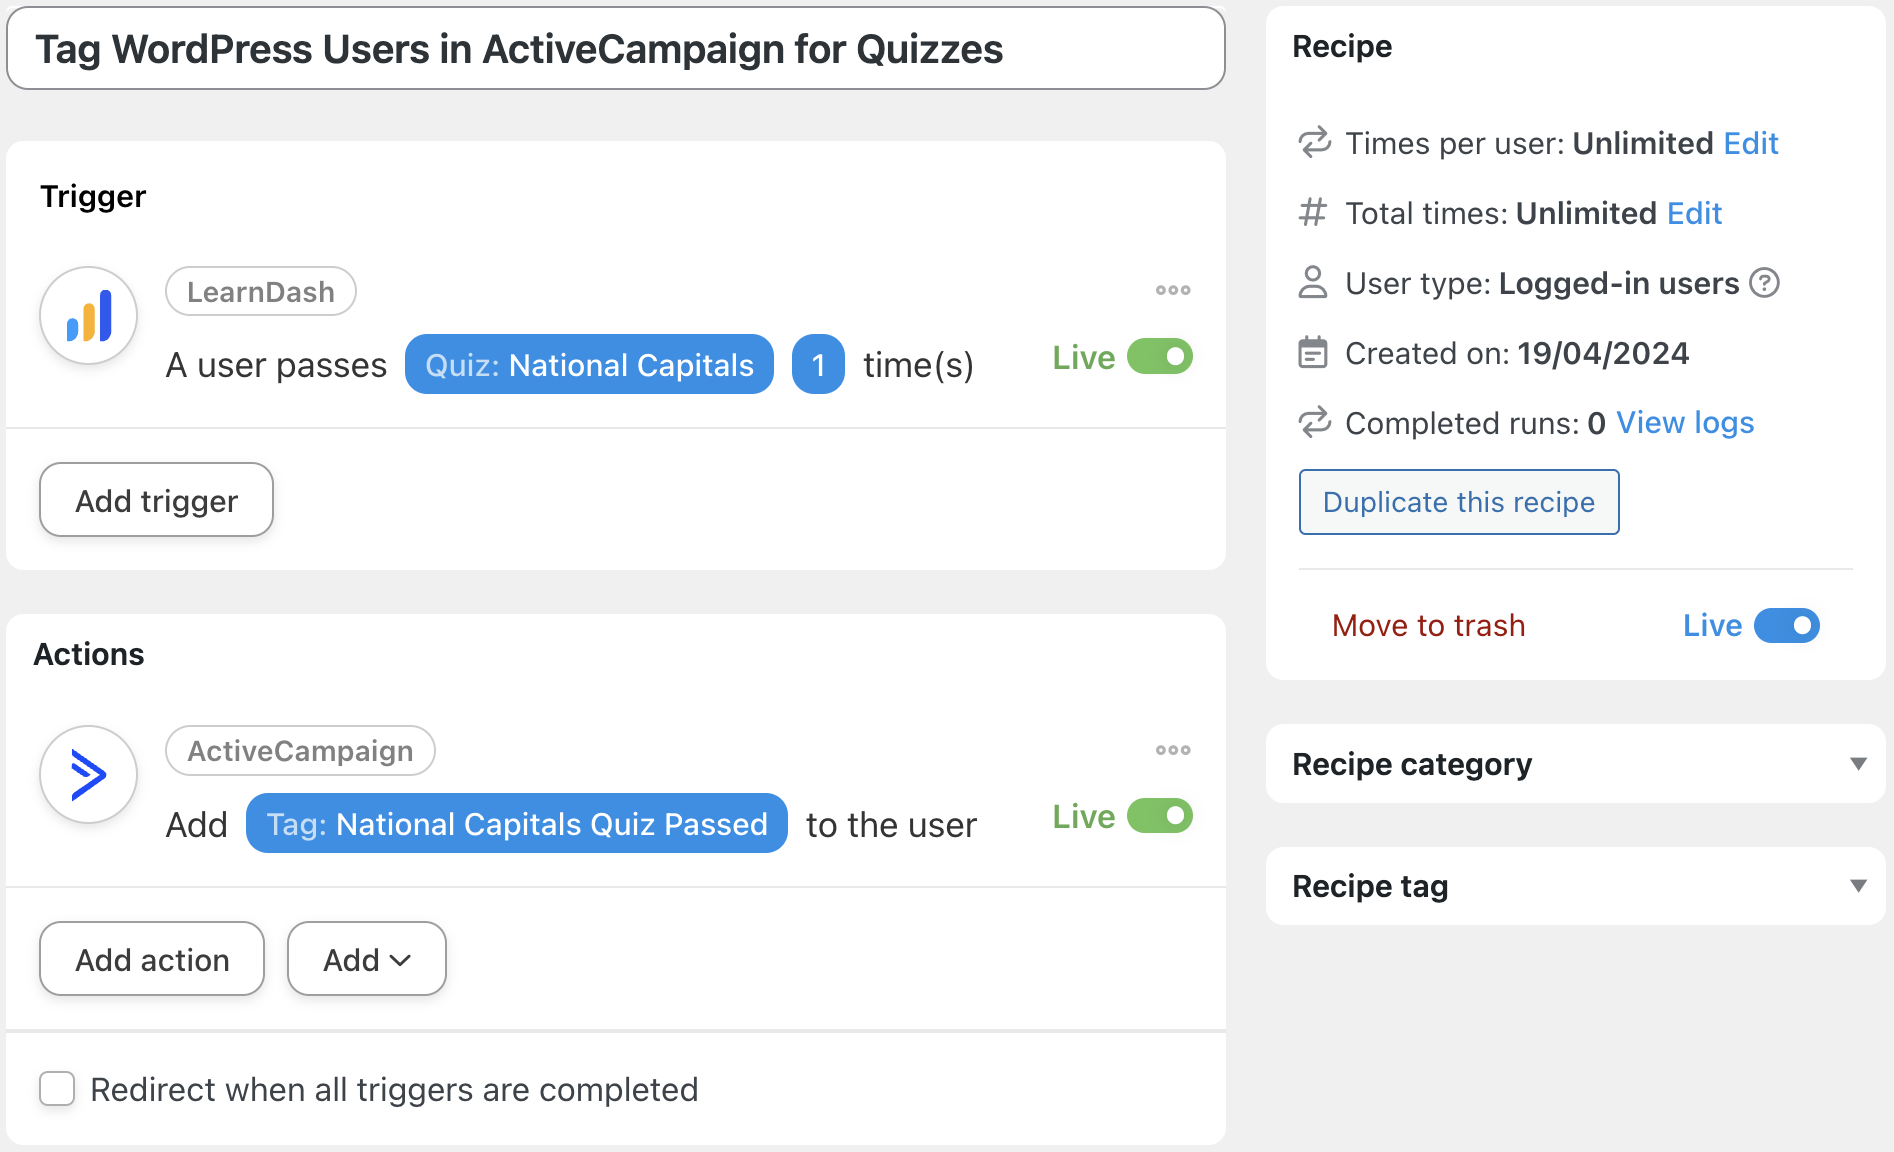
As in the recipe pictured above, we’ll be using LearnDash. However, Automator integrates just as well with LearnPress, Tutor LMS, LifterLMS, MasterStudy LMS and more.
Step 1: Create a New Recipe
From your WordPress Admin Dashboard, navigate to Automator > Add new recipe. In the pop-up window that appears, select Logged-in users.

Step 2: Name Your Recipe
Give your recipe a name that makes it easy to recognize at a glance. For example, we have named this recipe “Tag WordPress Users in ActiveCampaign for Quizzes”.
Step 3: Configure Your Trigger(s)
In the Trigger panel, from the menu of available integrations, select LearnDash or your preferred LMS.

From the dropdown list that appears, select your desired trigger. For example, we have selected A user passes a quiz.
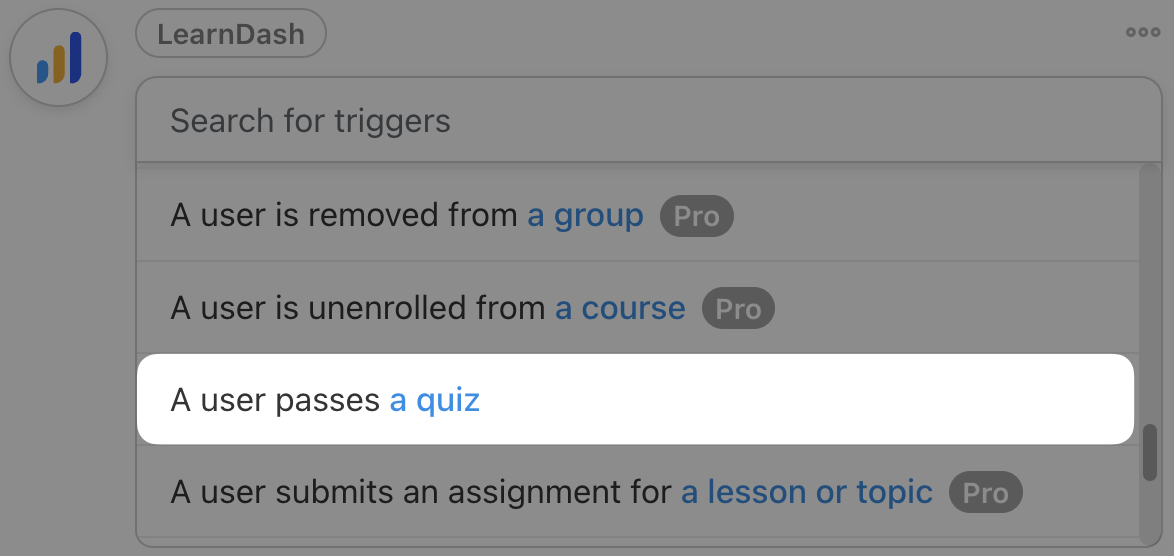
If your trigger had any bolded text highlighted in blue, Automator will prompt you to fill in those fields. For example, we have selected a quiz.
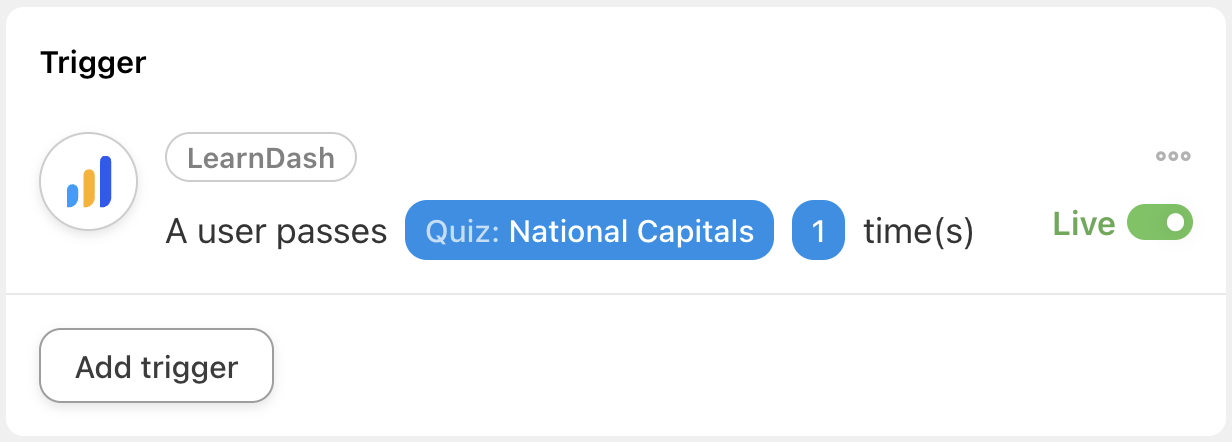
Once you’re finished, click Save. Your trigger should look something like this:
Step 4: Configure Your Action(s)
In the Actions panel, click Add action. From the menu of available integrations, select ActiveCampaign.
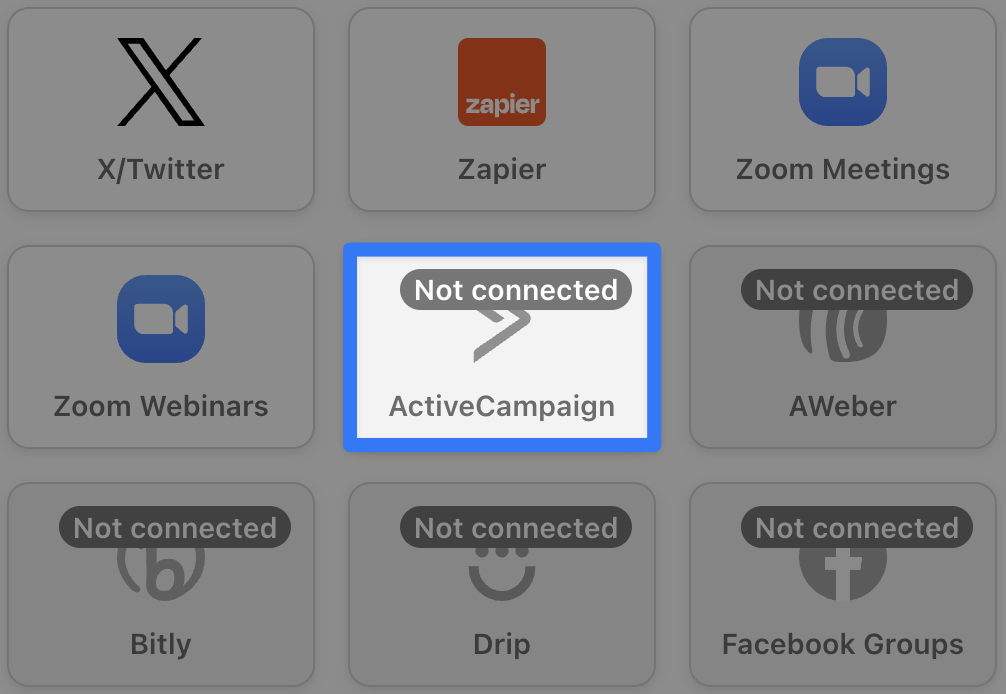
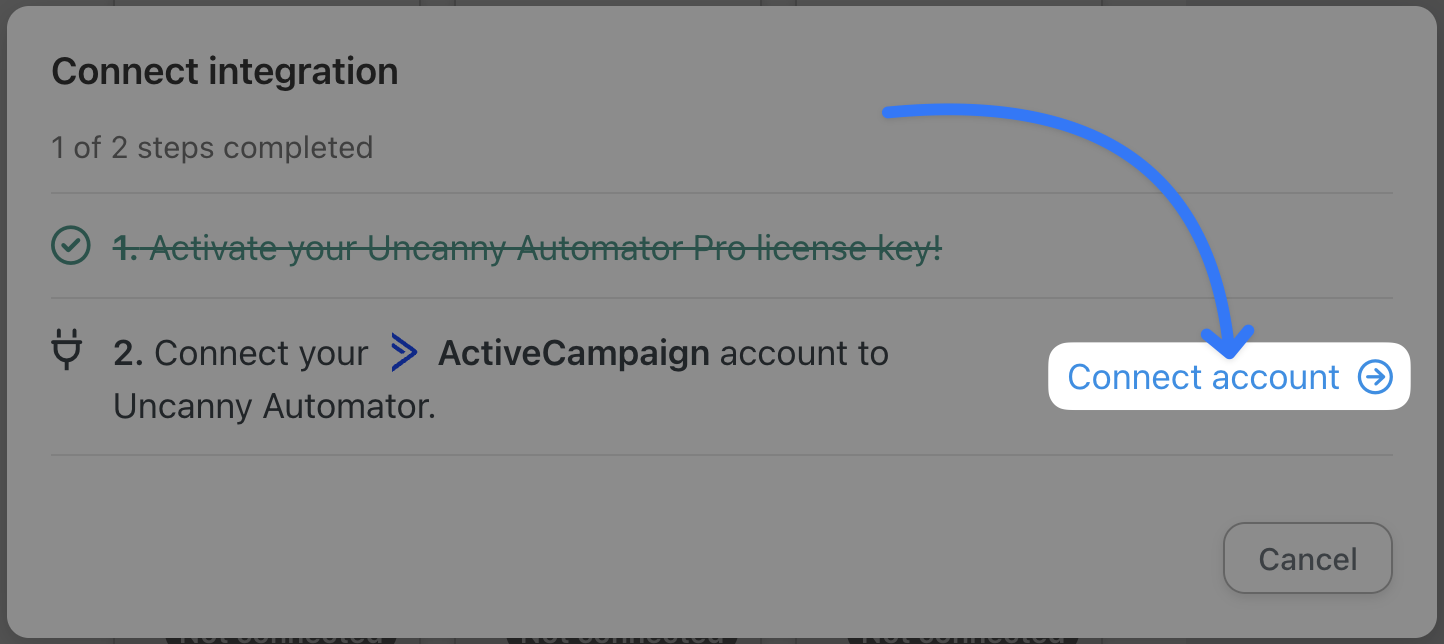
If you haven’t yet connected your ActiveCampaign account, then a pop-up window will appear. Click Connect account.
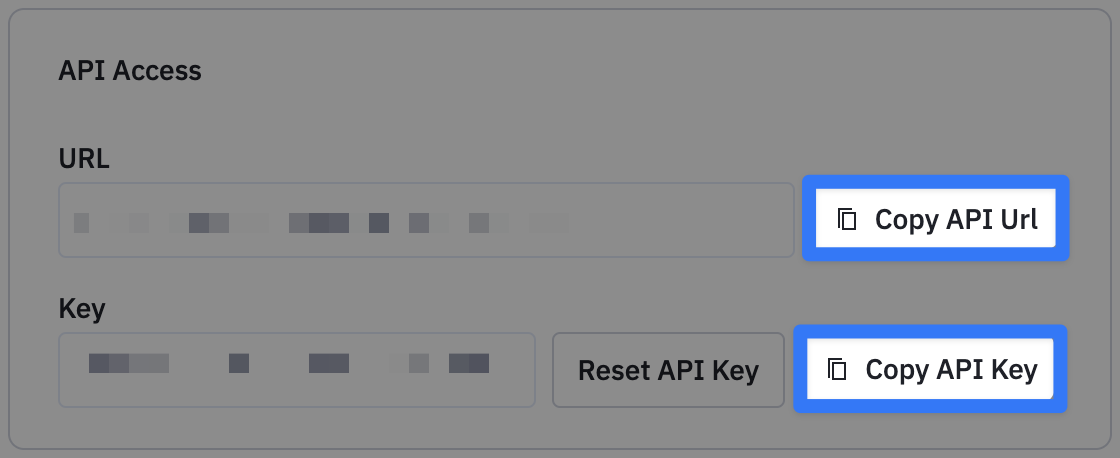
Another pop-up window will appear, prompting you to enter your Account URL and API key. To find these, go to your ActiveCampaign account and navigate to Settings > Developer. Copy the URL and API key.
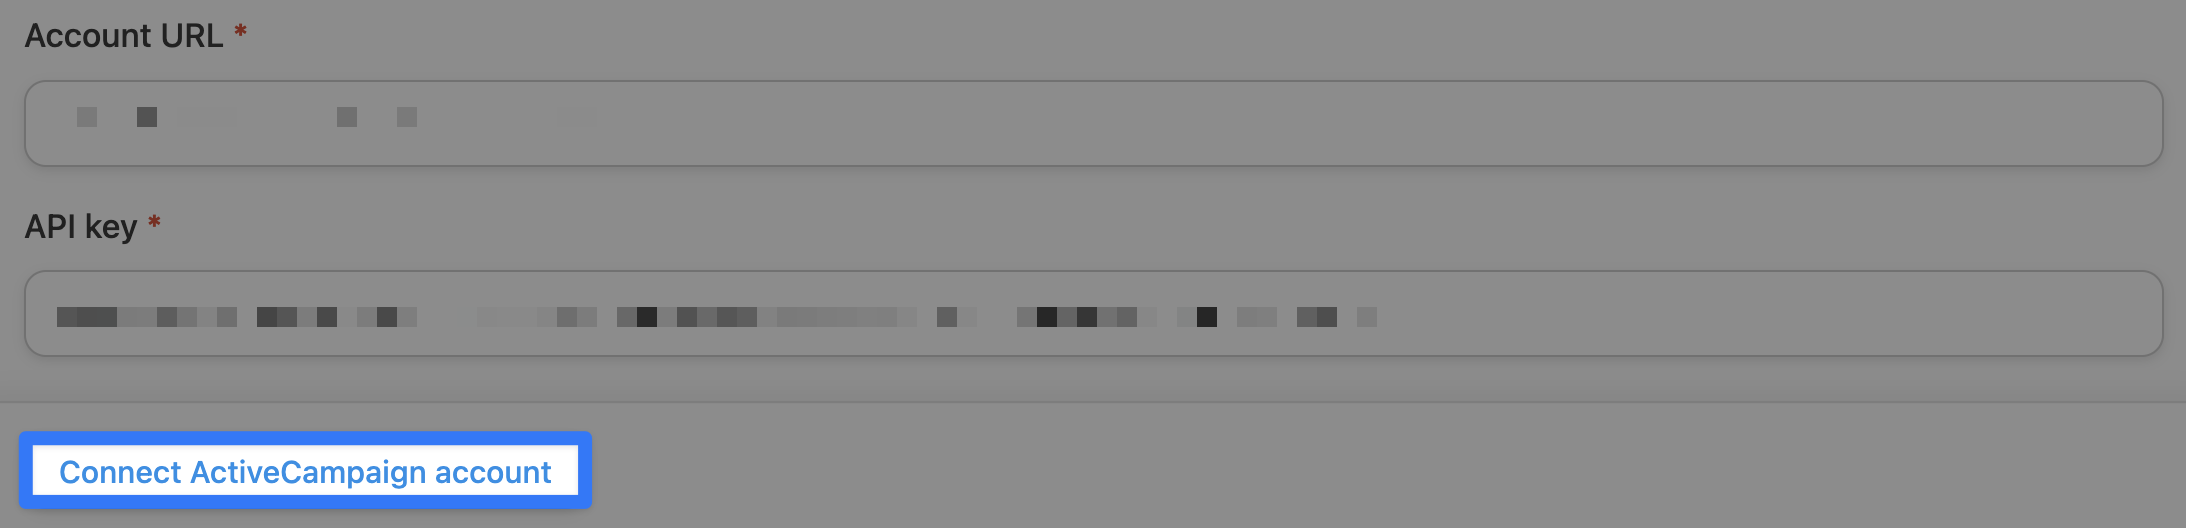
Paste the information into the corresponding fields in the Automator pop-up window. When you’re finished, click Connect ActiveCampaign account.
Next, click Save Settings and return to the recipe editor.
From the dropdown list appears, select Add a tag to the user.
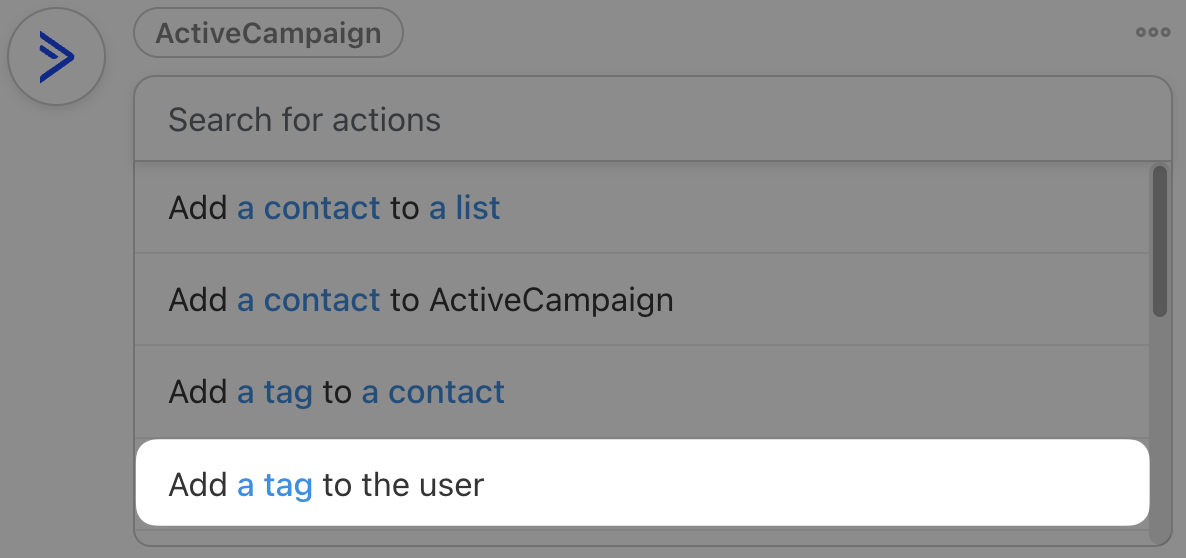
Automator will prompt you to select the tag you want to add to the user’s email in ActiveCampaign. Select the tag that corresponds to the LearnDash quiz from Step 3.
Once you’re finished, click Save. Your completed action should look something like this:

Step 5: Go Live!
You’re just about ready to connect ActiveCampaign to WordPress. All that’s left for you to do now is to toggle your recipe from Draft to Live.

That’s it! Now you see how easy it is to connect ActiveCampaign to WordPress with Automator, let’s take a look at some more advanced recipes. Don’t worry—they’re just as easy to cook up!
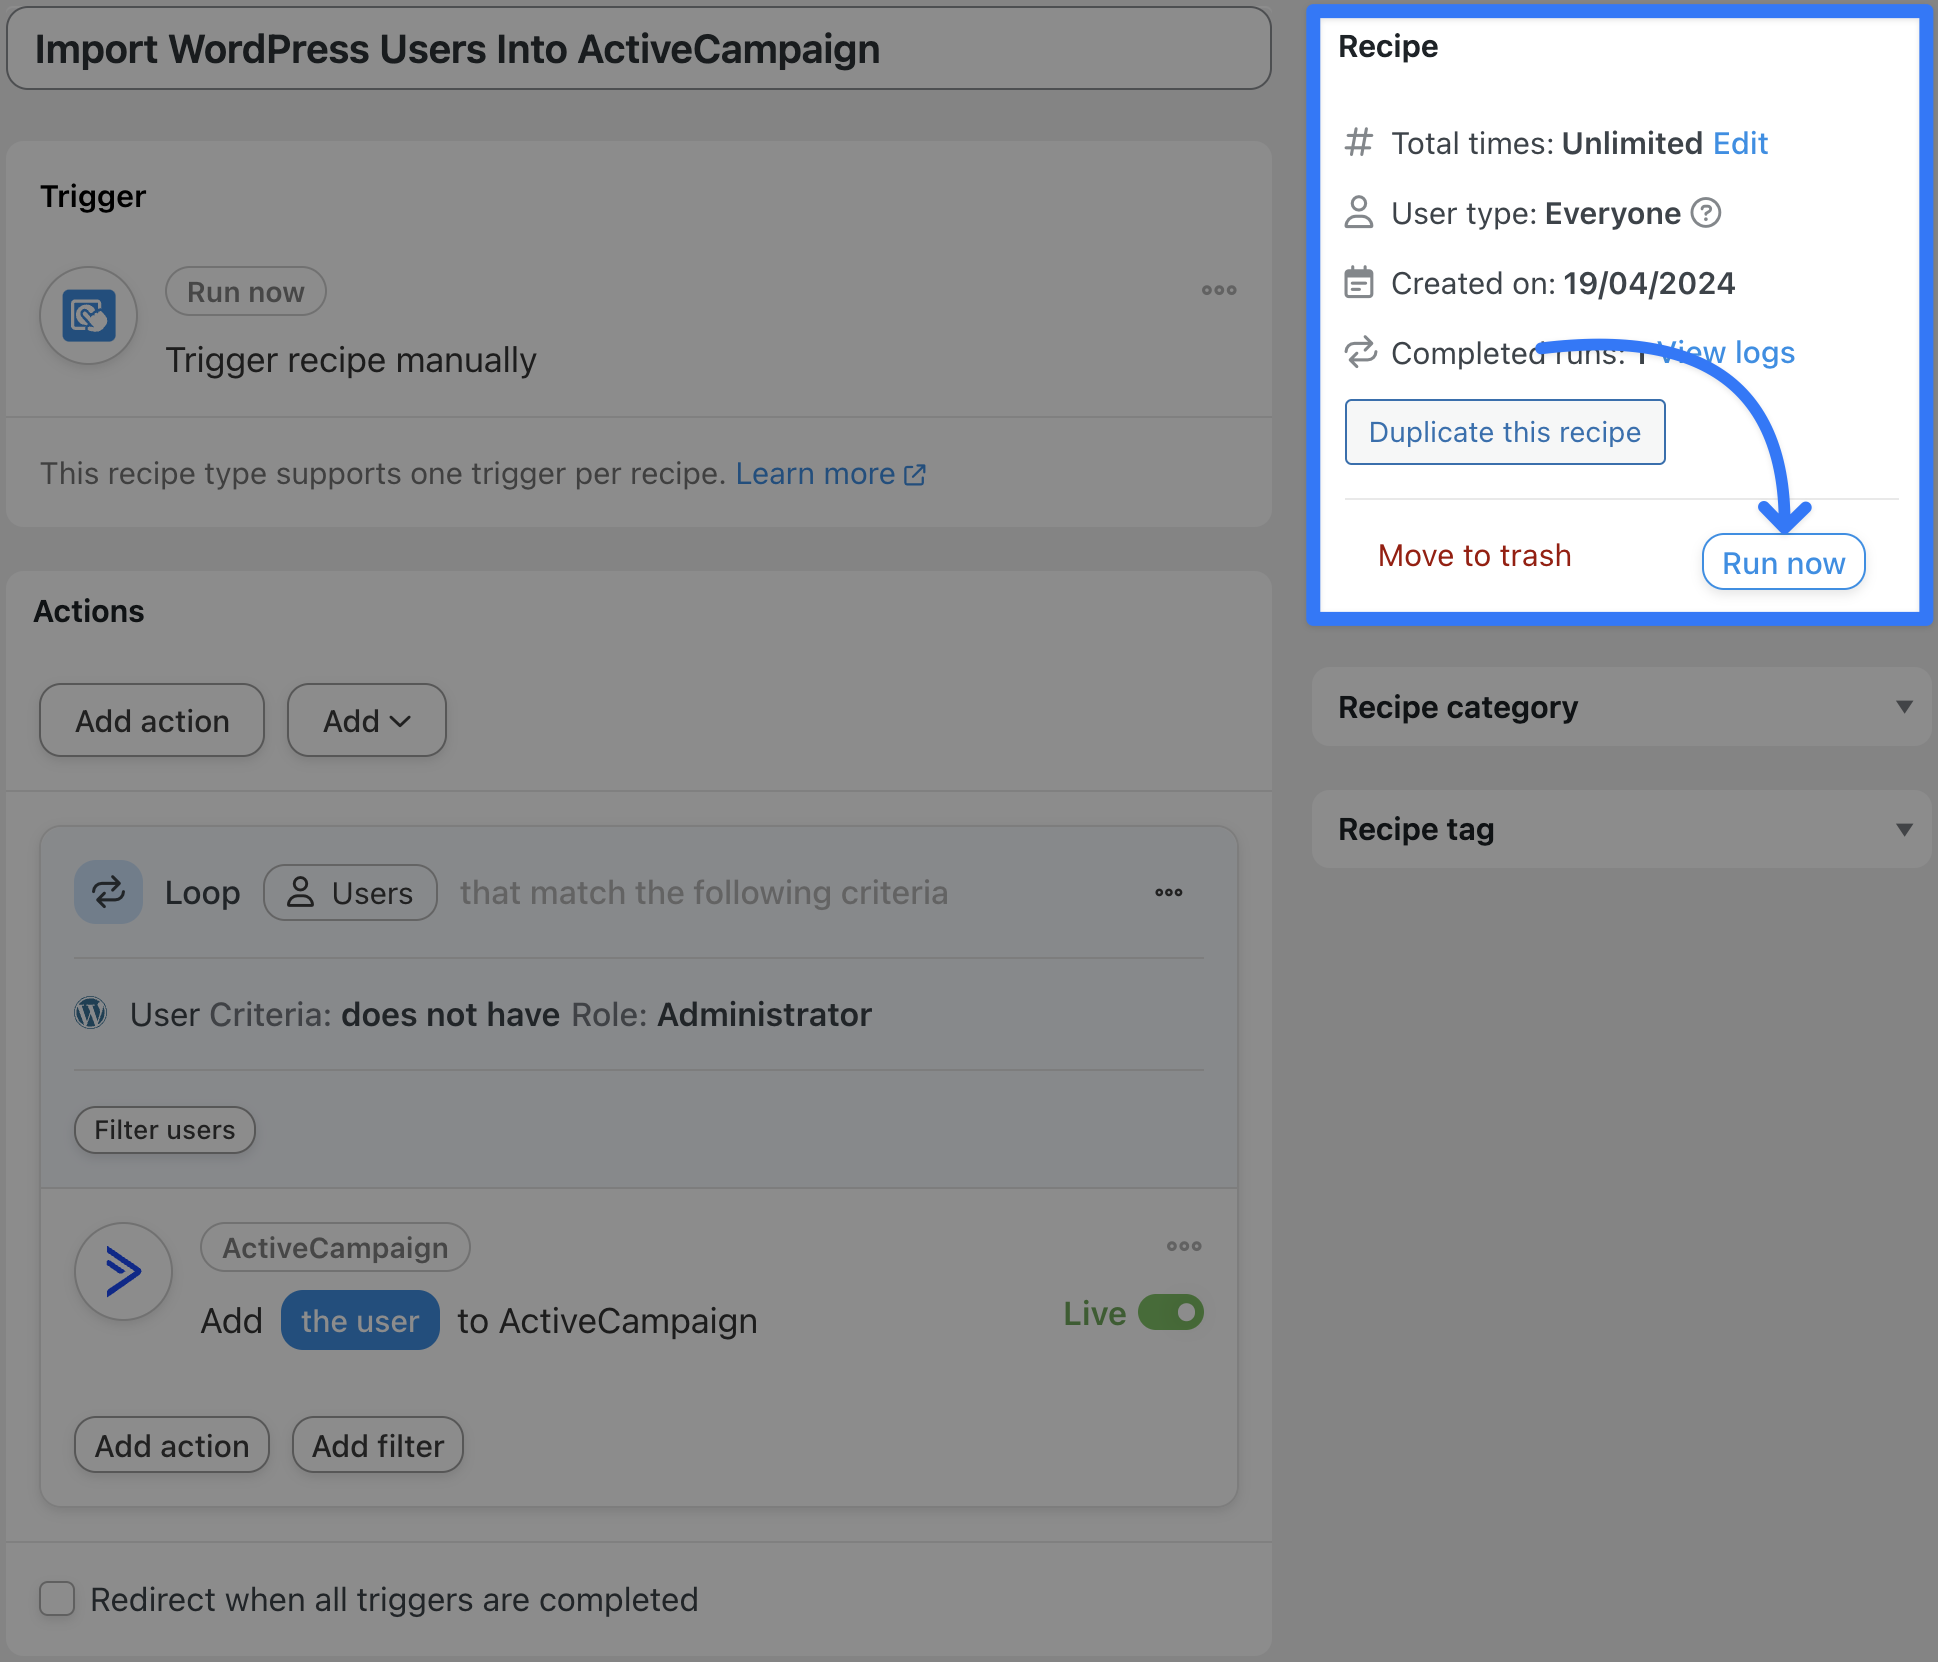
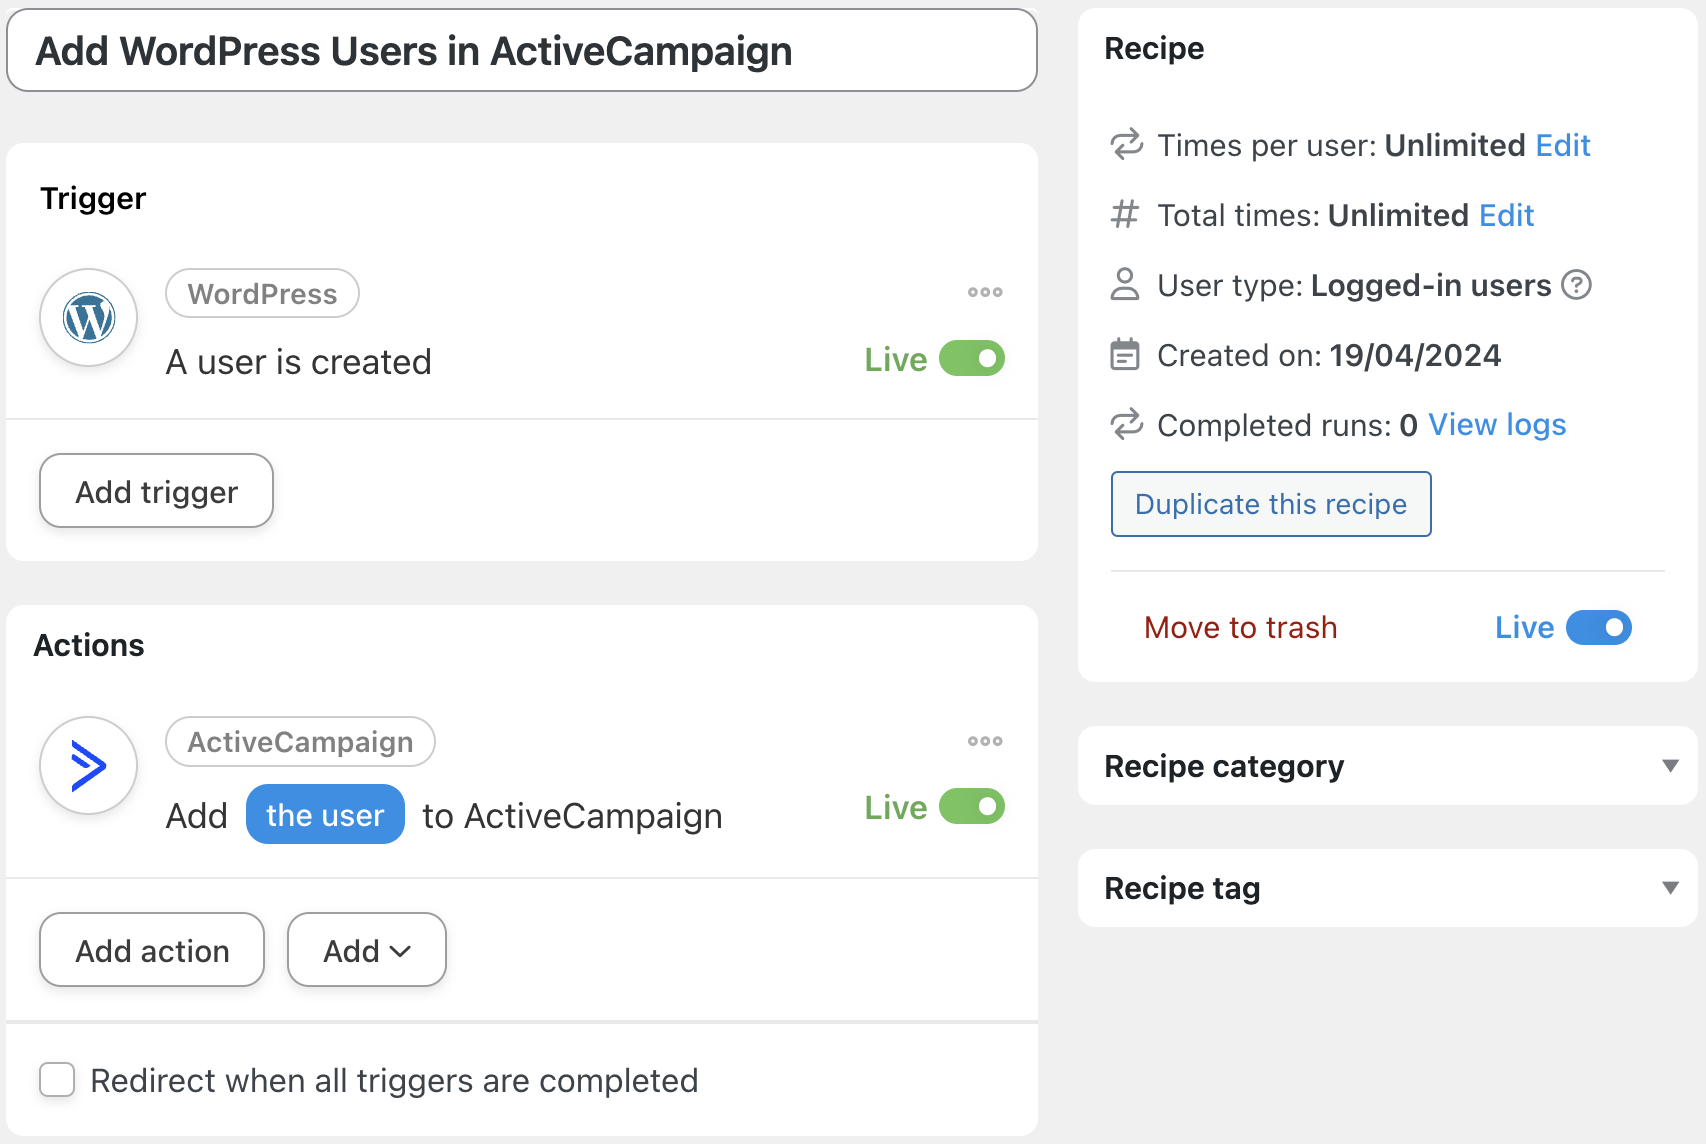
Import WordPress Users Into ActiveCampaign
We showed you how to tag your contacts in ActiveCampaign based on their activity on your WordPress website. But, how did all of our WordPress users get into ActiveCampaign in the first place?
With the click of a button, of course!
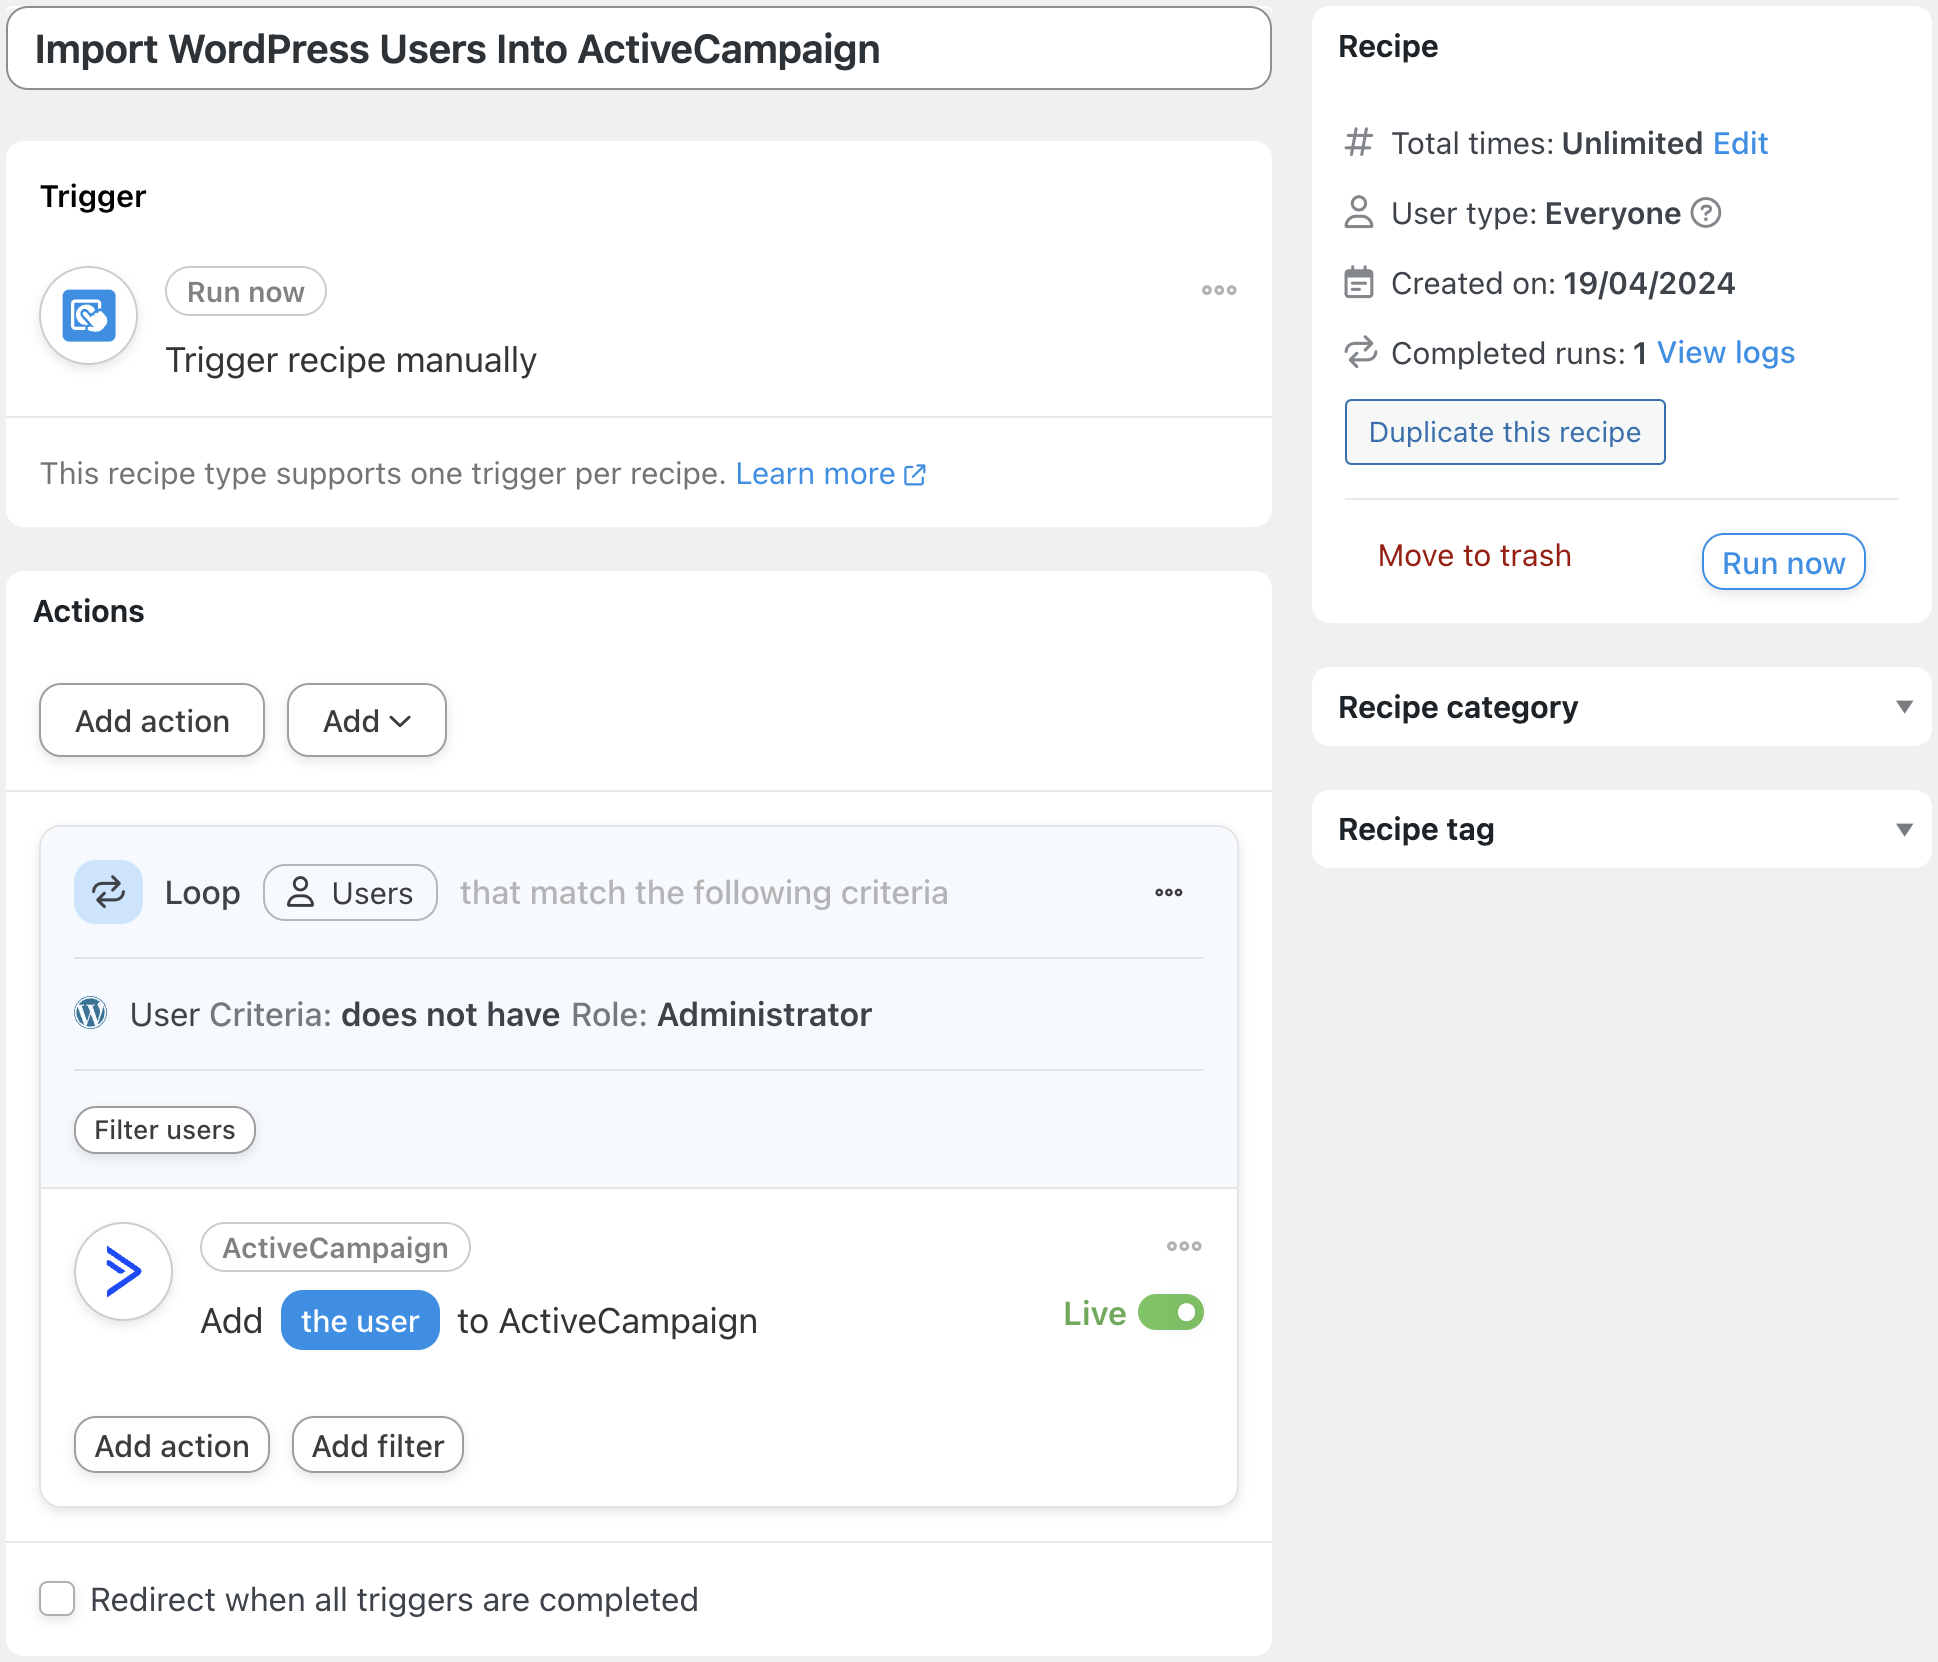
In the recipe pictured above, we used Automator’s powerful Loops feature to sync our WordPress user list with our ActiveCampaign account.
Here’s how we did it.
Step 1: Create a New Recipe
From your WordPress Admin Dashboard, navigate to Automator > Add new recipe. In the pop-up window that appears, select Everyone.
Step 2: Name Your Recipe
We named this recipe “Import WordPress Users Into ActiveCampaign”.
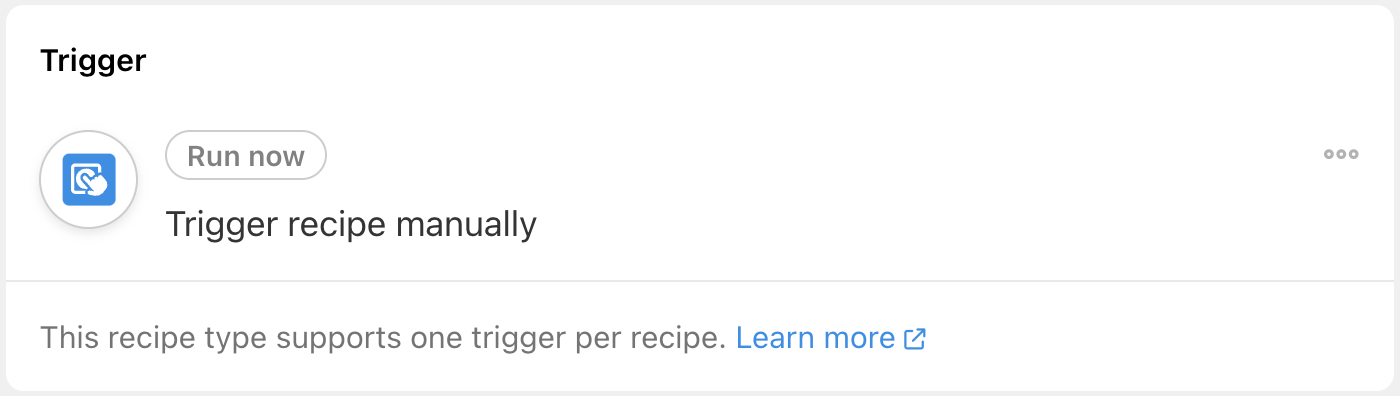
Step 3: Configure Your Trigger(s)
In the Trigger panel, from the menu of available integrations, select Run now. From the dropdown list that appears, select Trigger recipe manually. When you’re finished, your trigger should look like this:
Step 4: Configure Your Action(s)
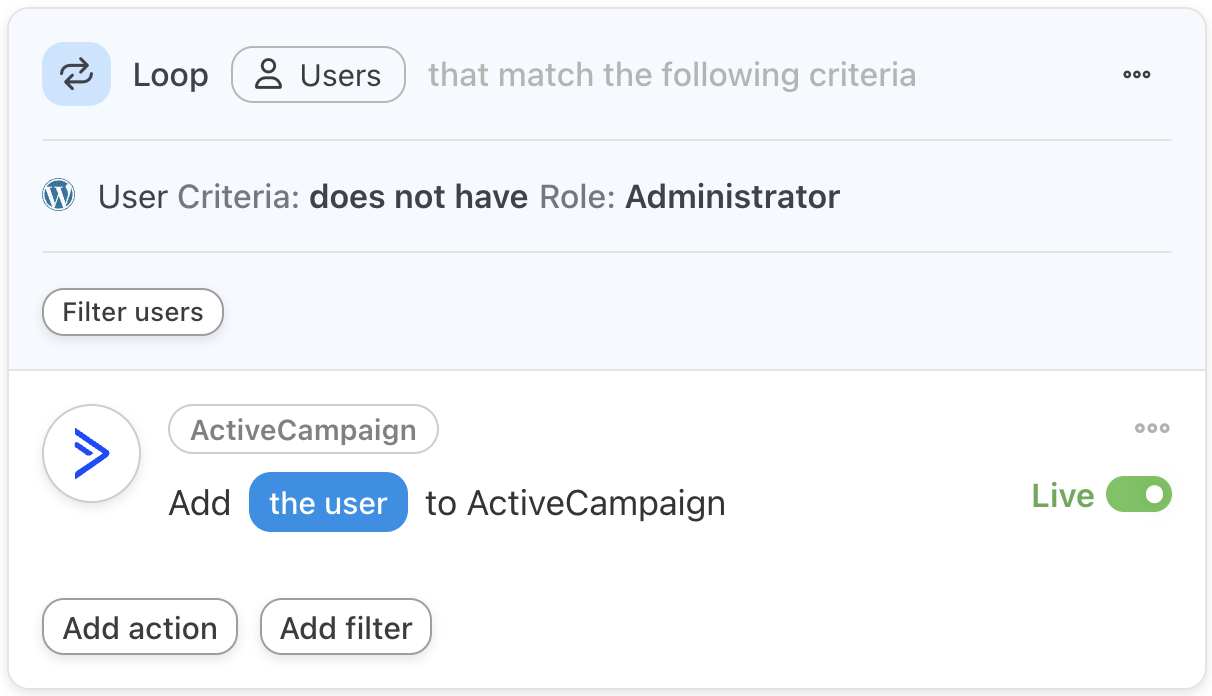
In the Actions panel, click Add and select User loop from the dropdown list.
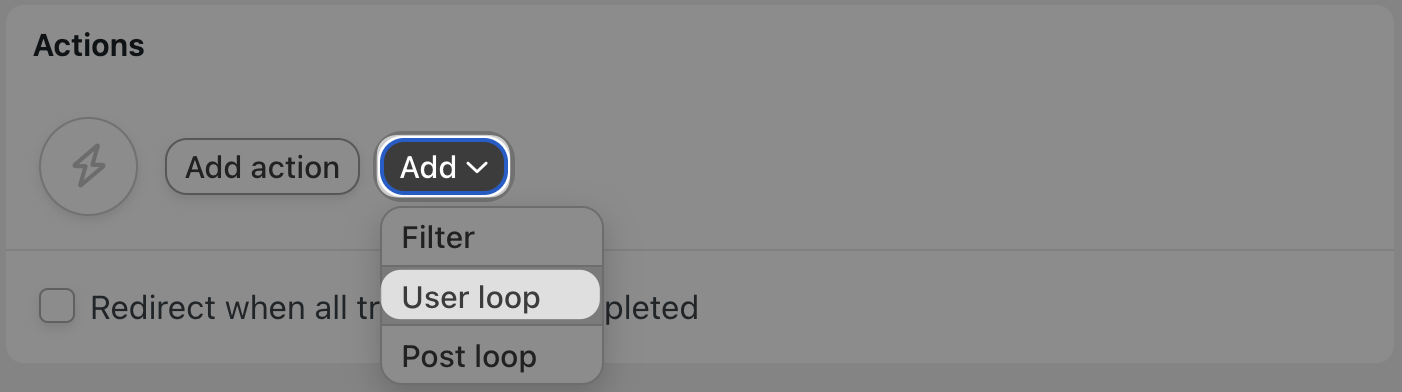
Automator will create a Loop pane within the Actions panel. By default, Automator will have applied a user filter to exclude WordPress admins from the actions. You can choose to remove this filter or add another one, depending on your own workflows.
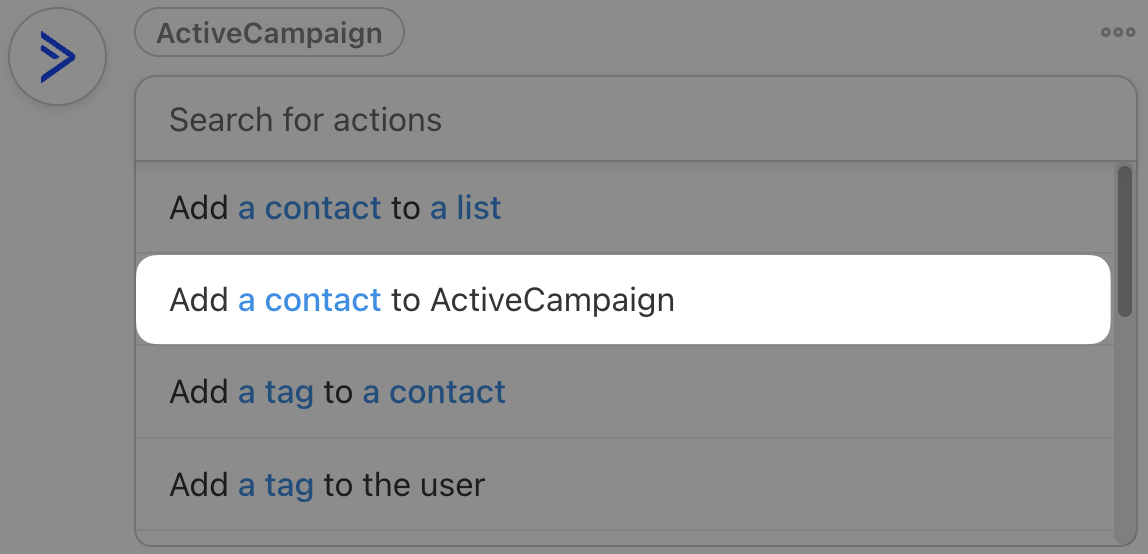
Click Add action within the Loop pane and select ActiveCampaign from the menu of available integrations. From the dropdown list appears, select Add the user to ActiveCampaign.
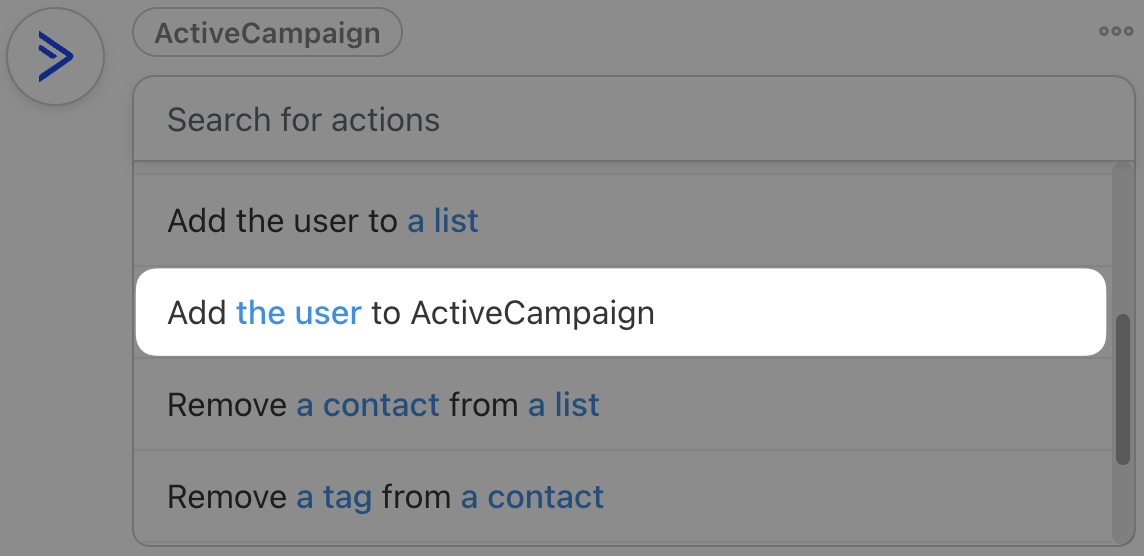
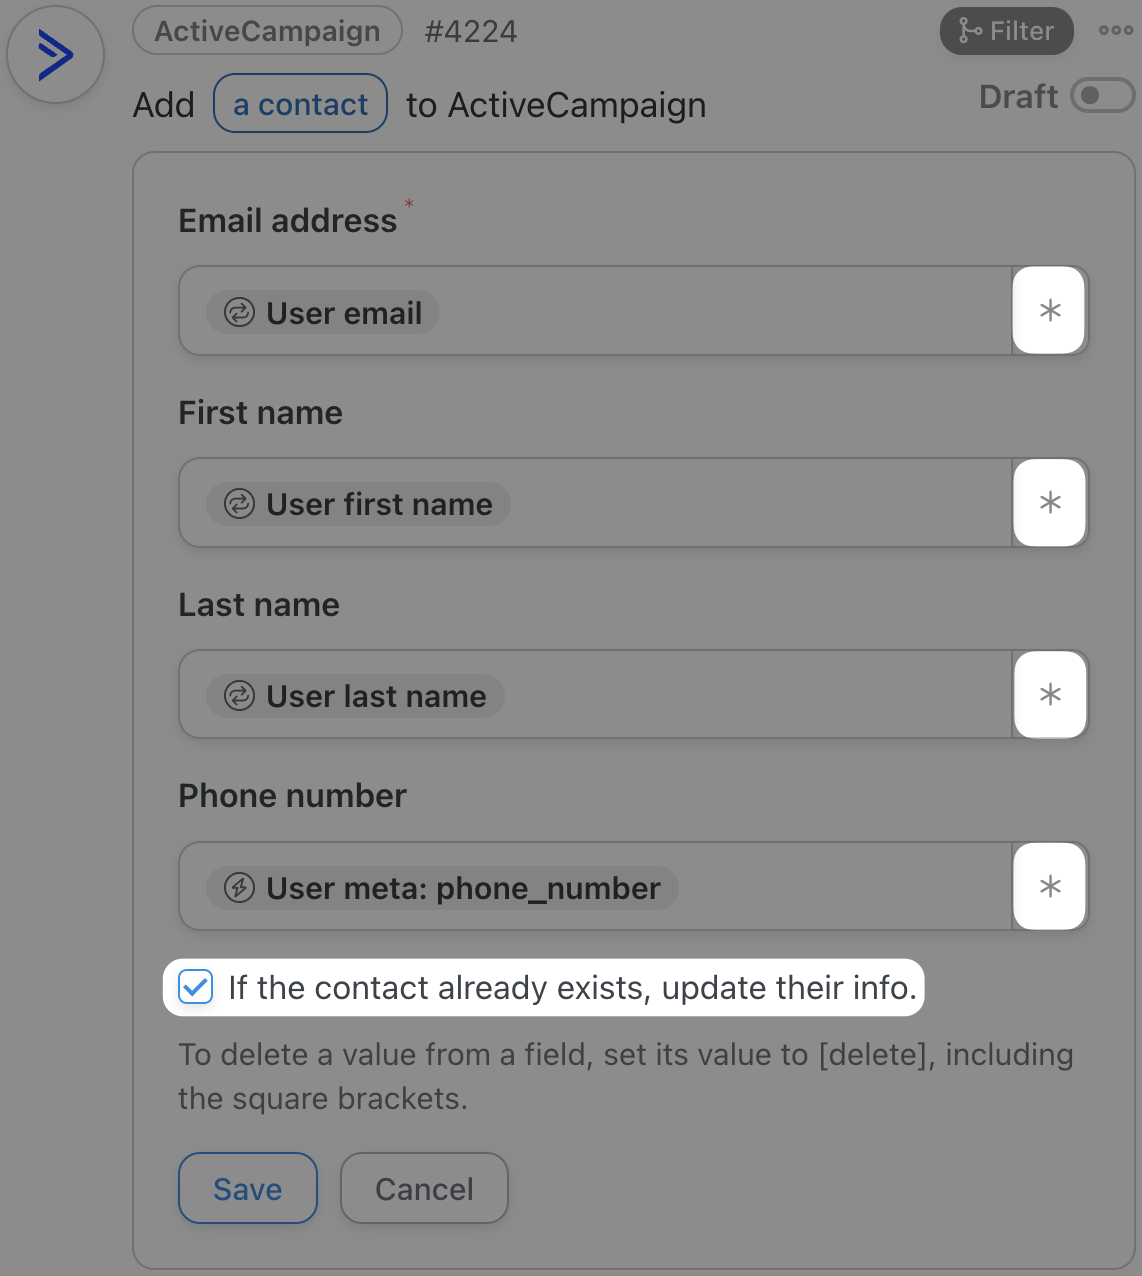
(Note: If you want to have slightly more control over how these WordPress users are imported into ActiveCampaign, you can select Add a contact to ActiveCampaign.)
You can then fill out these fields using tokens (i.e., dynamic data pulled from your WordPress website and from within recipes). To select a token, click on the Asterisk in each field.
Once you’re finished, your Loop pane should look something like this:
Step 5: Import Your Users!
You’re just about ready to import all of your WordPress users into ActiveCampaign. All you have to do is click Run now and let Automator do all of the work for you!
Of course, your WordPress user list isn’t a static list. As such, you can create another recipe to keep your WordPress users and ActiveCampaign contacts in perfect sync.
Connect WordPress to ActiveCampaign
So far, we’ve shown you recipes that connect ActiveCampaign to WordPress. But what about connecting WordPress to ActiveCampaign?
Automator supports ActiveCampaign triggers; meaning that changes you make to contacts in ActiveCampaign can affect changes on your WordPress website.
If you want to know how to set up these ActiveCampaign triggers, you can find a detailed guide in our Knowledge Base. Alternatively, find the abridged instructions below:
- From your WordPress Admin Dashboard, navigate to Automator > Settings > App integrations > ActiveCampaign.
- In the ActiveCampaign integration panel, toggle Enable triggers to the “on” position. Copy the Webhook URL provided to your clipboard.
- From your ActiveCampaign account, navigate to Settings > Developer and click Manage webhooks. In the new panel, click Add webhook and choose your webhook type (we recommend Standard).
- Fill out the fields, making sure to paste the Webhook URL from Automator into the URL field. When you’re finished, click Save.
- Return to your Automator window and click Save Settings. You can now find the ActiveCampaign triggers under the recipe type Everyone.
Now, how’s that for marketing automation?
Frequently Asked Questions
Conclusion
In this step-by-step tutorial, we showed you what makes Automator the best tool for creating an ActiveCampaign integration for WordPress. We even walked you through connecting your WordPress website to your ActiveCampaign account!
We’re pretty confident that you’re ready to tackle some recipes of your own. However, if you still have questions or would like to know more about this integration, drop us a line in the comments section below.
Until next time, happy automating!

Related Posts


Comments (0)