

Any AI app that supports remote MCP servers can connect to your WordPress site through Uncanny Automator, including desktop apps, editors, terminal tools and self-hosted agents such as Cursor, Claude Code, VS Code and Codex. This article lists the settings those apps need, the steps to finish connecting, and fixes for the common problems.
An MCP server is how AI apps such as ChatGPT or Claude connect to other software. Uncanny Automator is an MCP server for WordPress with a built-in automation engine: it connects your AI to your WordPress site. It is built on the open Model Context Protocol standard.
For ChatGPT, Claude, Gemini, Microsoft 365 Copilot and Perplexity, follow that app’s own article instead (linked at the end). This is also not the AI integrations in recipes, such as OpenAI, which add a provider’s API key so a recipe action can call a model.
What you need
- A WordPress site running Uncanny Automator 8.0.0 or newer, at a public web address. mcp.automatorplugin.com can’t reach a site on a local address, even when your AI app runs on the same computer as the site.
- An Uncanny Automator account. A free account is enough: on the Lite plan you get 300 tool uses a day for your first week, then 150 a day, shared across all your sites and AI apps. A tool use is one thing your AI does on your site through Uncanny Automator. Paid plans have unlimited tool usage. See Tool uses and the daily limit.
- An AI app that connects to remote MCP servers over Streamable HTTP with OAuth sign-in, using MCP protocol versions 2024-11-05 through 2026-07-28. Apps that only support the older SSE transport, only run local servers, or only accept a static API key can’t connect.
Connect your site first
Your AI app gets its tools from the sites connected to your Uncanny Automator account, so the setup page opens only after at least one site is connected. If you haven’t connected a site yet, follow Connect your WordPress site at mcp.automatorplugin.com, then come back here.
Open the setup page for another app
- Go to mcp.automatorplugin.com and sign in with your Uncanny Automator account. If your account has more than one license, choose one first. The Connections page opens.
- Click Connect an AI (it reads Connect another AI once an AI app is connected).
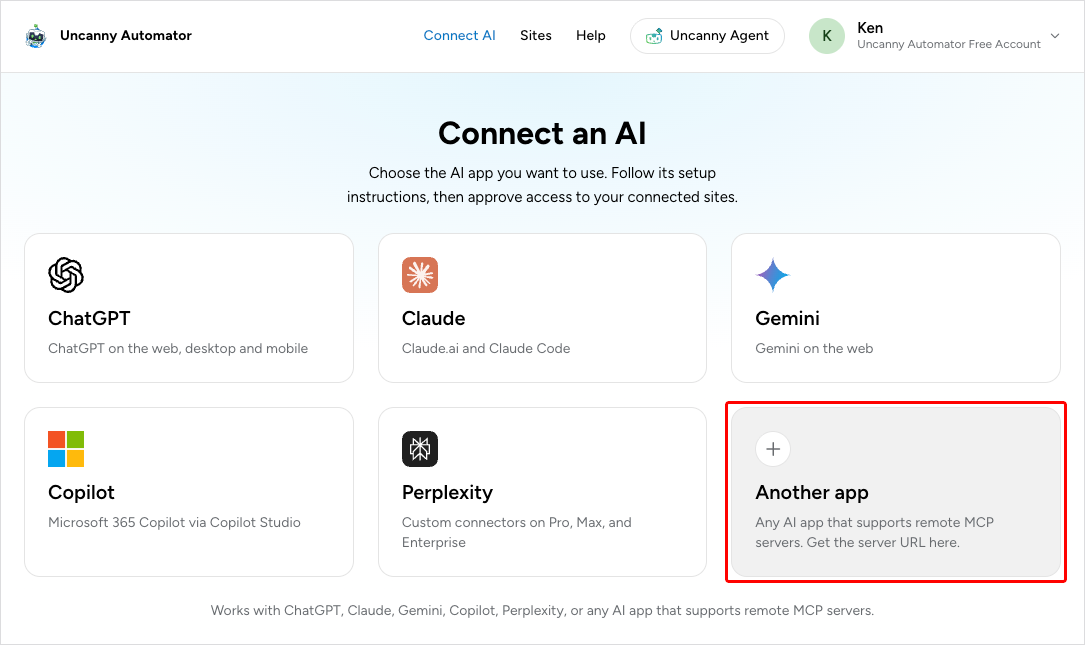
- Click the Another app card.
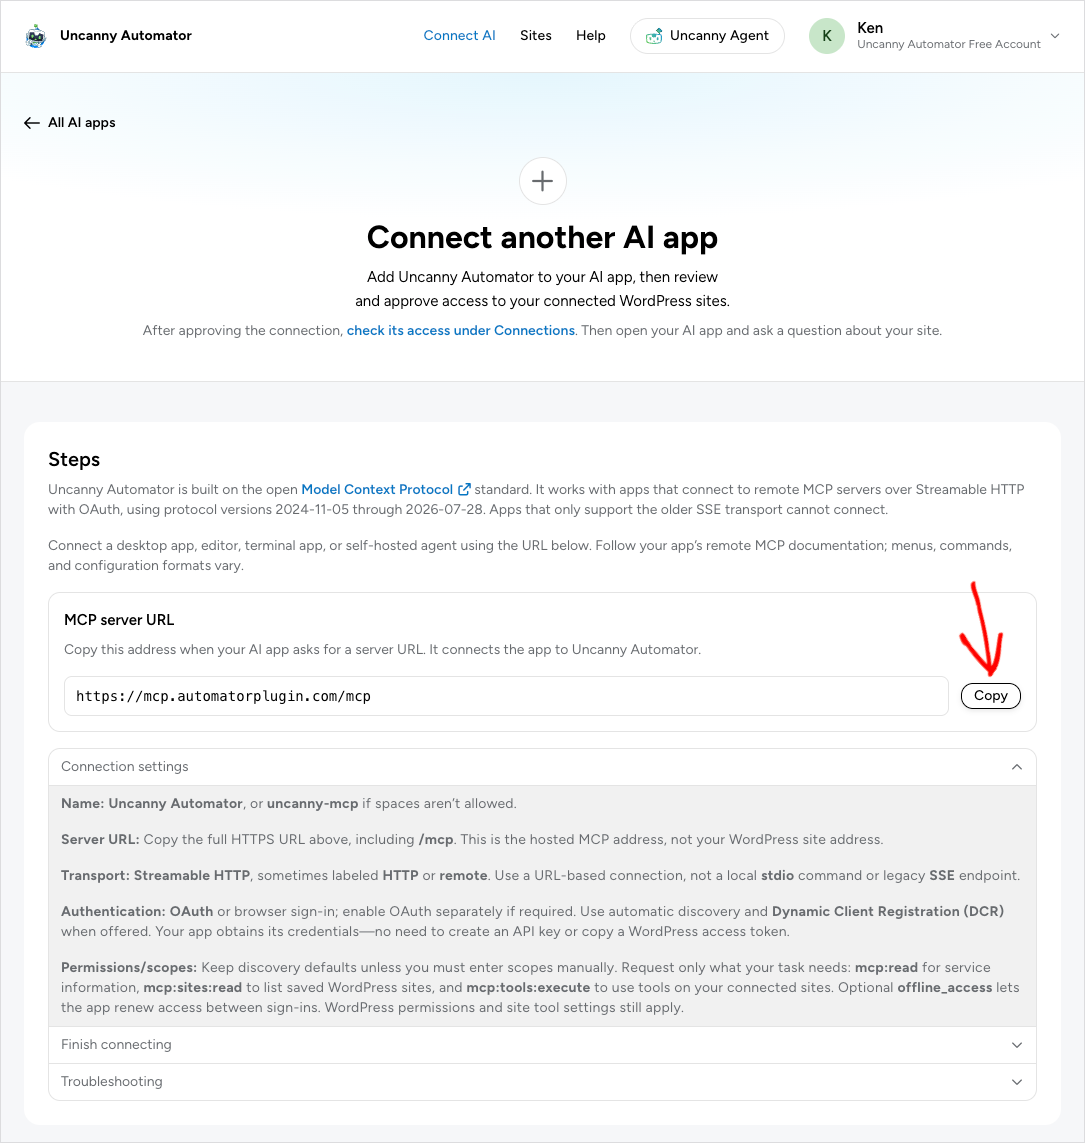
The Connect another AI app page opens. Under Steps it shows the server address under MCP server URL, then three sections you can open: Connection settings, Finish connecting and Troubleshooting. The rest of this article follows the same order.
- Under MCP server URL, click Copy.
Connection settings
Enter these in your app’s remote MCP settings. Menus, commands and configuration formats vary from app to app, so use your app’s own MCP documentation to find where each one goes.
| Setting | Value | Notes |
|---|---|---|
| Name | Uncanny Automator, or uncanny-mcp if spaces aren’t allowed |
Some apps show this name in their tool list. |
| Server URL | https://mcp.automatorplugin.com/mcp |
The full HTTPS address, including /mcp. It is the same for every account, and it is not your WordPress site’s address. |
| Transport | Streamable HTTP | Sometimes labeled HTTP or remote. Use a URL-based connection, not a local stdio command or an SSE endpoint. |
| Authentication | OAuth (browser sign-in) | Turn on OAuth if your app asks. Use automatic discovery and Dynamic Client Registration when offered: the app gets its own credentials, so you don’t create an API key or copy a WordPress password or token. |
| Scopes | Keep the discovery defaults | If you must enter scopes, request only what you need: mcp:read for service information, mcp:sites:read to list your connected sites, mcp:tools:execute to use tools on them, and optionally offline_access so the app can renew its access between sign-ins. |
Your WordPress permissions and each site’s tool settings still apply, whatever scopes the app has.
Finish connecting
- Save the connection in your app and run its MCP connect, authenticate or login step. Terminal apps may need a separate command for this.
- In the browser window that opens on mcp.automatorplugin.com, sign in with your Uncanny Automator account, review the requested access, and click Approve connection. The approval covers every connected site on your current license, including sites you connect later.
- Return to your app and enable the server and its tools for your chat or agent. If your app needs it, reload its MCP connections or start a new session.
- Test with a read-only request, such as “What plugins are installed on my site?”. Name the site if several are connected.
Copying the URL or saving the connection doesn’t prove the tools work; only a request that returns an answer from your site does. Each thing your app does on your site counts as one tool use.
Note: To connect more WordPress sites, use the Your sites link on the setup page. Sites you connect later join the approval without another sign-in.
What the approval page shows
The approval page names your app the way the app names itself. If the app doesn’t send a name, the page uses its return address instead, such as “An app on this computer” for a tool that signs in through a local address. Return address shows where the browser sends the result, so check it matches the app you’re connecting.
The heading depends on the scopes the app asks for:
- Connect [app name] to your WordPress sites? — the app asked for
mcp:tools:execute. It can read and make changes on each site within that site’s WordPress permissions, and Sites included in this approval lists the sites it can use. Approve connection stays unavailable until at least one site is connected or added back. - Let [app name] see your WordPress sites? — the app asked for
mcp:sites:readwithout tools. It sees your sites’ names, addresses and connection status, but can’t read or change their content or settings. - Connect [app name] to your Automator account? — the app asked for neither. It can read Uncanny Automator’s guides and service information only.
Access lasts up to 90 days when the app asks for offline_access and can renew its access, as ChatGPT and Claude do. An app that doesn’t ask for it gets up to 7 days. The approval page shows which applies, and after that the app asks you to connect again. Claude Code adds the server name you chose as a label next to the heading, so you can tell two Claude Code connections apart.
Troubleshooting
- No browser window opens — start MCP authentication from your app. If it prints a sign-in link, open it while the app is still waiting for approval.
- The app runs over SSH, in a container or on a remote server — the browser has to return the sign-in result to the machine running your app. A localhost return address points to the browser’s own machine, so follow your app’s instructions for forwarding the callback or for a manual return.
- The app only has API key or local command fields — check your app’s documentation for remote HTTP with OAuth and update the app if needed. If it asks for a client ID or client secret, look for automatic registration instead. Never enter WordPress credentials.
- Signed in, but tools or sites are missing — enable the MCP tools in your app, check that the site is connected, review the site’s tool settings in WordPress, then refresh the app’s tool list. If a site needs reconnecting, use the Your sites link on the setup page. To restore a site you removed from this app, connect the app again and select Add back on the approval page.
- Expired sign-in, denied access or connection errors — start a fresh sign-in from your app. Check that the full server URL is correct and that the app’s machine can reach it, and update the app if it reports an unsupported protocol. Use the app’s own MCP connection test: opening the URL in a browser is not a connection test.
For more help, see Troubleshooting AI connections and the MCP project’s guide to connecting remote servers.
For developers
These details help when your client needs manual configuration or you’re debugging a sign-in.
- Discovery — protected resource metadata is at
https://mcp.automatorplugin.com/.well-known/oauth-protected-resource/mcpand authorization server metadata athttps://mcp.automatorplugin.com/.well-known/oauth-authorization-server. - Client registration — Dynamic Client Registration. Client ID metadata documents are not advertised.
- Redirect URIs — between one and ten, each HTTPS or a loopback HTTP address (
localhost,127.0.0.1or::1), with no fragment or user information. - Token endpoint authentication —
none,client_secret_postorclient_secret_basic. Authorization responses come back in the query string of the registered callback. - Lifetimes — access tokens last one hour. The connection lasts 7 days, or 90 days with
offline_accessand a refresh token. - Tool list changes — when a tool’s schema changes, refresh the client’s tool list before calling it again.
The MCP authorization reference describes the sign-in flow these settings follow.
What to do next
- What your AI can do on your site: the kinds of work your app can do through Uncanny Automator.
- Choose what your AI can access: the switches on each site for tools, Automator actions and WordPress abilities.
- Manage and remove AI connections: your app’s site access, last use and recent activity on the Connections page, and how to disconnect it.
Related: Connect your AI to your WordPress site, Connect ChatGPT to your WordPress site, Connect Claude to your WordPress site, Connect Gemini to your WordPress site, Connect Microsoft 365 Copilot to your WordPress site, Connect Perplexity to your WordPress site


Comments (0)