

Uncanny Automator is an MCP server for WordPress with a built-in automation engine: it connects your AI to your WordPress site. An MCP server is how AI apps such as ChatGPT or Claude connect to other software. Once your AI is connected, you can manage and automate the site by asking the AI app you already use.
This article covers what you need, how the connection works, and the five steps from a new site to your first task. Each AI app has its own article with its exact steps.
Note: This is not the same as the AI integrations in recipes, where you add an OpenAI, Anthropic, Google Gemini or Perplexity API key so a recipe action can call a model. For those, see Connecting Anthropic to WordPress and the other provider articles.
What you need
- A WordPress site with Uncanny Automator 8.0.0 or newer, reachable on the internet at an address that starts with
https://. Uncanny Automator has to reach the site to connect it, so a local development site or anhttp://address can’t connect. If the plugin isn’t installed yet, see Installing Uncanny Automator. - A free Uncanny Automator account or an Uncanny Automator Pro license. A free account is enough: linked to the site, it puts the site on the Lite plan. With Uncanny Automator Pro, you activate your license key on the site instead (step 1 below).
- An administrator login for the site. Only a WordPress administrator can approve the connection.
- An AI app that can add a remote MCP server: ChatGPT, Claude, Gemini, Copilot, Perplexity, or any AI app that supports remote MCP servers.
On Lite you get 300 tool uses a day for your first week, then 150 a day, shared across all your sites and AI apps. A tool use is one thing your AI does on your site through Uncanny Automator. Paid plans have unlimited tool usage. Lite connects as many sites as you like. See Tool uses and the daily limit and the pricing page.
Each AI app has its own account requirements:
| AI app | What it needs | Steps |
|---|---|---|
| ChatGPT | ChatGPT on the web, desktop or mobile. The Free plan can add a custom MCP server and use it to read and make changes on your site. | Connect ChatGPT to your WordPress site |
| Claude | Claude on claude.ai. On a Team or Enterprise plan, an Owner adds the connector for the organization first. | Connect Claude to your WordPress site |
| Gemini | Gemini on the web with a personal Google account in the US, age 18 or older, using English, with Keep activity turned on (in Gemini, Settings > Activity). A work or school (Google Workspace) account may not show the option to add a custom app at all. | Connect Gemini to your WordPress site |
| Copilot | Microsoft 365 Copilot, set up in Copilot Studio with a work or school account that has Copilot Studio access. Personal Microsoft Copilot can’t connect. | Connect Microsoft 365 Copilot to your WordPress site |
| Perplexity | A Pro, Max or Enterprise plan. The Free plan has no option to add an MCP connector. | Connect Perplexity to your WordPress site |
| Another app | Any app that connects to remote MCP servers over Streamable HTTP with OAuth sign-in. | Connect another AI app or developer tool |
How the connection works
Your AI app doesn’t connect to your site directly. It connects to Uncanny Automator at mcp.automatorplugin.com, the hosted connection, which passes the AI’s requests to the sites you’ve connected. That means you approve two things:
- Your site. You connect the site at mcp.automatorplugin.com and approve the connection in your WordPress dashboard. Your AI then works on the site as the WordPress administrator who approved it, so your WordPress permissions still apply.
- Your AI app. When you add Uncanny Automator to your AI app, the app opens mcp.automatorplugin.com, where you review its access to your connected sites and approve it.
Every AI app uses the same server address, https://mcp.automatorplugin.com/mcp. Your sign-in tells your account apart, so there is no separate address for each site. One approval covers every site you’ve connected on your license, including sites you connect later.
Neither approval offers a choice of access level, such as read-only. You choose what the AI may use on each site under Automator > Settings > MCP settings, and the choice applies to every AI app connected to that site. See Choose what your AI can access.
Step 1: Link your site with a free account or a Pro license
The site needs a free Uncanny Automator account or an Uncanny Automator Pro license. If you completed the first step of the Setup wizard, it already has one and you can go to step 2.
With a free account
Link the site to a free Uncanny Automator account as described in Connecting your site with a free Uncanny Automator account. The site is then on the Lite plan, with a daily limit on tool uses.
With an Uncanny Automator Pro license
With a Pro license, you activate your license key on the site instead of linking a free account, and your AI has unlimited tool uses. Copy the key from your purchase email or from your account on automatorplugin.com. See Where can I find my license key?
Activate the key in the Setup wizard or on the License settings page.
In the Setup wizard (Uncanny Automator Pro installed and active):
- Go to Automator > Setup wizard. Its first step, Activate license, is headed Activate your Pro license.
- Paste your key into Uncanny Automator Pro license key and click Activate license.
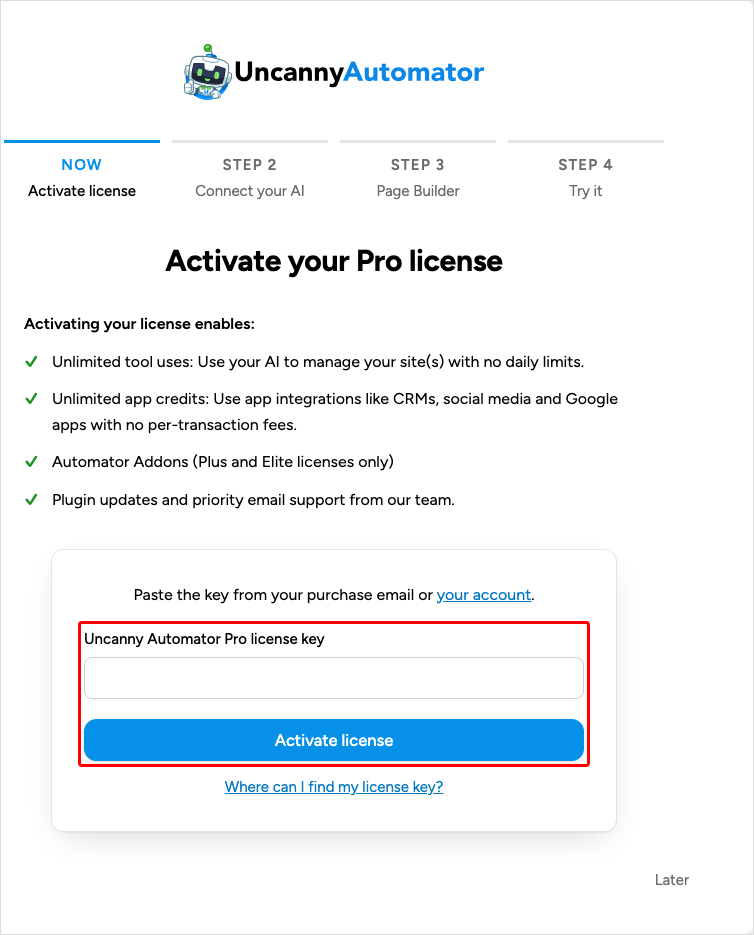
The wizard confirms that the license has been activated and reloads on step 2, Connect your AI to this site, which reads Your Pro license is active on this site.
On the License settings page:
- Go to Automator > Settings > General > License.
- Paste your key into Uncanny Automator Pro license key and click Activate license.
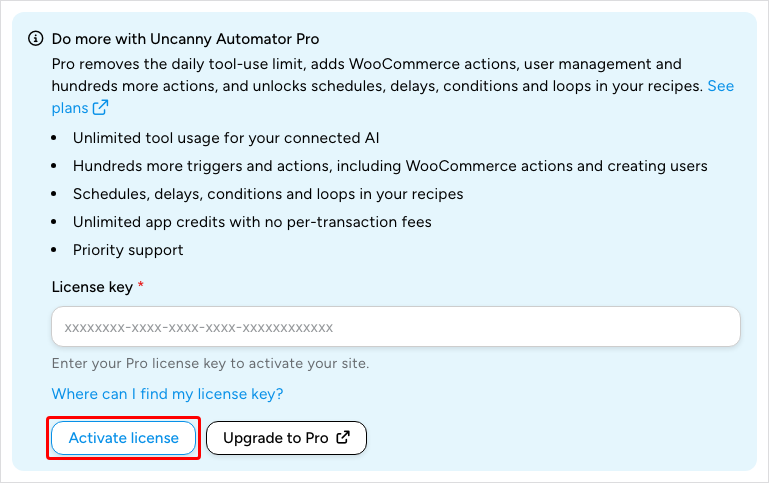
If only the free plugin is installed, the License page shows Do more with Uncanny Automator Pro instead. Enter your key under License key and click Activate license: Uncanny Automator activates the license, then downloads, installs and activates the Pro plugin for you. Then paste the same key again on the License page and click Activate license to finish.
When you sign in at mcp.automatorplugin.com in step 2, use the automatorplugin.com account that the Pro license belongs to. If that account also has a free account or another license, choose the Pro license activated on this site.
Step 2: Connect your site at mcp.automatorplugin.com
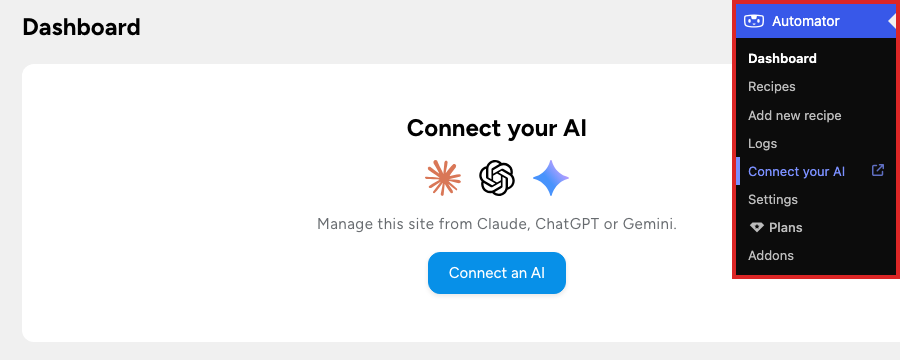
- In your WordPress dashboard, go to Automator > Connect your AI. The link tells mcp.automatorplugin.com which site you want to connect. If you aren’t signed in there, the automatorplugin.com sign-in page opens straight away.
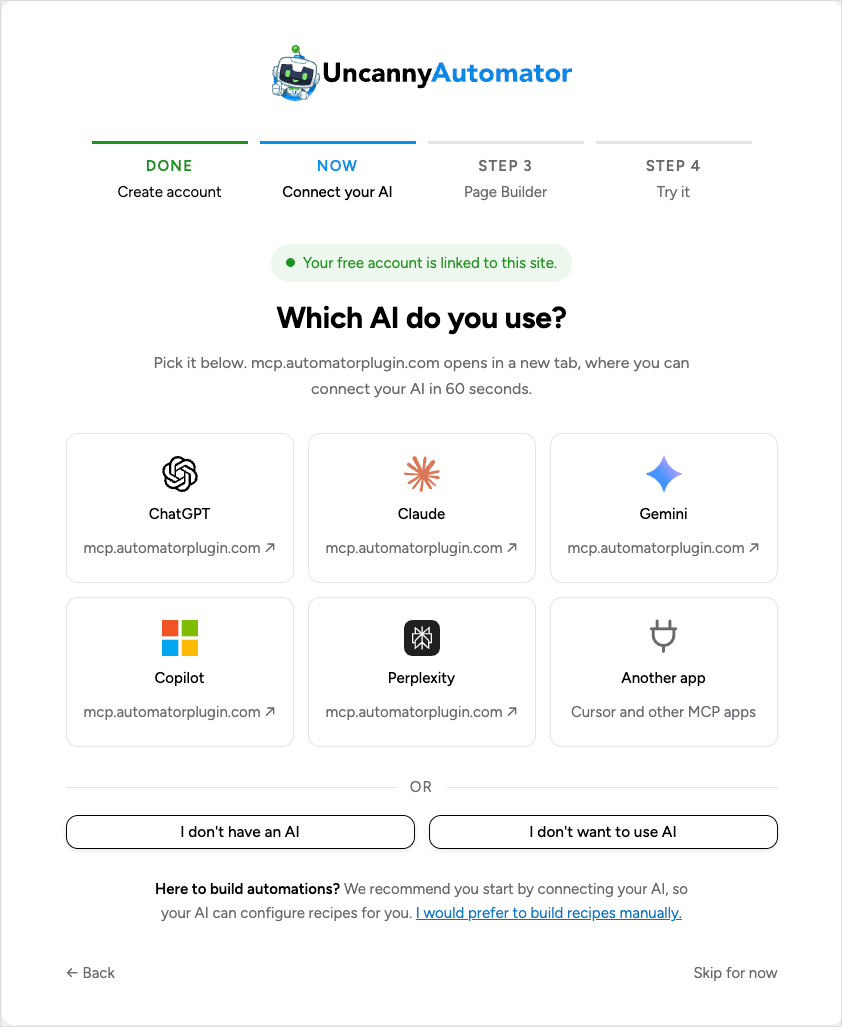
You can also start from step 2 of the Setup wizard, which reads Which AI do you use? (or Connect your AI to this site with Uncanny Automator Pro). Every AI app in the wizard opens the same link as the menu item.
- Sign in with the Uncanny Automator account the site is linked to. If you’re already signed in, you go straight to the next step. If your account has more than one license, choose the one your site uses.
- In the Connect this WordPress site dialog, click Continue to WordPress.
- Your site opens on the Connect this WordPress site? page. Check that it shows your site’s address and the WordPress account you want your AI to work as, then click Approve connection.
You return to mcp.automatorplugin.com, where a notice confirms that the site is connected.
If you go to mcp.automatorplugin.com directly instead, its home page reads Connect your AI to your WordPress site. Click Connect now to sign in, then choose the site from your list.
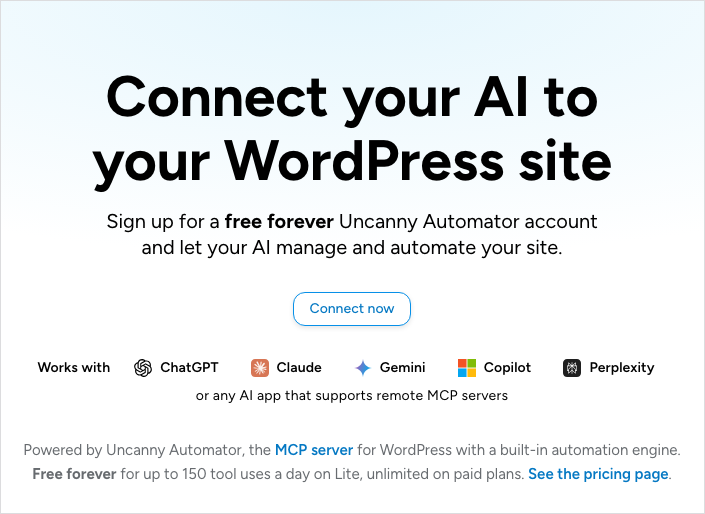
Connect your WordPress site at mcp.automatorplugin.com covers every screen in this step, choosing a license, and what to do when your site isn’t listed.
Step 3: Add Uncanny Automator to your AI app
- At mcp.automatorplugin.com, click Connect an AI on the page, or Connect AI in the header. The Connect an AI page lists the AI apps. If you chose an app in the Setup wizard, choose the same one here.
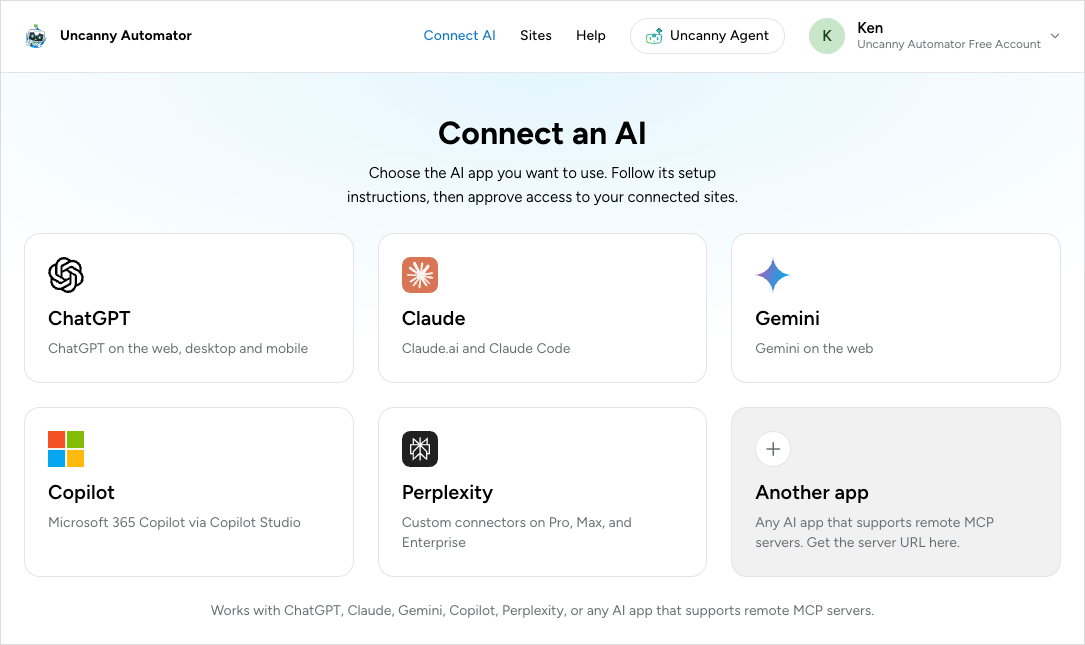
- Click your AI app’s card. Its setup page opens with numbered Steps for that app, the MCP server URL with a Copy button, and links to open the app and to its own setup guide.
- Click Copy, then follow the steps in your AI app to add Uncanny Automator as a custom connector, using the address you copied as the server URL.
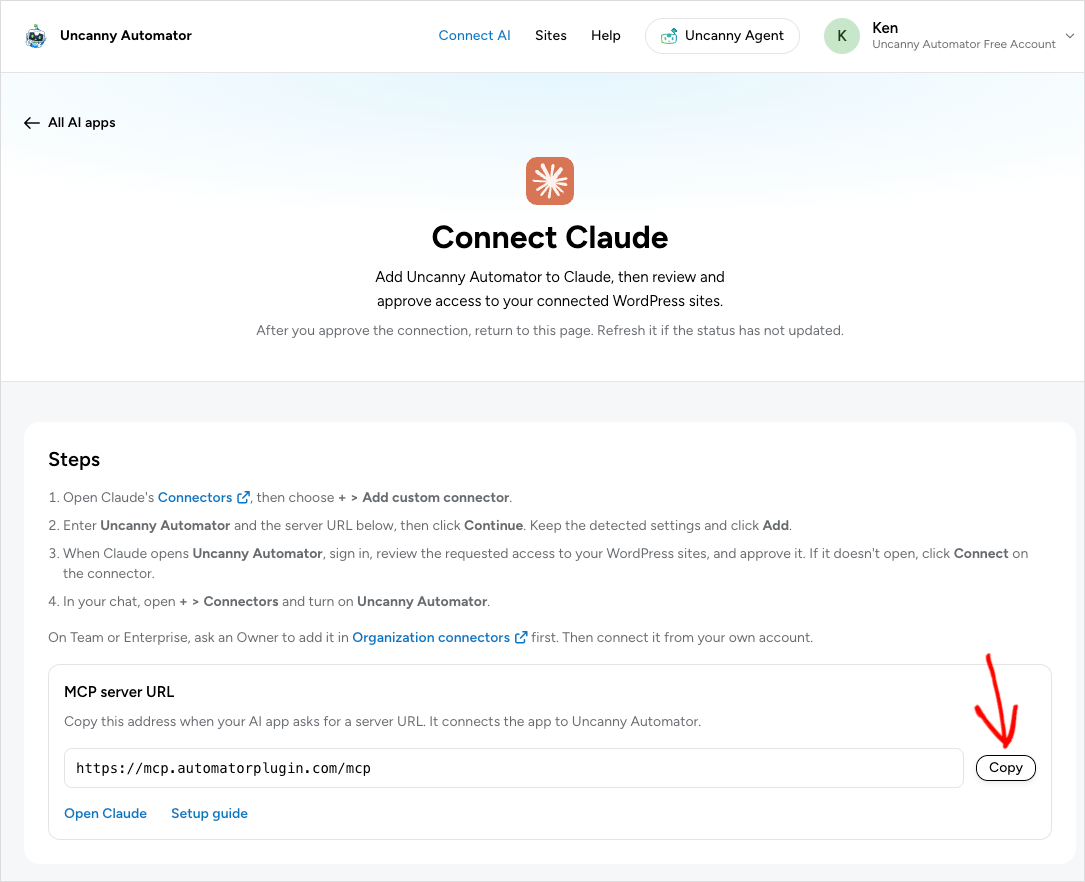
The article for each app walks through its screens: ChatGPT, Claude, Gemini, Microsoft 365 Copilot, Perplexity and another AI app or developer tool.
Step 4: Approve your AI app
When your AI app connects, it opens a window at mcp.automatorplugin.com.
- If you’re asked to, click Sign in and sign in with the same Uncanny Automator account.
- Review the page that asks whether to connect the app to your WordPress sites. Access you’re approving says what the app may do, and Sites included in this approval lists the sites it will reach.
- Click Approve connection.
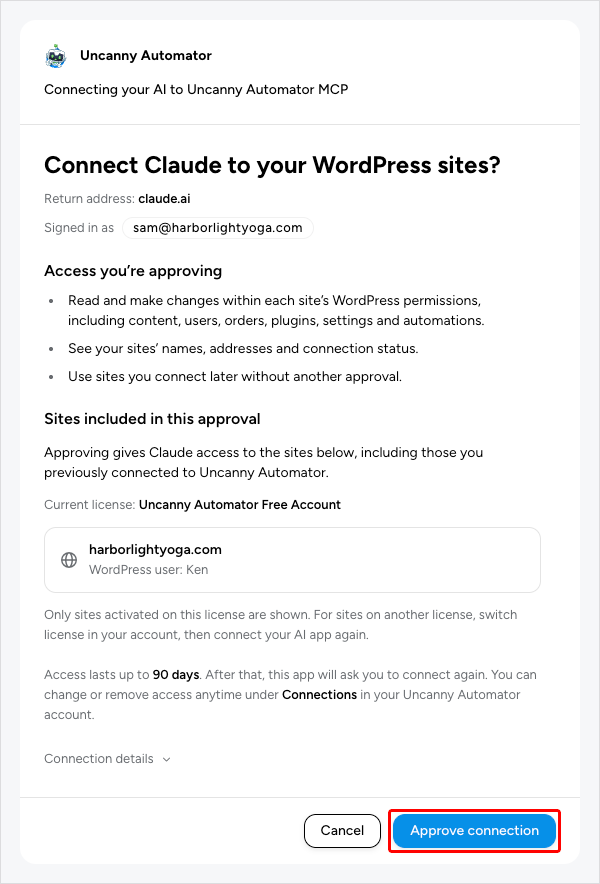
You’re sent back to your AI app. If a page reading Returning you to your AI app stays open, click Continue.
The approval lasts up to 90 days. After that, the app asks you to connect again. If you started from the Setup wizard, go back to its tab: it moves on to its Try it step by itself once your AI app is connected.
Step 5: Try your first task
Open a chat in your AI app and ask: What plugins are installed on my site? If you’ve connected more than one site, name the site in your request. Some apps also need Uncanny Automator turned on or chosen in the chat, and some ask your permission before each tool use; the app’s article says when.
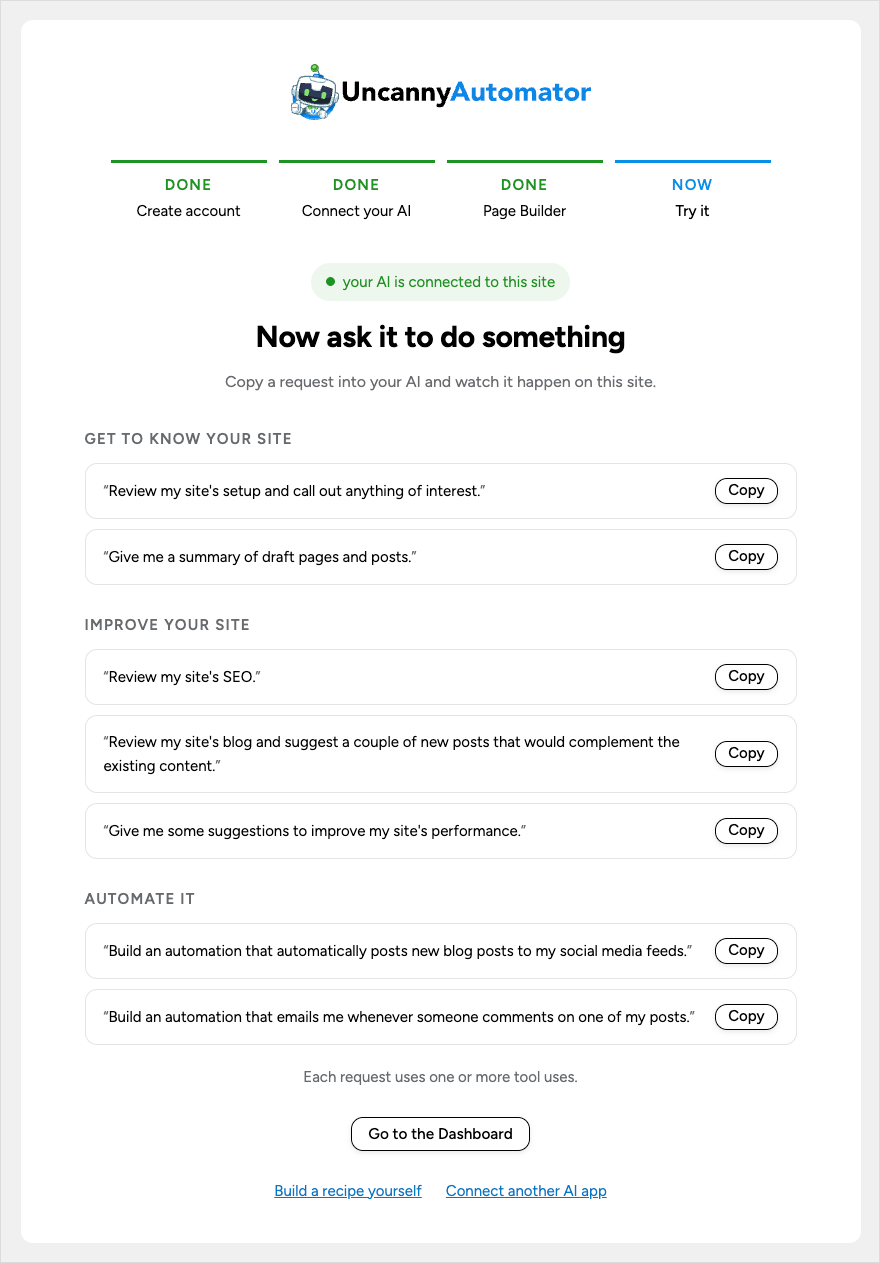
The Setup wizard’s Try it step, headed Now ask it to do something, suggests more requests grouped by what they do for your site. Click Copy beside one and paste it into your AI app.
For what else your AI can do, see What your AI can do on your site.
After you connect
- Choose what your AI can access on each site: which tools, Automator actions and WordPress abilities it may use. See Choose what your AI can access.
- Watch your tool uses on Automator > Dashboard or on the Connections page at mcp.automatorplugin.com. See Tool uses and the daily limit.
- Disconnect an app or a site whenever you like. See Manage and remove AI connections.
- Fix a connection that fails. See Troubleshooting AI connections.
If you don’t have an AI subscription, Uncanny Agent is the AI assistant built into Uncanny Automator. See What is Uncanny Agent?
Next: Connect your WordPress site at mcp.automatorplugin.com, What your AI can do on your site, Choose what your AI can access, Tool uses and the daily limit


Comments (0)