

Connect Microsoft 365 Copilot to your WordPress site and you can manage and automate the site by asking a Copilot agent. You add Uncanny Automator to an agent in Copilot Studio as an MCP tool, approve access to your connected sites on mcp.automatorplugin.com, test the agent, then publish it to Microsoft 365 Copilot. Personal Microsoft Copilot can’t connect to Uncanny Automator; this setup needs a work or school account.
An MCP server is how AI apps such as ChatGPT or Claude connect to other software. Uncanny Automator is an MCP server for WordPress with a built-in automation engine: it connects your AI to your WordPress site.
This is not the AI integrations in recipes, such as OpenAI, which add a provider’s API key so a recipe action can call a model.
What you need
- A WordPress site running Uncanny Automator 8.0.0 or newer, at a public web address. mcp.automatorplugin.com can’t reach a site on a local address, such as a development copy on your computer.
- An Uncanny Automator account. A free account is enough: on the Lite plan you get 300 tool uses a day for your first week, then 150 a day, shared across all your sites and AI apps. A tool use is one thing your AI does on your site through Uncanny Automator. Paid plans have unlimited tool usage. See Tool uses and the daily limit.
- A Microsoft work or school account with access to Copilot Studio. A Copilot Studio trial lets you build and test the agent but can’t publish it, and your organization may need to turn on access first. See Microsoft’s licensing requirements.
Connect your site first
The Copilot agent gets its tools from the sites connected to your Uncanny Automator account, so the Copilot setup page opens only after at least one site is connected. If you haven’t connected a site yet, follow Connect your WordPress site at mcp.automatorplugin.com, then come back here.
Open the Copilot setup page
The setup page on mcp.automatorplugin.com has the server address you paste into Copilot Studio. Keep it open next to Copilot Studio while you work.
- Go to mcp.automatorplugin.com and sign in with your Uncanny Automator account. If your account has more than one license, choose one first. The Connections page opens.
- Click Connect an AI (it reads Connect another AI once an AI app is connected). You can also click Connect AI in the header.
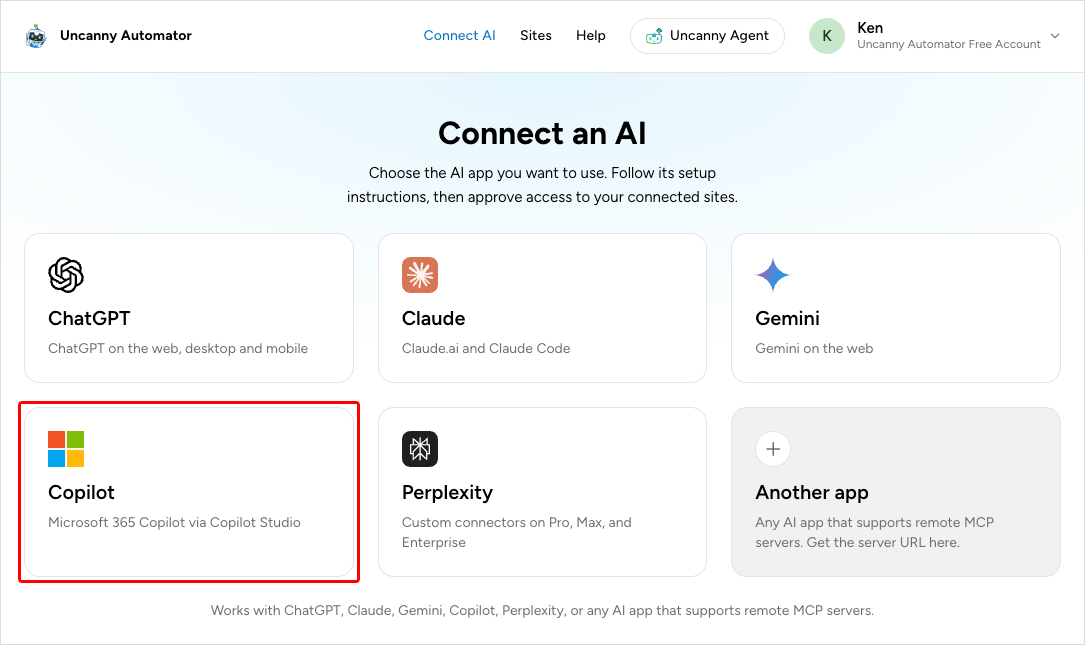
- On the Connect an AI page, click the Copilot card, “Microsoft 365 Copilot via Copilot Studio”.
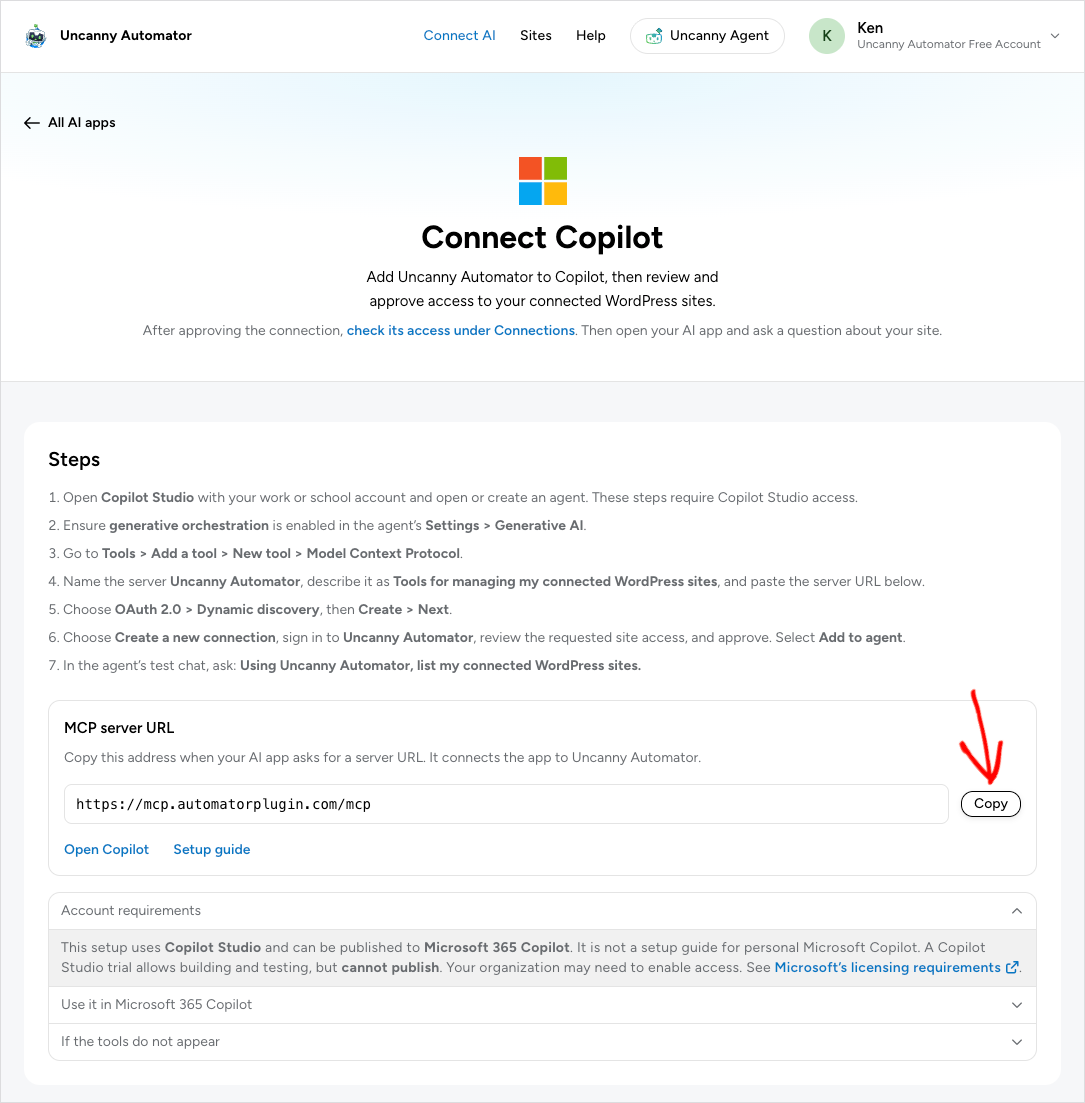
The Connect Copilot page opens. It lists the steps for Copilot Studio, and under MCP server URL it shows the address https://mcp.automatorplugin.com/mcp. Every Uncanny Automator account uses this same address; your sign-in is what links the agent to your sites. Below the address, Account requirements is open, and Use it in Microsoft 365 Copilot and If the tools do not appear open when you click them.
- Under MCP server URL, click Copy.
Add Uncanny Automator to your Copilot Studio agent
Add the server as a tool on an agent in Copilot Studio. The steps below match the setup page.
- Open Copilot Studio with your work or school account. Open an agent, or go to Agents > New agent to create one. The agent opens on its Build tab.
Note: If saving the agent shows You don’t have permission to create agents (“Ask your admin to grant you the right role, then try again. User license not found”), your account doesn’t have a Copilot Studio license or the role that lets it create agents. Ask your Microsoft 365 administrator for access.
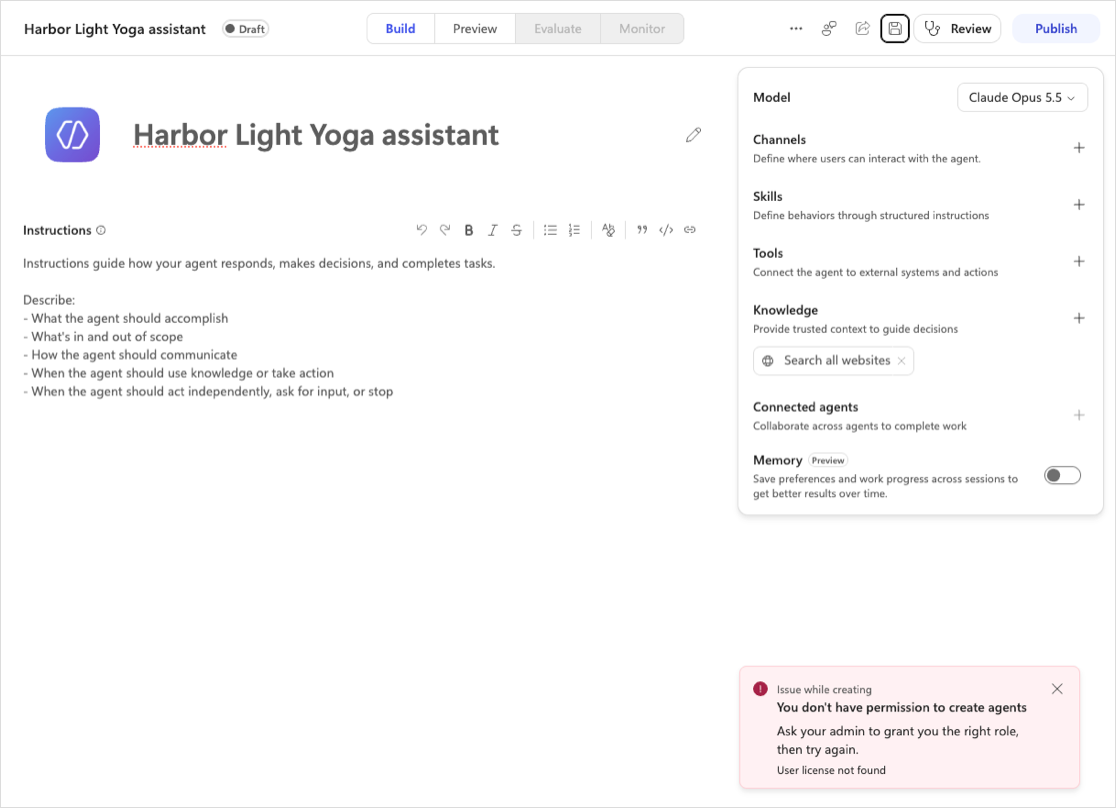
- Next to Tools, click +. In Add a tool, click + Add and choose Model Context Protocol (MCP).
- Enter Uncanny Automator as the server name, enter Tools for managing my connected WordPress sites as the description, and paste the address you copied as the server URL.
- Under authentication, choose OAuth 2.0 > Dynamic discovery.
- Click Create, then Next.
- Choose Create a new connection. Copilot Studio opens mcp.automatorplugin.com so you can approve the connection.
Note: Use Dynamic discovery. Copilot Studio gets its own credentials from Uncanny Automator, so you never enter a WordPress username, password or API key.
Approve the connection
The approval page is on mcp.automatorplugin.com, in the window Copilot Studio opens. It decides which of your sites the agent can use.
- If the page reads Sign in to review this connection, click Sign in and sign in with the Uncanny Automator account your site is connected to.
- If your account has more than one license, choose the license your site is activated on and click Use this license. Only sites on the chosen license are included.
- Check the top of the page. The heading asks whether to connect the app to your WordPress sites, using the name Copilot Studio gives itself. Return address shows where you’ll be sent back after approving.
- Under Access you’re approving, review what the agent can do: read and make changes on each site within that site’s WordPress permissions, see your sites’ names, addresses and connection status, and use sites you connect later without another approval.
- Under Sites included in this approval, check that your site is listed. To add a site that is on your license but not connected yet, click Connect next to it. Your site’s WordPress approval page, Connect this WordPress site?, opens; approve it there and you come back to this page.
- Click Approve connection.
You’re sent back to Copilot Studio. If a page reading Returning you to your AI app stays open, click Continue.
- Back in Copilot Studio, click Add to agent.
The approval page also says how long access lasts: up to 90 days. After that, Copilot Studio asks you to connect again. You can change or remove access at any time under Connections at mcp.automatorplugin.com.
Note: The approval page has no read-only choice. To limit what the agent can do on a site, use the switches in that site’s WordPress dashboard, described in Choose what your AI can access.
The Connect Copilot page doesn’t show a connected status; it links to check its access under Connections instead. To confirm the connection, click Connections in the header on mcp.automatorplugin.com and find the app under Connected AI apps.
Try a first prompt
- Open the agent’s Preview tab in Copilot Studio.
- Ask: Using Uncanny Automator, list my connected WordPress sites.
The agent asks Uncanny Automator for the answer and shows your sites in the chat. Each thing the agent does on your site counts as one tool use, so one request can use several.
If the agent doesn’t use Uncanny Automator, check that the tool was added to the agent. Organization policies can also block tools; see Microsoft’s MCP troubleshooting guide. A successful sign-in on its own doesn’t prove the tools work, so always test with a request.
Use the agent in Microsoft 365 Copilot
Once the test works, publish the agent so you can use it in Microsoft 365 Copilot. A Copilot Studio trial can’t publish, and publishing and sharing across your organization depend on your Microsoft access and your administrator’s policies.
- Publish the agent in Copilot Studio.
- Set up the Teams and Microsoft Copilot channel and turn on Make agent available in Microsoft Copilot.
- Finish the installation steps in Microsoft’s publishing and installation guide.
What to do next
- What your AI can do on your site: the kinds of work the agent can do through Uncanny Automator.
- Choose what your AI can access: the switches on each site for tools, Automator actions and WordPress abilities.
- Manage and remove AI connections: the agent’s site access, last use and recent activity on the Connections page, and how to disconnect it.
- Troubleshooting AI connections: what to do when a step above fails.
Related: Connect your AI to your WordPress site, Connect another AI app or developer tool, Tool uses and the daily limit


Comments (0)