Struggling with member churn? Get started with these proven, automated membership retention strategies for WordPress…
How to Create WooCommerce Discount Popups: Generate Leads & Drive Conversions
WooCommerce discount popups are a great way to generate leads and drive conversions with a single workflow. I’ll take you through the process step-by-step and share some tips for maximizing your engagement and conversion rates.

Do you want to make a discount popup for your WooCommerce store like any of the ones below?
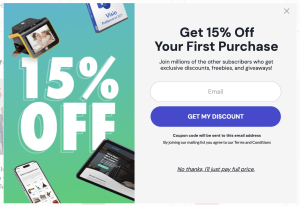
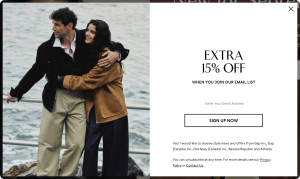
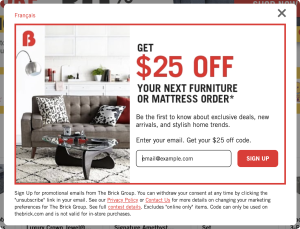

If so, you’ve come to the right place. In this guide, I’ll show you how to set up WooCommerce discount popups that not only look great but also deliver real results. More subscribers, more first-time buyers, and a healthier email list.
All without custom code or crazy development costs. Just clicks and conversions.
By the end of this guide, you’ll know:
- why discount popup campaigns generate more leads and drive more conversions,
- how to design a discount popup in WordPress with OptinMonster,
- how to generate and email unique coupons with WooCommerce + Uncanny Automator, and
- some insider tips and tricks for maximizing WordPress popup conversions.
Here’s what you’ll need:
- OptinMonster to design popups and campaigns and collect leads
- WooCommerce to serve as your ecommerce platform
- Uncanny Automator to connect everything and automate your introductory offers
Ready to turn pageviews into profit? Let’s get started.
Why Use WooCommerce Discount Popups to Collect Leads
Popups aren’t just a gimmick—they work.
Here’s why discount popups are one of the most effective lead-generation strategies for WooCommerce stores:
- Popups convert visitors into subscribers. On average, popups convert 3%-5%, with some campaigns converting between 9%-11%. That might not sound like a lot, but if you have 10,000 monthly site visitors, that’s 300+ new leads every month!
- Email marketing delivers high ROI. Email marketing returns about $36 per $1 of investment. Combine that with your hundreds of new leads, and the gains start to rack up.
- Coupons influence buying. Two-thirds of consumers have made an unplanned purchase due to a coupon. Similarly, 80% of consumers feel encouraged to make a first-time purchase when they find an offer.
- Offers reduce cart abandonment. Timely incentives can reduce cart abandonment. In case an introductory offer didn’t get the job done, find out how Uncanny Automator can help you recover abandoned carts in WooCommerce.
- Unique codes protect your margins and keep your campaigns clean. Single-use codes reduce sharing, protect promos, and enable clear channel-level attribution.
In summary, WordPress discount popups give you a cost-effective way to capture leads, convert browsers into buyers, and protect your store’s bottom line.
Now that we know why WooCommerce discount popups are essential ecommerce tools, I’ll show you how to build one.
How to Create a WooCommerce Discount Popup: OptinMonster + Automator
All you need to create a WooCommerce discount popup is OptinMonster and Uncanny Automator.
OptinMonster handles the popup campaign while Automator integrates the popup with your WooCommerce store to generate and email unique coupons for your new subscribers.
Step 1: Create a New OptinMonster Campaign
First, we’ll create a discount popup campaign with OptinMonster.
Don’t have OptinMonster yet? Get this monster on your site >>>
From your WordPress Admin Dashboard navigate to OptinMonster > Campaigns and click Add new.

Step 2: Select a Campaign Type and Template
OptinMonster has tons of great templates to help you create campaigns faster.
When the “Create New Campaign” modal appears, click Templates.

Next, select the campaign type Popup.

Choose from any number of the available templates. Both the “Get a Discount Code” and the “Get a Coupon Code” templates are great options to start with.

Name your campaign then click Start building.
Step 3: Design Your Discount Popup
First, you’ll get to design your popup. This is where you can channel your creativity and brand voice to create something that will get your audience’s attention.
↓ Need some help with the design? Jump ahead to the “Dos and Don’ts”. ↓
The only block that you must include in your popup’s design is the Fields block. (This enables “Integrations” later on.)

Once you’re happy with the design of your popup, it’s time to decide who sees your campaign, when, and where.
Step 4: Set the Display Rules
Deciding who sees your popup, when, and where on your site will depend on your business’ audience and workflows.
Generally speaking, however, WooCommerce discount popups work best when:
- they are shown to new site visitors,
- they are shown 5-7 seconds after a guest lands on a page, and
- they are shown only on strategic pages (homepage, product pages, category pages, key landing pages).
Given these best practices, your display rules might look something like this:

↓ Not sure about your display rules? Jump ahead for some tips and tricks. ↓
Click the Done button to move on to what happens once your popup is shown.
Under Cookie Settings, set the following conditions:
- If it is converted, show it again… never, or until browser cookies are cleared.
- If it is closed, but not converted, show it again… on their next visit to the site.

Once you’re finished, click Done one more time and review the summary of your display rules.
Step 5: Configure Your Integrations
In this step, we’ll connect OptinMonster to Uncanny Automator so you can automatically send coupon codes to your new subscribers.
Don’t have Automator yet? What are you waiting for… a popup? >>>
Open a new browser tab and navigate to your WordPress Admin Dashboard. From there, navigate to Automator > Add new recipe.
In the modal that appears, select Everyone.

You may want to give your recipe (that’s what Automator calls its automations) a name that’s easy to recognize at a glance. For example, I’ve named this recipe “WooCommerce Discount Popup with OptinMonster”.
In the Trigger panel, from the menu of available integrations, select OptinMonster.

From the dropdown list that appears, select Receive data from OptinMonster webhook.

Copy the Webhook URL.

Return to the OptinMonster tab and click Add new integration.

Under All Integrations, select Webhook.

In the dropdown that appears, select Add New Webhook, then create a new Webhook Account Name and paste the Webhook URL into the Webhook URL field.

Important: Before you click Connect to Webhook, return to your Automator tab and click Get samples at the bottom of the Trigger panel.

Within 60 seconds, return to your OptinMonster tab and click Connect to Webhook.
Once the connection is successful, you can return to your Automator tab where you’ll see a modal with the results of the test.

Click Use these fields then click Save. Your completed Automator trigger will look like this:

Step 6: Launch Your Campaign
Return to your OptinMonster tab and publish your campaign.

(Note: You can test your OptinMonster campaigns prior to launching them to make sure everything looks exactly the way you want.)
Step 7: Automatically Email WooCommerce Discount Coupons
We’re just about done configuring our WooCommerce discount popups. All that’s left for us to do is to set up the actual discount coupons that we’ll be sending out to new subscribers.
Return to your Automator tab and the recipe editor.
In the Actions panel, click Add action and select Woo.

From the dropdown list that appears, select Generate and email a coupon code.

Automator will present you with a form to configure your discount offer. Set the:
- discount type,
- coupon amount,
- expiry date,
- minimum and maximum qualifying spends,
- specific products,
- product categories,
- usage limits,
- and more.
In the To field, we’re going to use a token to select the email address that your site visitor entered in the OptinMonster popup.
To use this token, click the Asterisk in the To field and select the token with the label “lead/email” in it.

Next, draft your email.
Make sure that your email includes:
- A catchy and high-energy subject line that references your new subscriber’s action of signing up.
- The coupon code. By default, Automator will include the “coupon_code” token in the Email body field. However, you can add it yourself by clicking the asterisk or typing {{coupon_code}}.
- Some copy that reinforces the value of subscribing to your newsletter.
- The important details of your discount offer, such as an expiration, product/product category restrictions, etc.
Here’s what a simple, straightforward email might look like:

Once you’ve drafted your email, click Save.
Want some help branding your WordPress emails? Check out this guide for designing stunning WordPress emails with a FREE plugin >>>.
Step 8: Automatically Send Discount Coupons
All you have to do now is toggle your recipe from Draft to Live.

That’s it! You’ve just set up an automated workflow for WooCommerce discount popups.
- OptinMonster will run your campaign and collect your leads.
- Uncanny Automator will generate and email the discount coupon to your new subscribers.
But you don’t have to stop there. Both OptinMonster and Uncanny Automator connect to your favorite CRMs, such as HubSpot, Mailchimp, Drip, and many more.
Add a secondary action to connect WooCommerce to HubSpot with Automator and begin growing your list and segmenting your leads right away.

Do you want even better open and engagement rates? Send your introductory discount offers to your subscribers via WhatsApp for 90%+ open rates >>>.
The Dos and Don’ts of Designing Discount Popups
Not all discount popups are created equal. Sometimes, the difference between a popup that converts and one that simply annoys site visitors is the design.
To make sure that your popup is irresistible—not irritating—follow these design rules.
✅ Do Highlight the Offer Prominently
Use large, bold text to clearly communicate the introductory offer. Most site visitors will close a popup before reading it, but a prominently displayed offer can arrest their attention.

For example, this discount popup from Bed Bath & Beyond uses a different font color, bold text, and all caps to communicate an offer of “20% OFF”.
✅ Do Use High Contrast for Visibility
High contrast helps your offer and CTA stand out and draws your site visitors’ eyes to the key information they need.
✅ Do Limit Form Fields
Every campaign you run should serve a single purpose and therefore, should have a single form field.
Discount popups serve the sole purpose of turning first-time site visitors into email subscribers and, hopefully, shoppers. All you need for that is an email.
✅ Do Maintain Brand Consistency
Align the popup with your store’s branding (fonts, colors, etc.) so it feels like part of the experience, not a distraction from it.

OptinMonster’s own exit intent popup, for example, uses a sans serif font and bright green to maintain brand consistency and meet industry expectations. The content itself is also on-brand; playful yet metrics-driven for a conversion-focused marketing tool.
✅ Do Think About Mobile Responsiveness
You might have built your discount popup campaign on a desktop device. However, chances are your site visitors will see it on a mobile device.
That’s because nearly 75% of all ecommerce sales are made on a mobile device. Keep that in mind when designing your popups.
❌ Don’t Write a Novel
Keep the content in your discount popup short and punchy. Big blocks of text will likely turn site visitors off.
If you have to communicate lots of details, provide links to posts, pages, and other long form content in your popup. Which brings us to the next definite don’t…
❌ Don’t Forget About Privacy and Terms and Conditions
Provide links to your privacy policy and terms and conditions in your popup. This lets your site visitors know that you have standards and practices around the protection of their data.
You can also update your terms and conditions to let your site visitors know the details of your offer, such as cart minimums/maximums, excluded product(s), expiration dates, etc.
❌ Don’t Sacrifice Function for Form
Popups should be visually striking—but only to serve a purpose. Make sure that your discount popups use legible, easy-to-scan fonts, and high-contrast colors.
Best Practices, Tips & Tricks
So, you’ve designed a stunning discount popup that follows all of the “dos” and none of the “don’ts”… but it’s still not converting. Why?
There’s more to a successful WooCommerce discount popup campaign than meets the eye. Follow these best practices to ensure that your campaign is as effective as it can be at driving conversions.
- Trigger at 5-7 seconds: Give your visitors a little time to see the landing page. The popup will give them a reason to click deeper into your site before they bounce. Think of it like offering a window shopper a reason to enter the store; something caught their eye, and a discount catches their attention.
- Test different triggers: Maybe your audience is a little different. Try using different triggers (scroll depth, exit intent, etc.) to adapt your campaign to your site visitors’ behavior.
- Use single use coupons: Automator lets you set very specific usage restrictions on the coupons you generate. Set a usage limit of one and restrict the authorized email at checkout to the same email from the OptinMonster popup.
- Use urgency and scarcity: Use time-limited coupons or only offer a limited number of coupons by restricting how many times the Automator recipe will run. This will encourage site visitors to sign up for a limited offer that feels exclusive and encourage them to actually use it.
- Protect your margins: Set minimum spends and/or restrict the discount offer to specific products and/or product categories. If you do offer a storewide discount without restrictions, make it modest.
- Use segmentation: Segmentation can start right away. Tag and segment your new subscribers based on the landing page and any other available data to get a better idea of who your newest subscribers are.

Frequently Asked Questions
Conclusion
Hopefully I’ve convinced you that WooCommerce discount popups are one of the simplest yet most effective ways to grow your email list and drive conversions.
When designed well and backed by automation, they’re not just attention-grabbers—they’re profit drivers.
Together, we created an OptinMonster popup campaign that is polished and on-brand and ready to capture leads. We then walked through using Uncanny Automator to integrate your popup campaign with your WooCommerce store to deliver unique coupons.
And the conversion-optimizing doesn’t have to stop there. Did you know that you can use Uncanny Automator for WooCommerce abandoned cart recovery?

Show me how to recover my abandoned carts >>>
With what you’ve learned in this post, high-quality leads and better conversion rates are in your future. Don’t forget to subscribe to our mailing list for more WordPress and ecommerce automation guides.
Until next time, happy automating!

Related Posts


This Post Has 0 Comments