

Custom user fields are profile fields you define for your WordPress users, such as Company name or Phone number, that recipes can fill in, check, and display. The Custom User Fields Addon manages them from one settings page. This article covers adding, editing, and deleting fields; putting data into them is covered in Updating custom user field data.
You need the Custom User Fields Addon installed and active, which requires the Plus or Elite plan. Once the addon is active, an Addons tab appears in Automator > Settings with a Custom user fields entry.
Adding a custom user field
- In your WordPress dashboard, go to Automator > Settings > Addons > Custom user fields.

- Click Add field.
- In the Create field dialog, enter a Field name that describes the data you plan to collect, such as Company name or Phone number. The name is how the field appears on the Edit User page, in the token picker, and in recipes.
- Leave Use custom meta key set to No. The addon then generates the Meta key from the field name, for example
uacuf_company_namefor Company name.

- Click Save.
- Repeat from step 2 for each field you need.

Each field appears in the table with its name, its meta key underneath, and a Shortcode you can copy with one click. To rename a field, click the pencil icon (Edit field) in its row.
About meta keys
WordPress stores each field’s values in the user meta table, under the field’s meta key. Think of the meta key as a bookmark: it points to where the data for that field lives. The generated key suits almost every site, so leave it as it is.
Switch Use custom meta key to Yes only when you want the field to point at a meta key that already exists, such as one another plugin uses. The field then gives your recipes a token, a condition, and triggers for that plugin’s data.
Important: Do not change the meta key of a field that already holds data. The stored values stay under the old key, and the field starts pointing at a new, empty one. The old data can then only be reached by its original meta key.
Where a new field appears
As soon as a field is saved, it is available in three places:
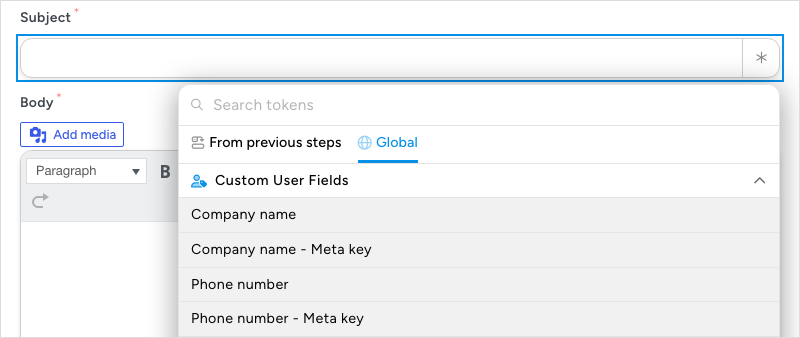
- The token picker: in the recipe builder, click the ∗ button at the end of any field that accepts tokens and open the Global tab. Custom User Fields is the first section on the tab. It has a token named after each field, which returns the user’s current value, and a second token, the field name followed by “- Meta key” (for example, Company name – Meta key), which returns the meta key itself.
- The Edit User page: every user’s profile has an Uncanny Automator Custom User Fields section where an administrator can view and change the values.

- Shortcodes: the shortcode from the table, such as
[[automator_uf meta_key="uacuf_company_name"]], displays the field’s value for the user viewing the page. See Displaying Custom User Fields.
Deleting a custom user field
A field you no longer use does no harm, so there is no need to delete it. Delete a field only when you no longer need to update or display its data and no recipe uses it.
Deleting a field removes it from the settings table and from the token picker, but it does not delete any data. The confirmation says so: “Deleting the field will remove it from the list and from tokens in Automator recipes, but no data will be deleted for users in the database.”
Removing the stored data first
To delete the values stored in the field as well, run a recipe that removes them from every user before you delete the field. Do it while the field still exists, because the recipe needs the field’s meta key. The recipe uses a Loop block, which requires Uncanny Automator Pro:
- Create an Everyone recipe with the Run now trigger (Trigger recipe manually). Run now is an Everyone trigger: in a Logged-in users recipe the picker does not let you choose it.
- Add a Loop block with Loop type set to Users, and use Add modifier to add loop filters that select the users whose data should go, for example A user meta value meets a condition on the field’s meta key.
- Click + Add inside the Loop block and add WordPress Core > Delete user meta. In Key, enter the field’s meta key, or insert the field’s Meta key token from the Custom User Fields section of the token picker.
- Click Run now in the top bar.
Bulk update users with a recipe walks through this recipe shape step by step, including how to test it on a few users first. There is no undo for deleted data.
Deleting the field
- Go to Automator > Settings > Addons > Custom user fields.
- Click the trash icon (Delete field) in the field’s row.
- Read the notice and click Delete field to confirm.
If you delete a field by mistake, create it again with the same meta key: click Add field, switch Use custom meta key to Yes, and enter the original key. Because deleting the field left the data in place, the recreated field shows the stored values again. Only data you removed with a recipe is gone for good.
Related: Updating custom user field data, Displaying Custom User Fields, Installing the Custom User Fields Addon, Loop block: users, posts and tokens, Managing tokens.

Comments (0)