

Send WordPress Slack notifications with Uncanny Automator and format them so they get read. Includes…
10 Gravity Forms Automations That Save Hours Every Week
Gravity Forms automations can save you hours of repetitive work every week. You can get started for free with Uncanny Automator.
It’s Monday morning, and Forms > Entries is holding a weekend’s worth of submissions. You export them and paste them into a Google sheet. You forward the hot ones to sales. You add the rest to your CRM by hand. Gravity Forms collected every one of them perfectly. Moving them is the chore, and Gravity Forms automation fixes exactly that part.
With Uncanny Automator, a new entry posts itself to Slack. It logs itself in the sheet your team already uses and adds itself to the CRM with the right tag. On the next business day, it gets a reply. By the time you open the entries screen, the work is done.
Below are ten recipes that do exactly that. (A recipe is what Automator calls an automation.) Six run on Uncanny Automator Lite, the free plugin. Four use Automator Pro for a field-value trigger, a timed condition, user creation or a payment trigger.
Each recipe pairs a trigger with one or more actions. Here, the trigger is always a Gravity Forms submission. Tokens carry the details from the entry into each action. (A token is dynamic data pulled from the entry, like the name and email fields.)
Let’s start with what you need, then build.
Get Automator Lite free on WordPress.org >>>
What You Need for These Gravity Forms Automations
Gravity Forms, on any license. Recipes 1 to 9 need no Gravity Forms add-on. Recipe 10 starts from a payment, so it needs one of the Gravity Forms payment add-ons (2Checkout, Authorize.Net, Mollie, PayPal, Square or Stripe).
Uncanny Automator Lite, free from WordPress.org. Recipes that stay inside your site are unlimited. The FluentCRM and webhook recipes below are two examples. Four recipes reach outside WordPress, to Slack, Google Sheets, OpenAI and ClickUp. Those run on app credits. (App credits pay for third-party app integrations.) A free Automator account includes 250 app credits. Each app action uses one. Automator Pro plans are unlimited.
Automator Pro for recipes 7 to 10. They use a field-value trigger, conditions and delays, user creation and a payment trigger, which are Pro features.
One detail before you build. Gravity Forms gives Automator two submission triggers. Gravity Forms > A user submits a form only fires for logged-in users. Gravity Forms > A form is submitted fires for anyone, visitors included.
Lead forms are filled in by visitors, so recipes 1 to 9 use Gravity Forms > A form is submitted. You’ll find it in the Everyone list when you create a recipe. Recipe 10 is the exception: the learner pays while logged in, so it uses a logged-in trigger. The knowledge base explains recipes for Everyone if you want the details.
Here’s the whole list at a glance. Every trigger and action name below matches the Gravity Forms integration page. I checked each one while writing this post.
10 Gravity Forms Automations You Can Build Today
The recipes run from “works on the free plugin today” to “needs Pro.” The first two come with full build steps. After that you know the pattern. So each later recipe gets the trigger, the action and what changes once it’s live.
1. Post New Leads to Slack the Moment They Arrive (Gravity Forms Slack Integration)
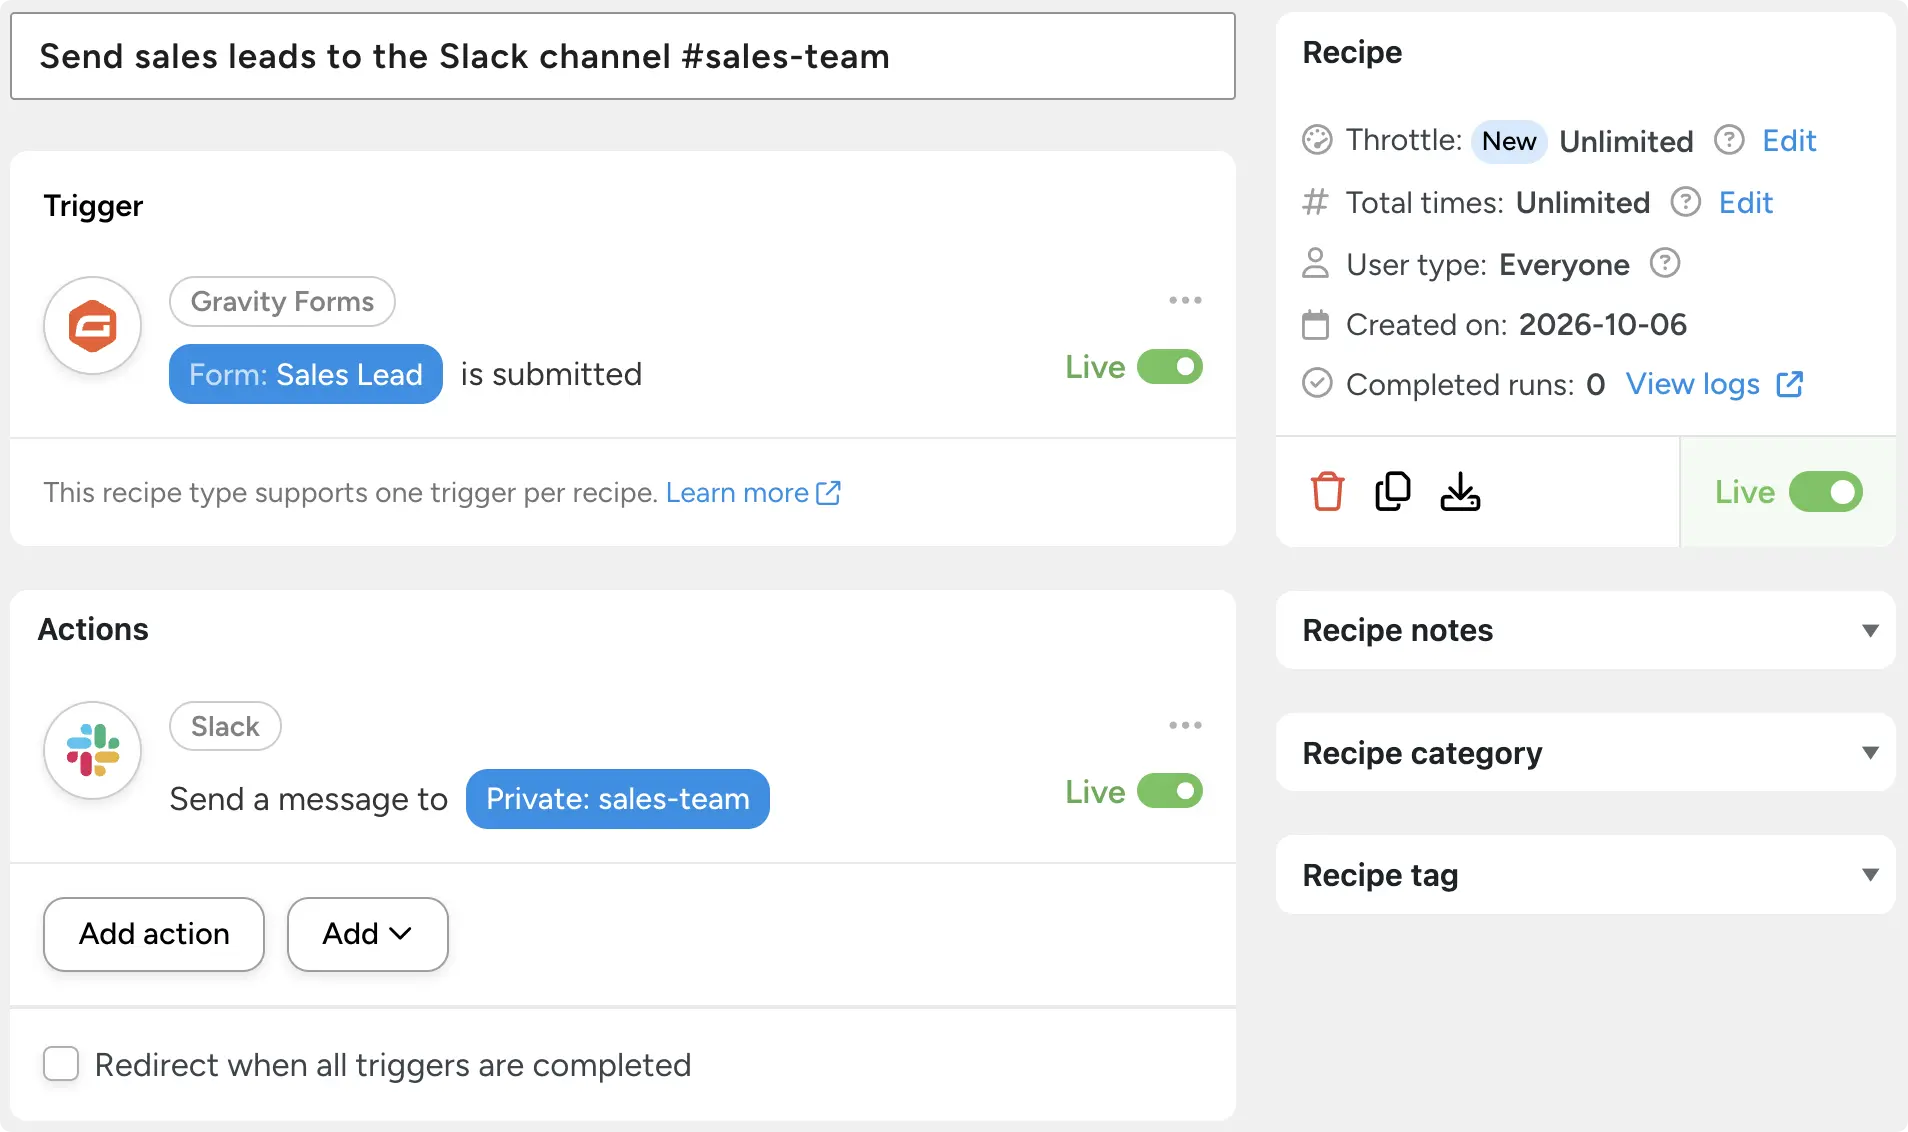
- From your WordPress Admin Dashboard, navigate to Automator > Add new recipe. In the modal that appears, select Everyone, since visitors fill in lead forms.
- Give your recipe a name that makes it easy to recognize at a glance. For example, “Send sales leads to the Slack channel #sales-team”.
- In the Trigger panel, from the menu of available integrations, select Gravity Forms > A form is submitted. Automator will prompt you to select the form; here, that’s the Sales Lead form. Click Save.
- In the Actions panel, click Add action and select Slack. (Note: If you haven’t connected Slack yet, click Connect account and follow the prompts. A free Automator account covers the connection.)
- From the dropdown list that appears, select Send a message to a channel, then choose the channel. Here, that’s the private #sales-team channel.
- Automator will present you with a form for drafting the message. Use tokens to add the name, email, company and message fields. (Tokens are dynamic data from the form submission or from your site.) To use a token, click the Asterisk in the Message field and select the token you want. Add the Entry source URL token too, so the team sees which page converted. Click Save.
- Toggle your recipe from Draft to Live.
From now on, every sales lead lands in the right Slack channel with the fields your team needs. It can even include a link back to the page it came from. Nobody refreshes Forms > Entries, waiting to see an update.
If one person owns the inbox, swap the action for Slack > Send a direct message to a Slack user. There’s also a ready-made template for this recipe in the template library. Microsoft Teams, Discord, Telegram and WhatsApp work the same way with their own actions.
For more team workflows, see how to integrate Slack with WordPress.
Time saved: about 1 hour/week. That assumes 40 entries a week and 90 seconds to repost each one by hand.
2. Log Every Submission to a Google Sheet
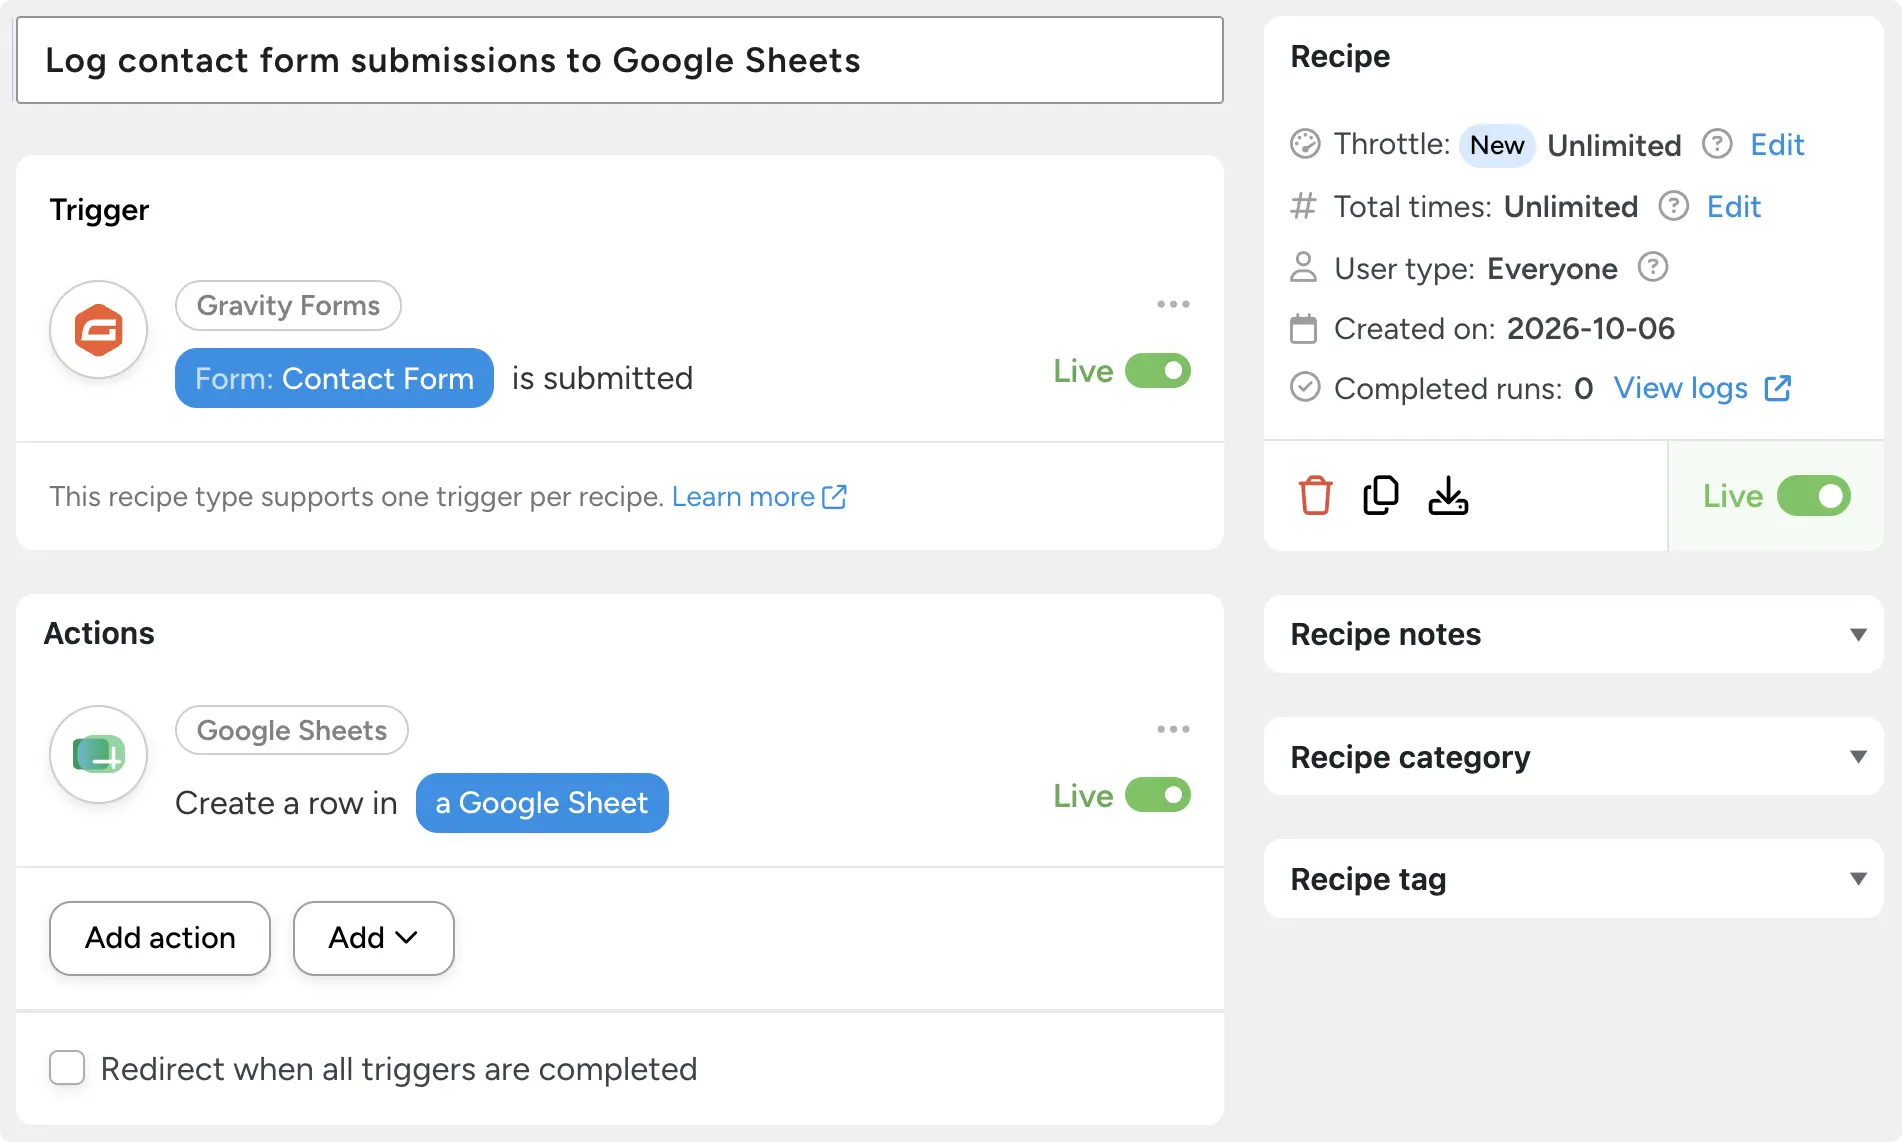
- From your WordPress Admin Dashboard, navigate to Automator > Add new recipe and select Everyone.
- Give your recipe a clear name, like “Log contact form submissions to Google Sheets”.
- In the Trigger panel, from the menu of available integrations, select Gravity Forms > A form is submitted. Choose the form (here, Contact Form) and click Save.
- In the Actions panel, click Add action and select Google Sheets. (Note: If you haven’t connected your Google account yet, do that first under Automator > App integrations.)
- From the dropdown list that appears, select Create a row in Google Sheets, then choose the spreadsheet and the worksheet.
- Map one token to each column: name, email, company and message. Put the entry date in the last column so the sheet sorts itself. Click Save.
- Toggle your recipe from Draft to Live.
Once this recipe is live, every contact form entry becomes a new row in your Google Sheet the moment it’s submitted. No one has to remember the weekly export, and the sheet is never a week behind when someone asks for this week’s numbers.
One extra worth knowing: the trigger Gravity Forms > An entry for a form is updated is also free in Automator Lite. Pair it with the action Google Sheets > Update a row in a Google Sheet, and the row stays current when someone edits the entry in WordPress.
I walk through this recipe field by field in How to Connect Gravity Forms to Google Sheets, including how to sort entries across worksheets.
Time saved: about 20 minutes/week. That’s the weekly export, clean-up and paste you no longer do.
3. Add Submitters to Your CRM and Tag Them by Interest (Gravity Forms CRM Integration)
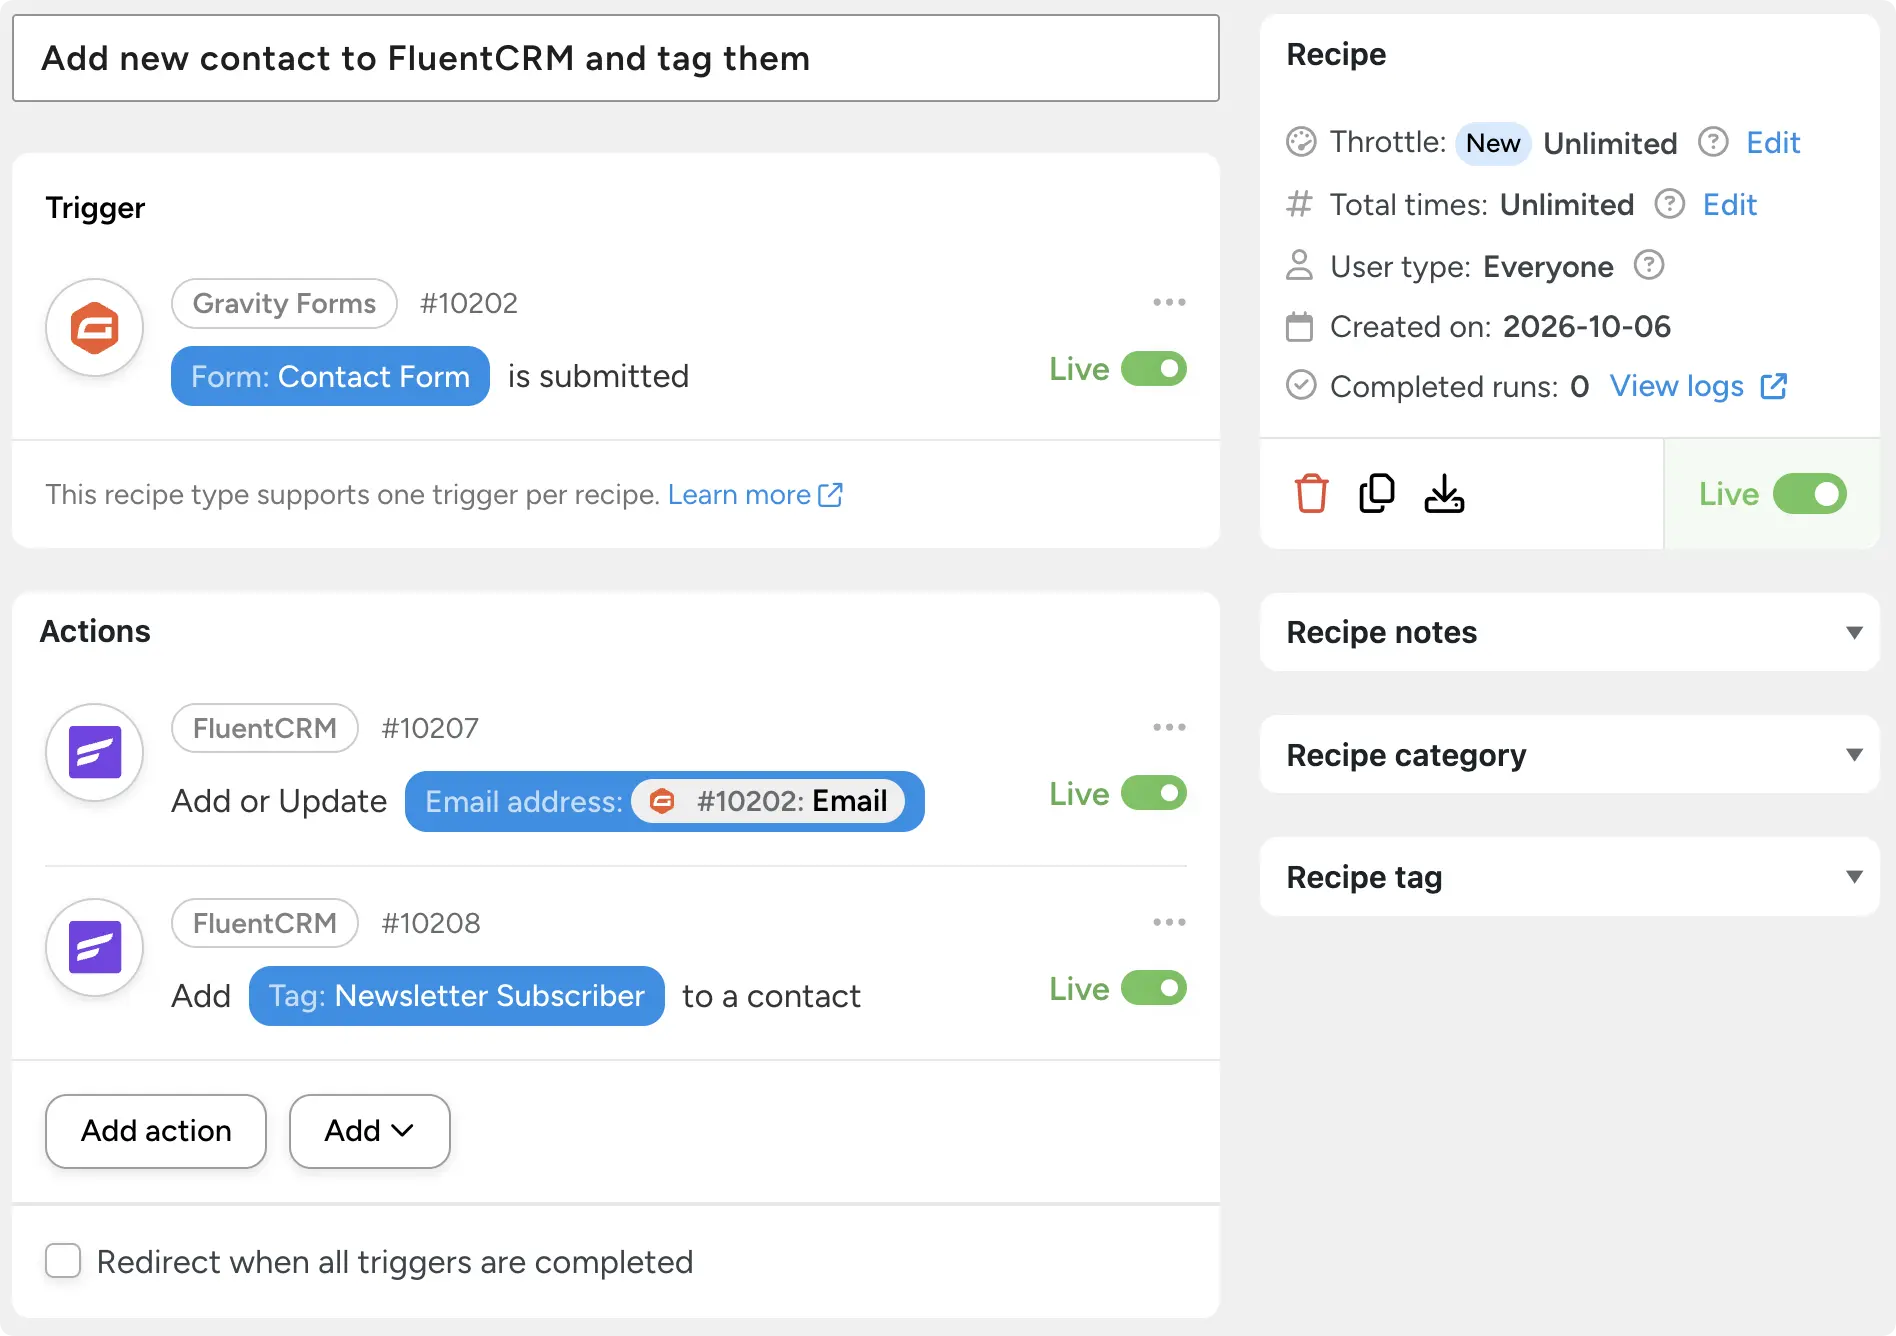
The trigger is Gravity Forms > A form is submitted, on the Contact Form. The first action is FluentCRM > Add/Update a contact. Map the Email token to the email address, plus the first and last name tokens if the form collects them.
The second action is FluentCRM > Add tags to a contact. Give it a tag that says what the person signed up for. In the screenshot it’s “Newsletter Subscriber”; a webinar form might use “Webinar lead.” One recipe per form keeps the tags clean.
With this recipe live, everyone who fills in the form is in your CRM within seconds, tagged by the form they came from. Typing contacts into the CRM is the first job to slip in a busy week. Then the segment you wanted to email is three weeks out of date. This recipe takes that job off the list for good.
FluentCRM runs inside WordPress, so this recipe uses no app credits at all. If your CRM lives outside WordPress, the pattern is the same and runs on app credits. The HubSpot equivalents are HubSpot > Add/Update the user in HubSpot and HubSpot > Add a HubSpot contact to a static list. ActiveCampaign and Mailchimp handle tags and audiences, and Brevo and MailerLite handle lists.
On Automator Pro, recipe 7’s trigger goes a step further. It tags the contact by what they chose in the form, not just which form they filled in. For the bigger picture, see our guide to automating WordPress lead generation.
Time saved: about 1 hour 20 minutes/week. That assumes 40 contacts a week and two minutes each to add and tag by hand.
4. Turn a Request Form Into a ClickUp Task
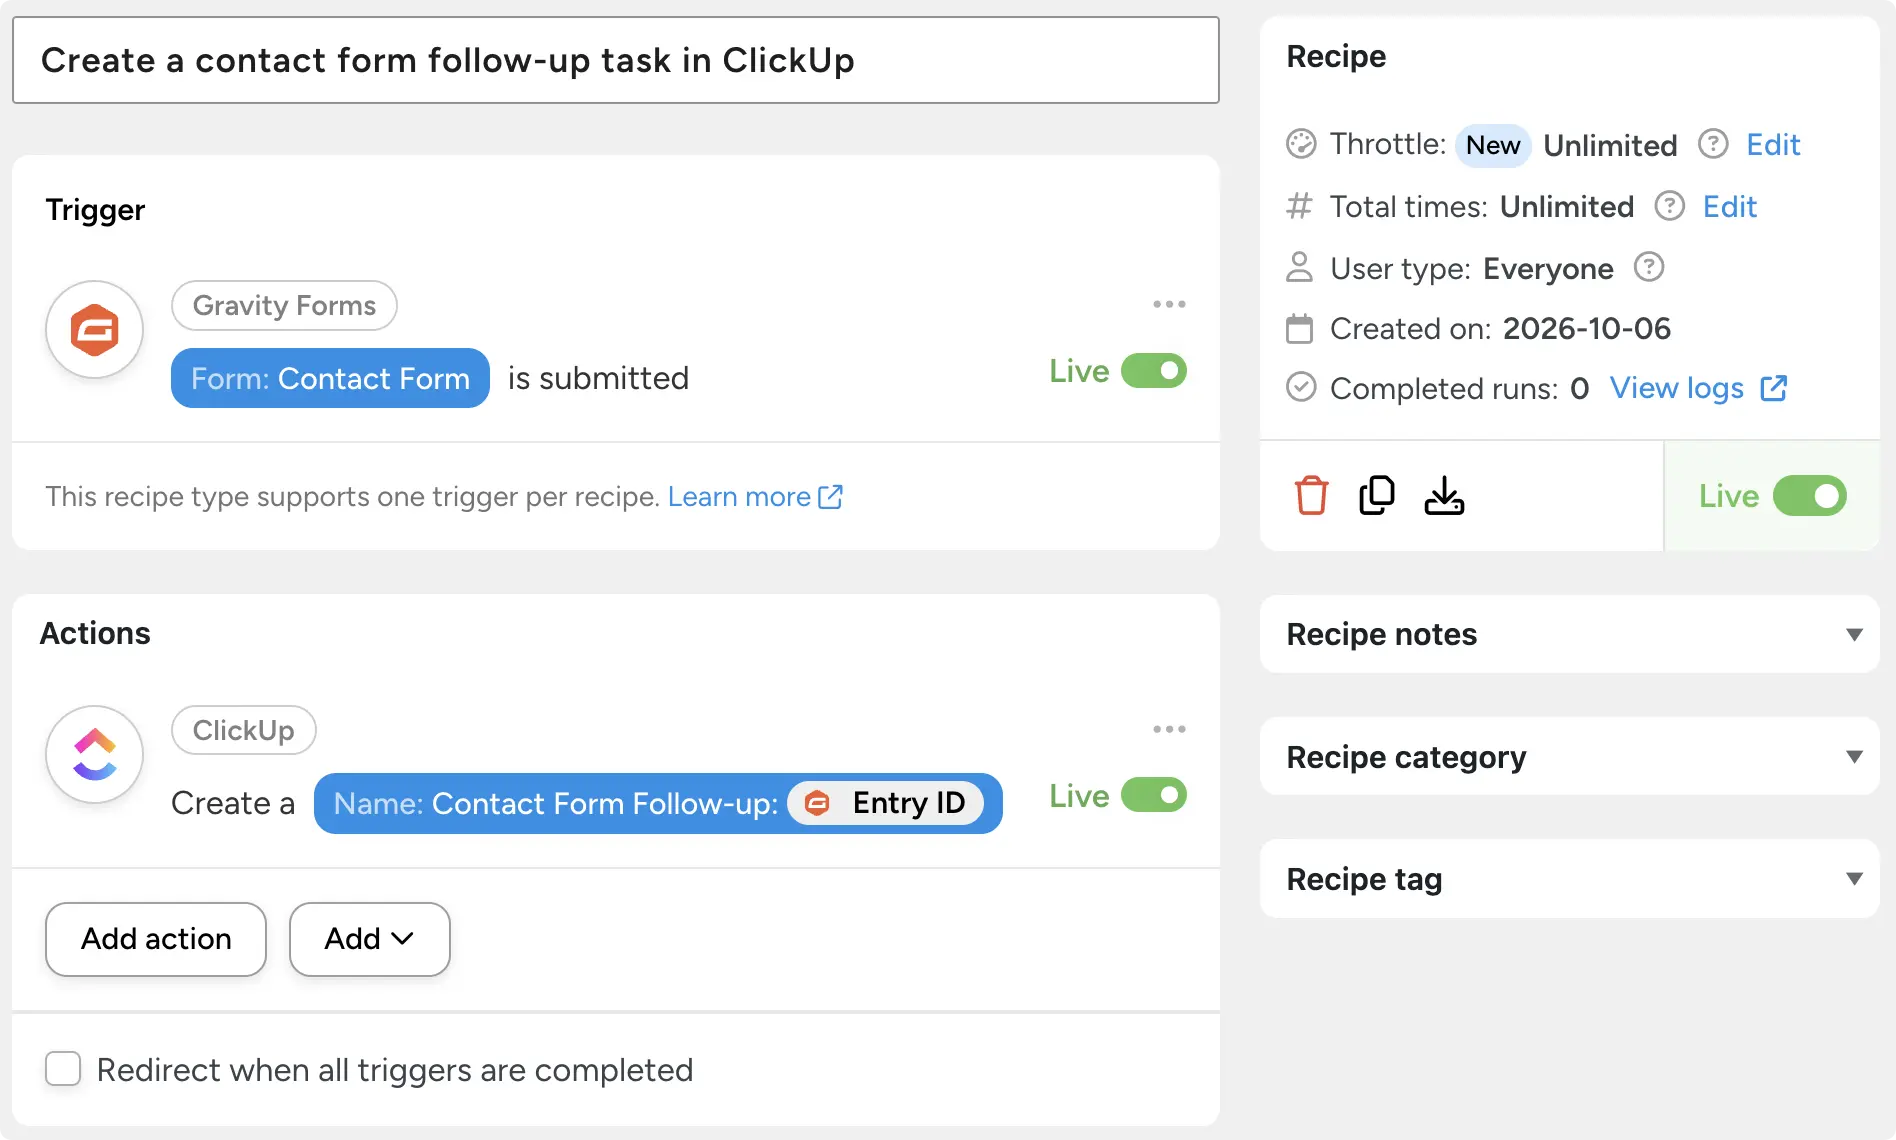
The trigger is Gravity Forms > A form is submitted, on the Contact Form. The action is ClickUp > Create a task in the list you choose. Name the task “Contact Form Follow-up:” followed by the Entry ID token, so every task is unique and easy to find. Put the Message and Email tokens in the description so there’s always a way to reply.
Add Emails > Send an email as a second action if you want the requester to get a confirmation with the task name in it.
Now every contact form message becomes a ClickUp follow-up task the moment it’s submitted. The same build handles website change requests, content requests and internal support questions. Nobody re-types anything into the board, and nothing gets lost in an inbox. Agencies with a client request form get a ticket queue without a ticketing plugin.
Asana and Trello work the same way with their own actions.
Time saved: about 30 minutes/week. That assumes 10 requests a week and three minutes each to re-type by hand.
5. Analyze Each Message’s Sentiment With AI and Alert Sales
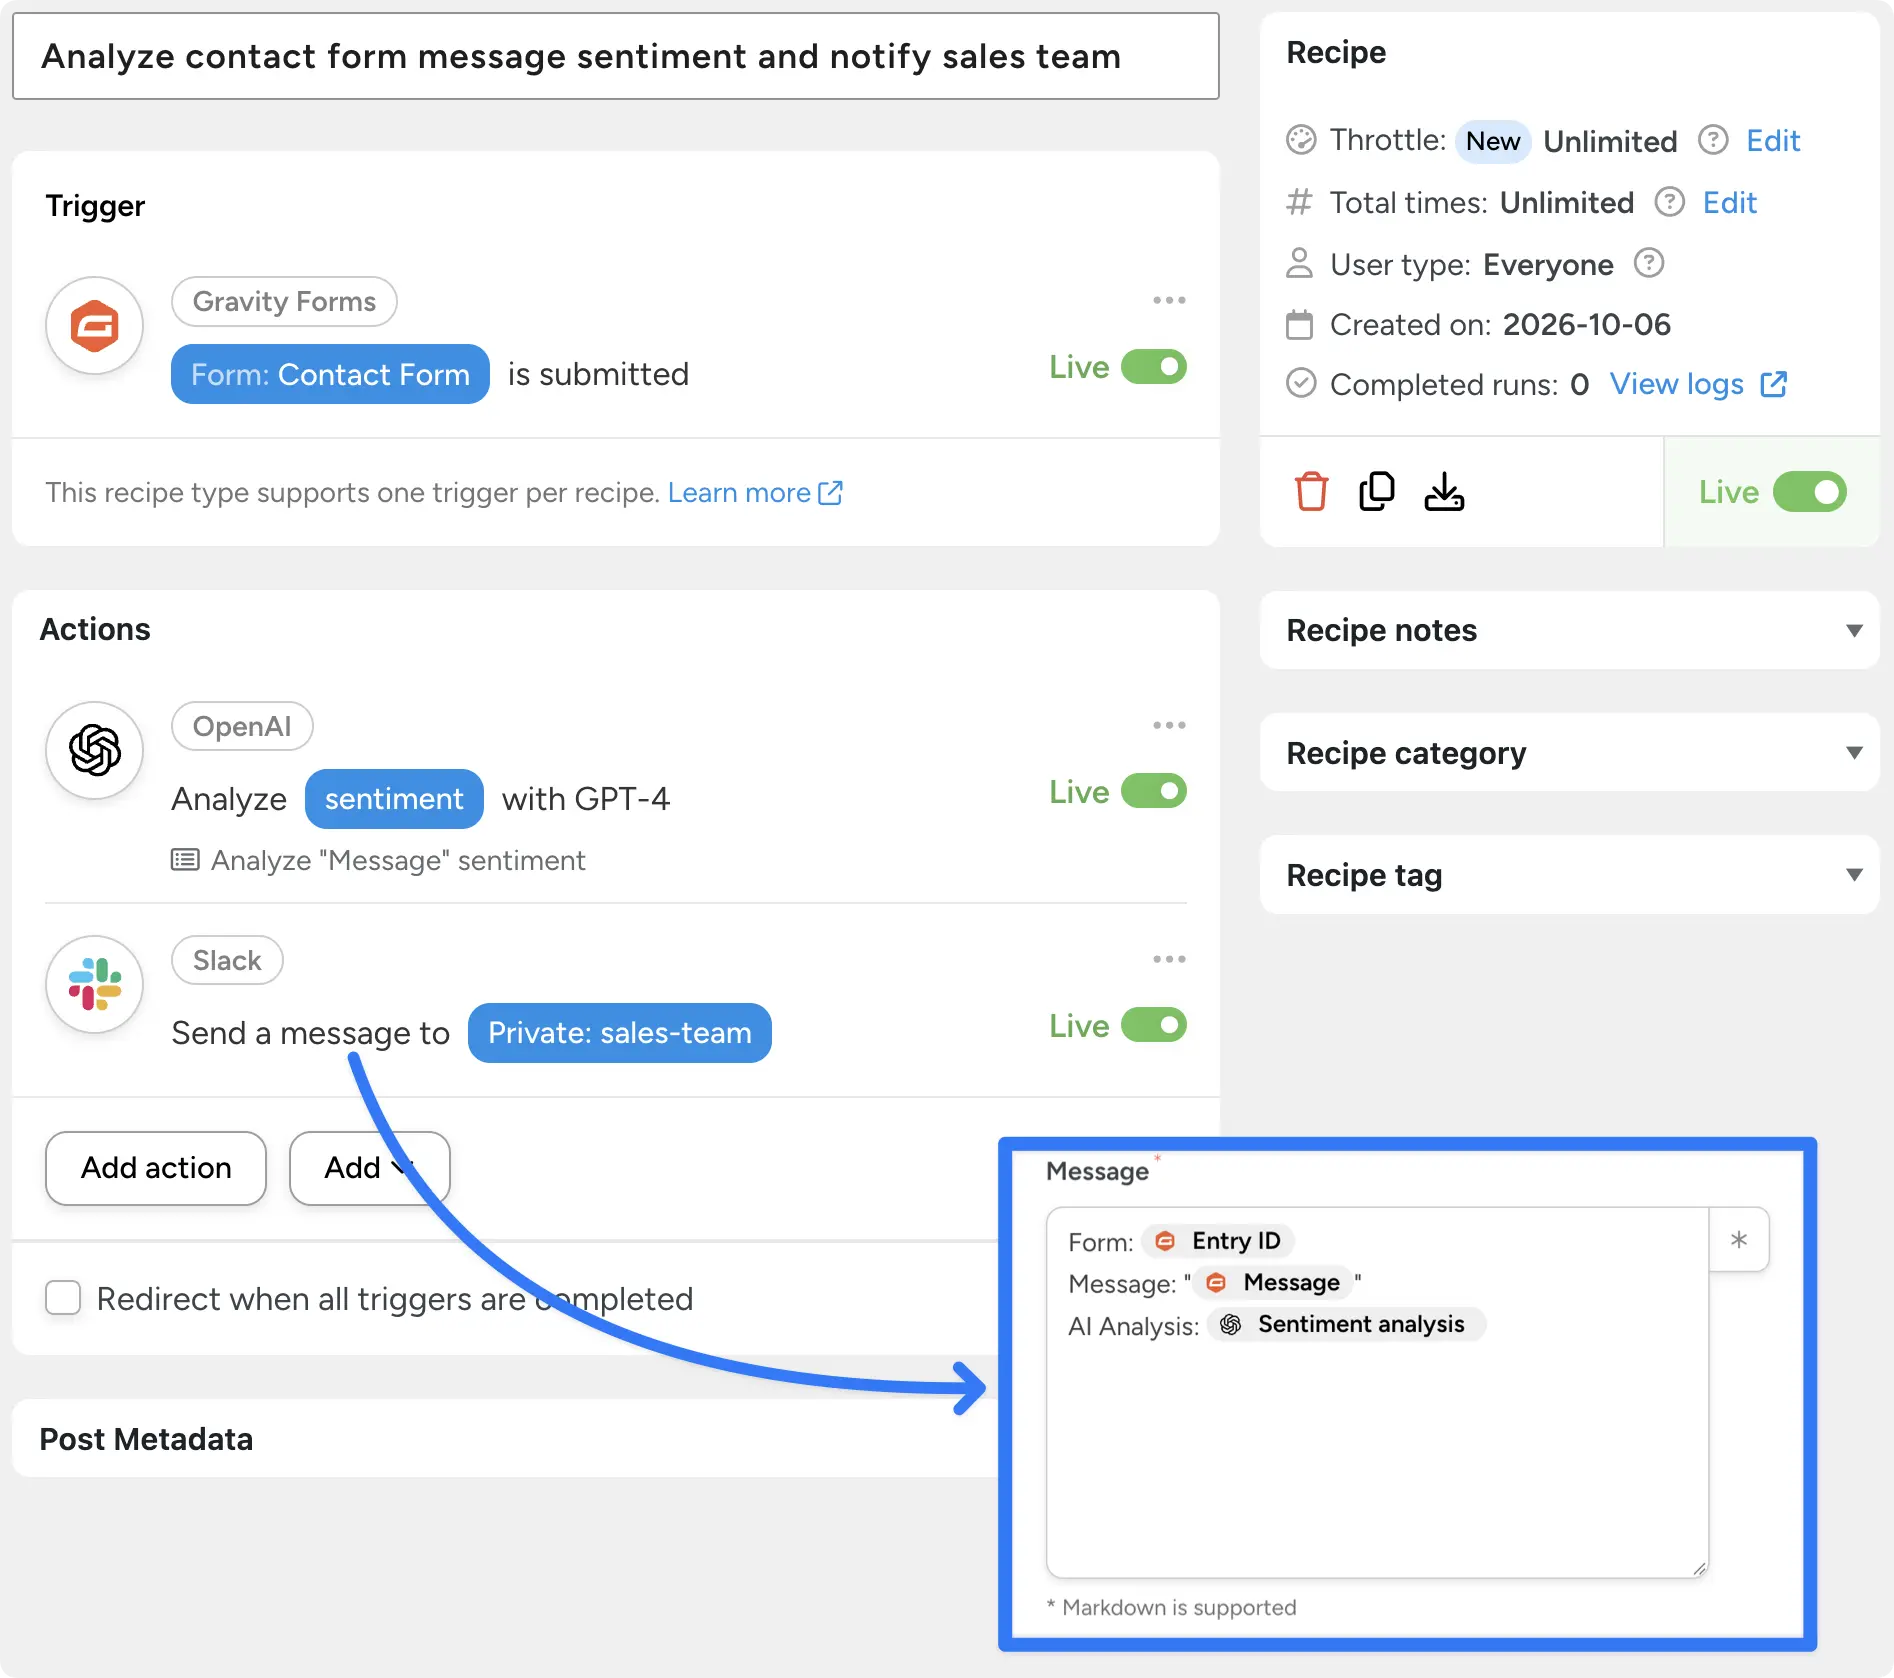
The trigger is Gravity Forms > A form is submitted, on the Contact Form. The first action is OpenAI > Analyze sentiment with GPT-4. Point it at the Message field token, and it returns a Sentiment analysis token for each entry.
The second action is Slack > Send a message to a channel, here the private #sales-team channel. Build the message from three tokens: the Entry ID, the Message, and the Sentiment analysis from the first action.
Every message now reaches the sales team with an AI read on the sender’s mood attached. Someone still has to read forty messages to find the three worth a call. Now the frustrated customer and the eager buyer stand out before anyone opens the entry. Treat the sentiment as a reading aid: it tells you where to look first, and you still decide who to call.
You bring your own OpenAI API key, and OpenAI bills that usage separately from Automator. The knowledge base covers connecting OpenAI to WordPress. The Anthropic and Google Gemini integrations have their own text actions if you’d rather not use OpenAI.
Time saved: about 30 minutes/week. That assumes 40 messages a week, and that the sentiment flag cuts triage per message from a minute to fifteen seconds.
6. Send Submission Data Anywhere With an Outgoing Webhook (Gravity Forms Webhooks)
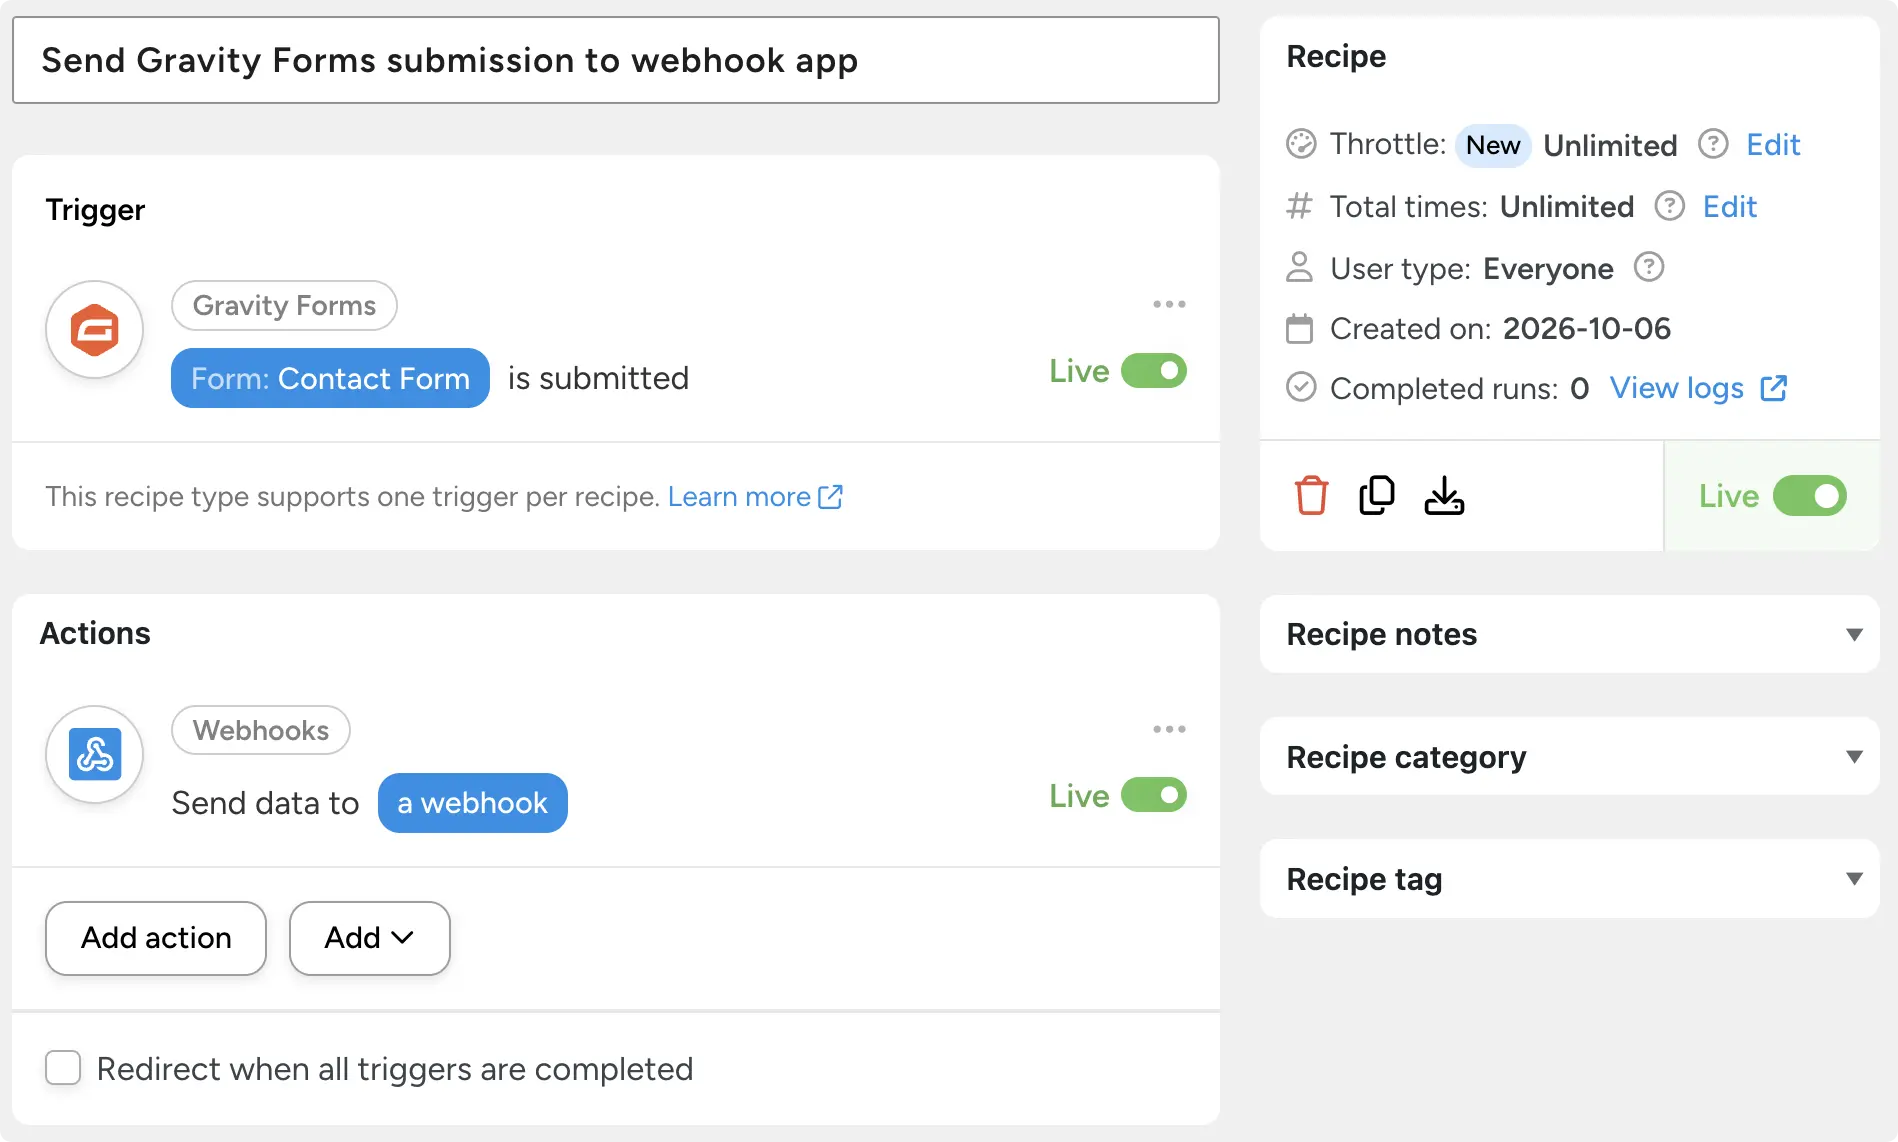
The trigger is Gravity Forms > A form is submitted, on the Contact Form. The action is Webhooks > Send data to a webhook. Paste the endpoint URL from the other tool and choose the method. Then add one key per form field and map each value to a token.
The action records a response status token. Check it first when the other end says it didn’t receive anything.
Every submission now reaches the other tool seconds after it’s submitted, with no export and no copy-paste. Outgoing webhooks are unlimited on Automator Lite and use no app credits. That makes this the free route to any tool without a native Automator integration. Think of a Notion database, an Airtable base, an n8n or Make scenario, or something built in-house.
(Note: receiving data from a webhook, the trigger side, is an Automator Pro feature.)
To see a webhook recipe end to end, read Connect Shopify to WordPress. It walks through one with real field mapping.
Time saved: about 1 hour/week. That assumes 40 entries a week and 90 seconds each to copy an entry into the other tool by hand.
The next four need Automator Pro. Each one does something the free plugin can’t: decide, wait, create or take a payment.
Get Automator Pro >>>
7. Route Each Lead to the Right Person Based on a Form Field
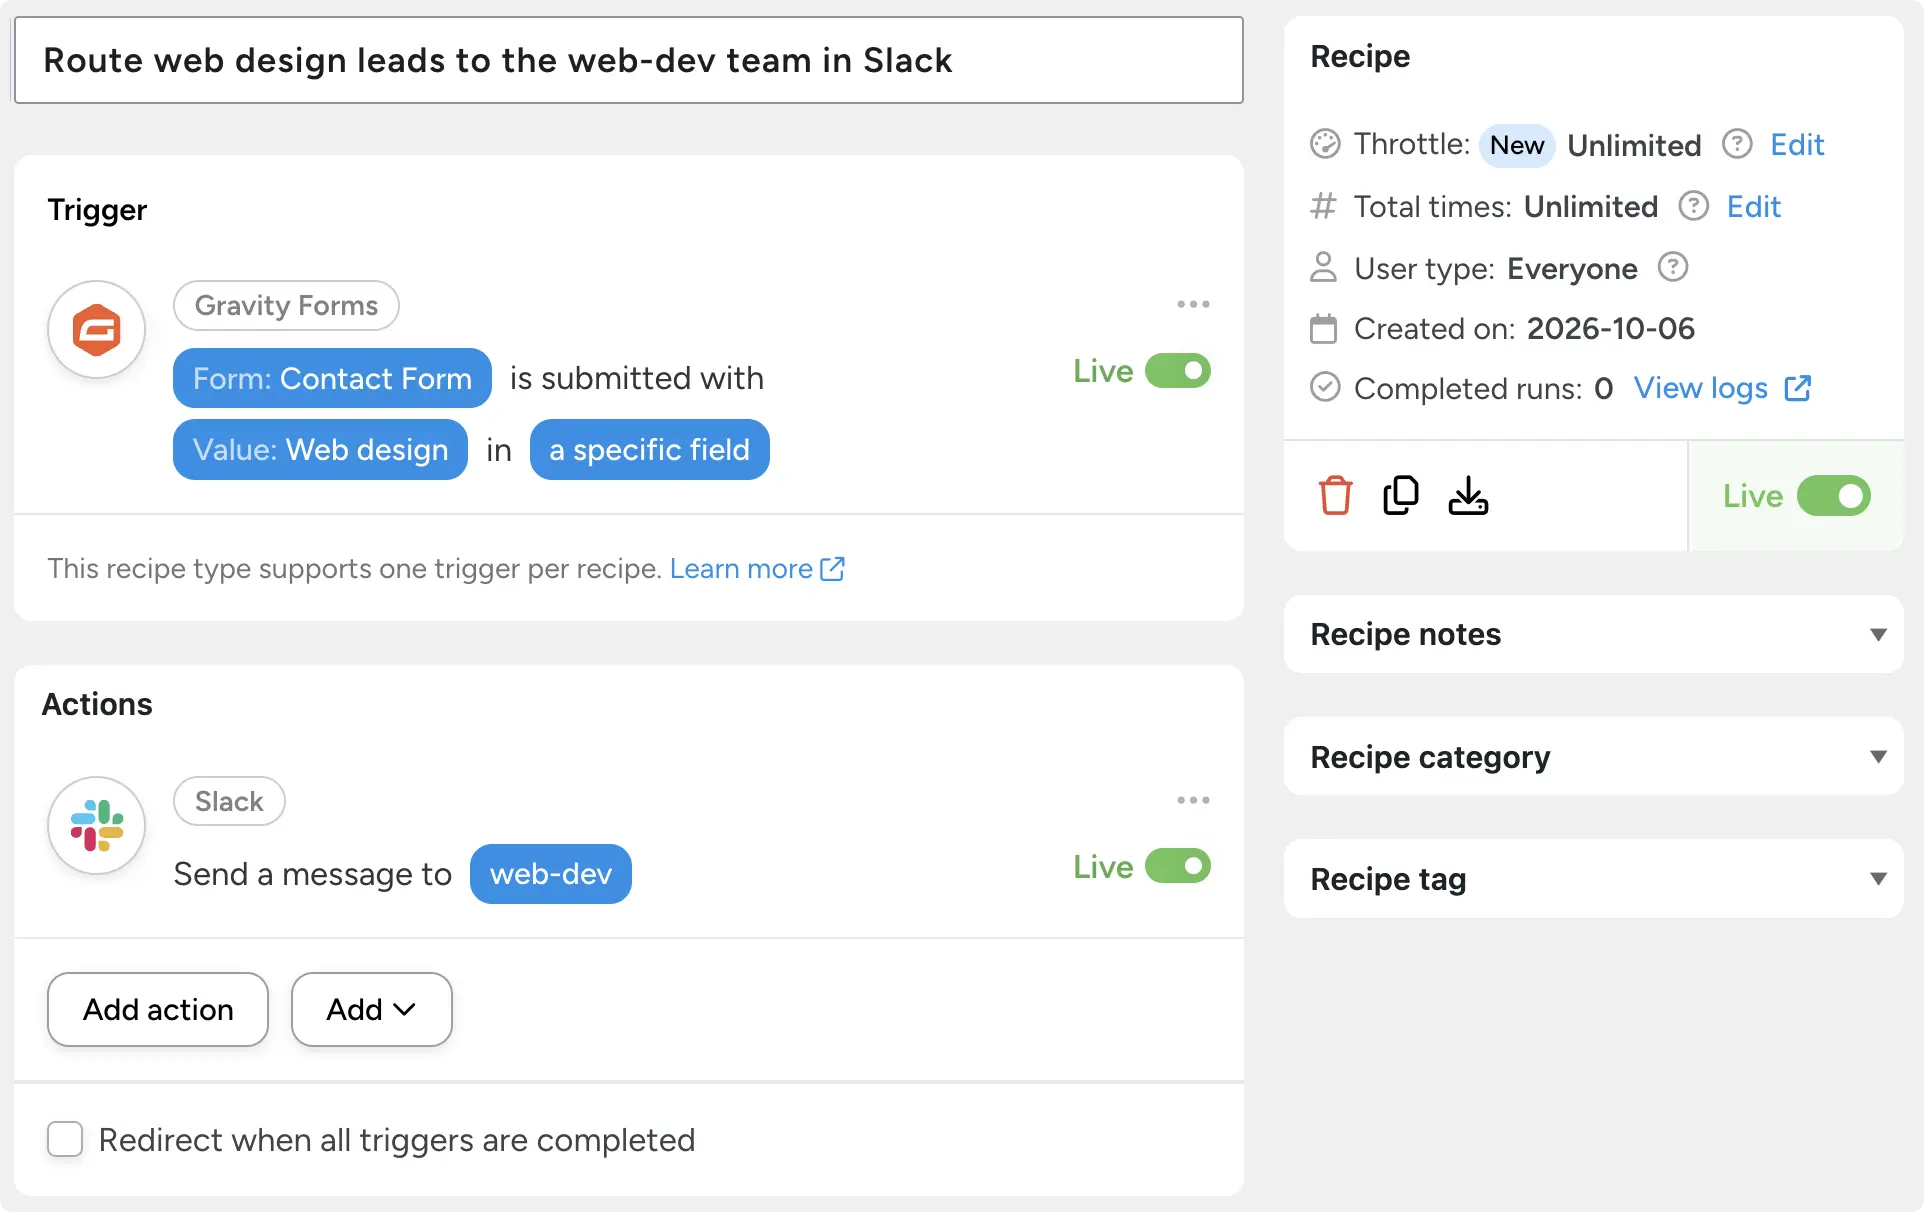
The trigger is Gravity Forms > A form is submitted with a specific value in a specific field. Choose the form (Contact Form), the field that asks what the person needs, and the value (“Web design”). The action is Slack > Send a message to a channel, here the #web-dev channel.
Three services means three small recipes, one per value. Or build one recipe with three Slack actions and a condition on each. (A condition is a rule that decides whether an action runs.) Prefer email? Swap in Emails > Send an email to the person who owns that service.
Now a web design inquiry goes straight to the web-dev team’s channel within seconds of the submission, and an SEO inquiry goes to the SEO team’s. A shared inbox is where leads go to wait, and this is the recipe that empties it.
The same trigger handles territory routing on a Country or State field. If you built recipe 3, add the tag action here too, so the contact is tagged by what they asked for.
Time saved: about 40 minutes/week. That assumes 40 leads a week and a minute each to read and forward by hand.
8. Send a Business-Day Follow-Up (Friday Entries Get Monday’s Email)
Some businesses reply during work hours only. A follow-up that lands at 2 a.m. on Saturday reads like a bot. The same email on Monday reads like a person who just sat down with a coffee. This recipe gives Friday entries the Monday treatment.
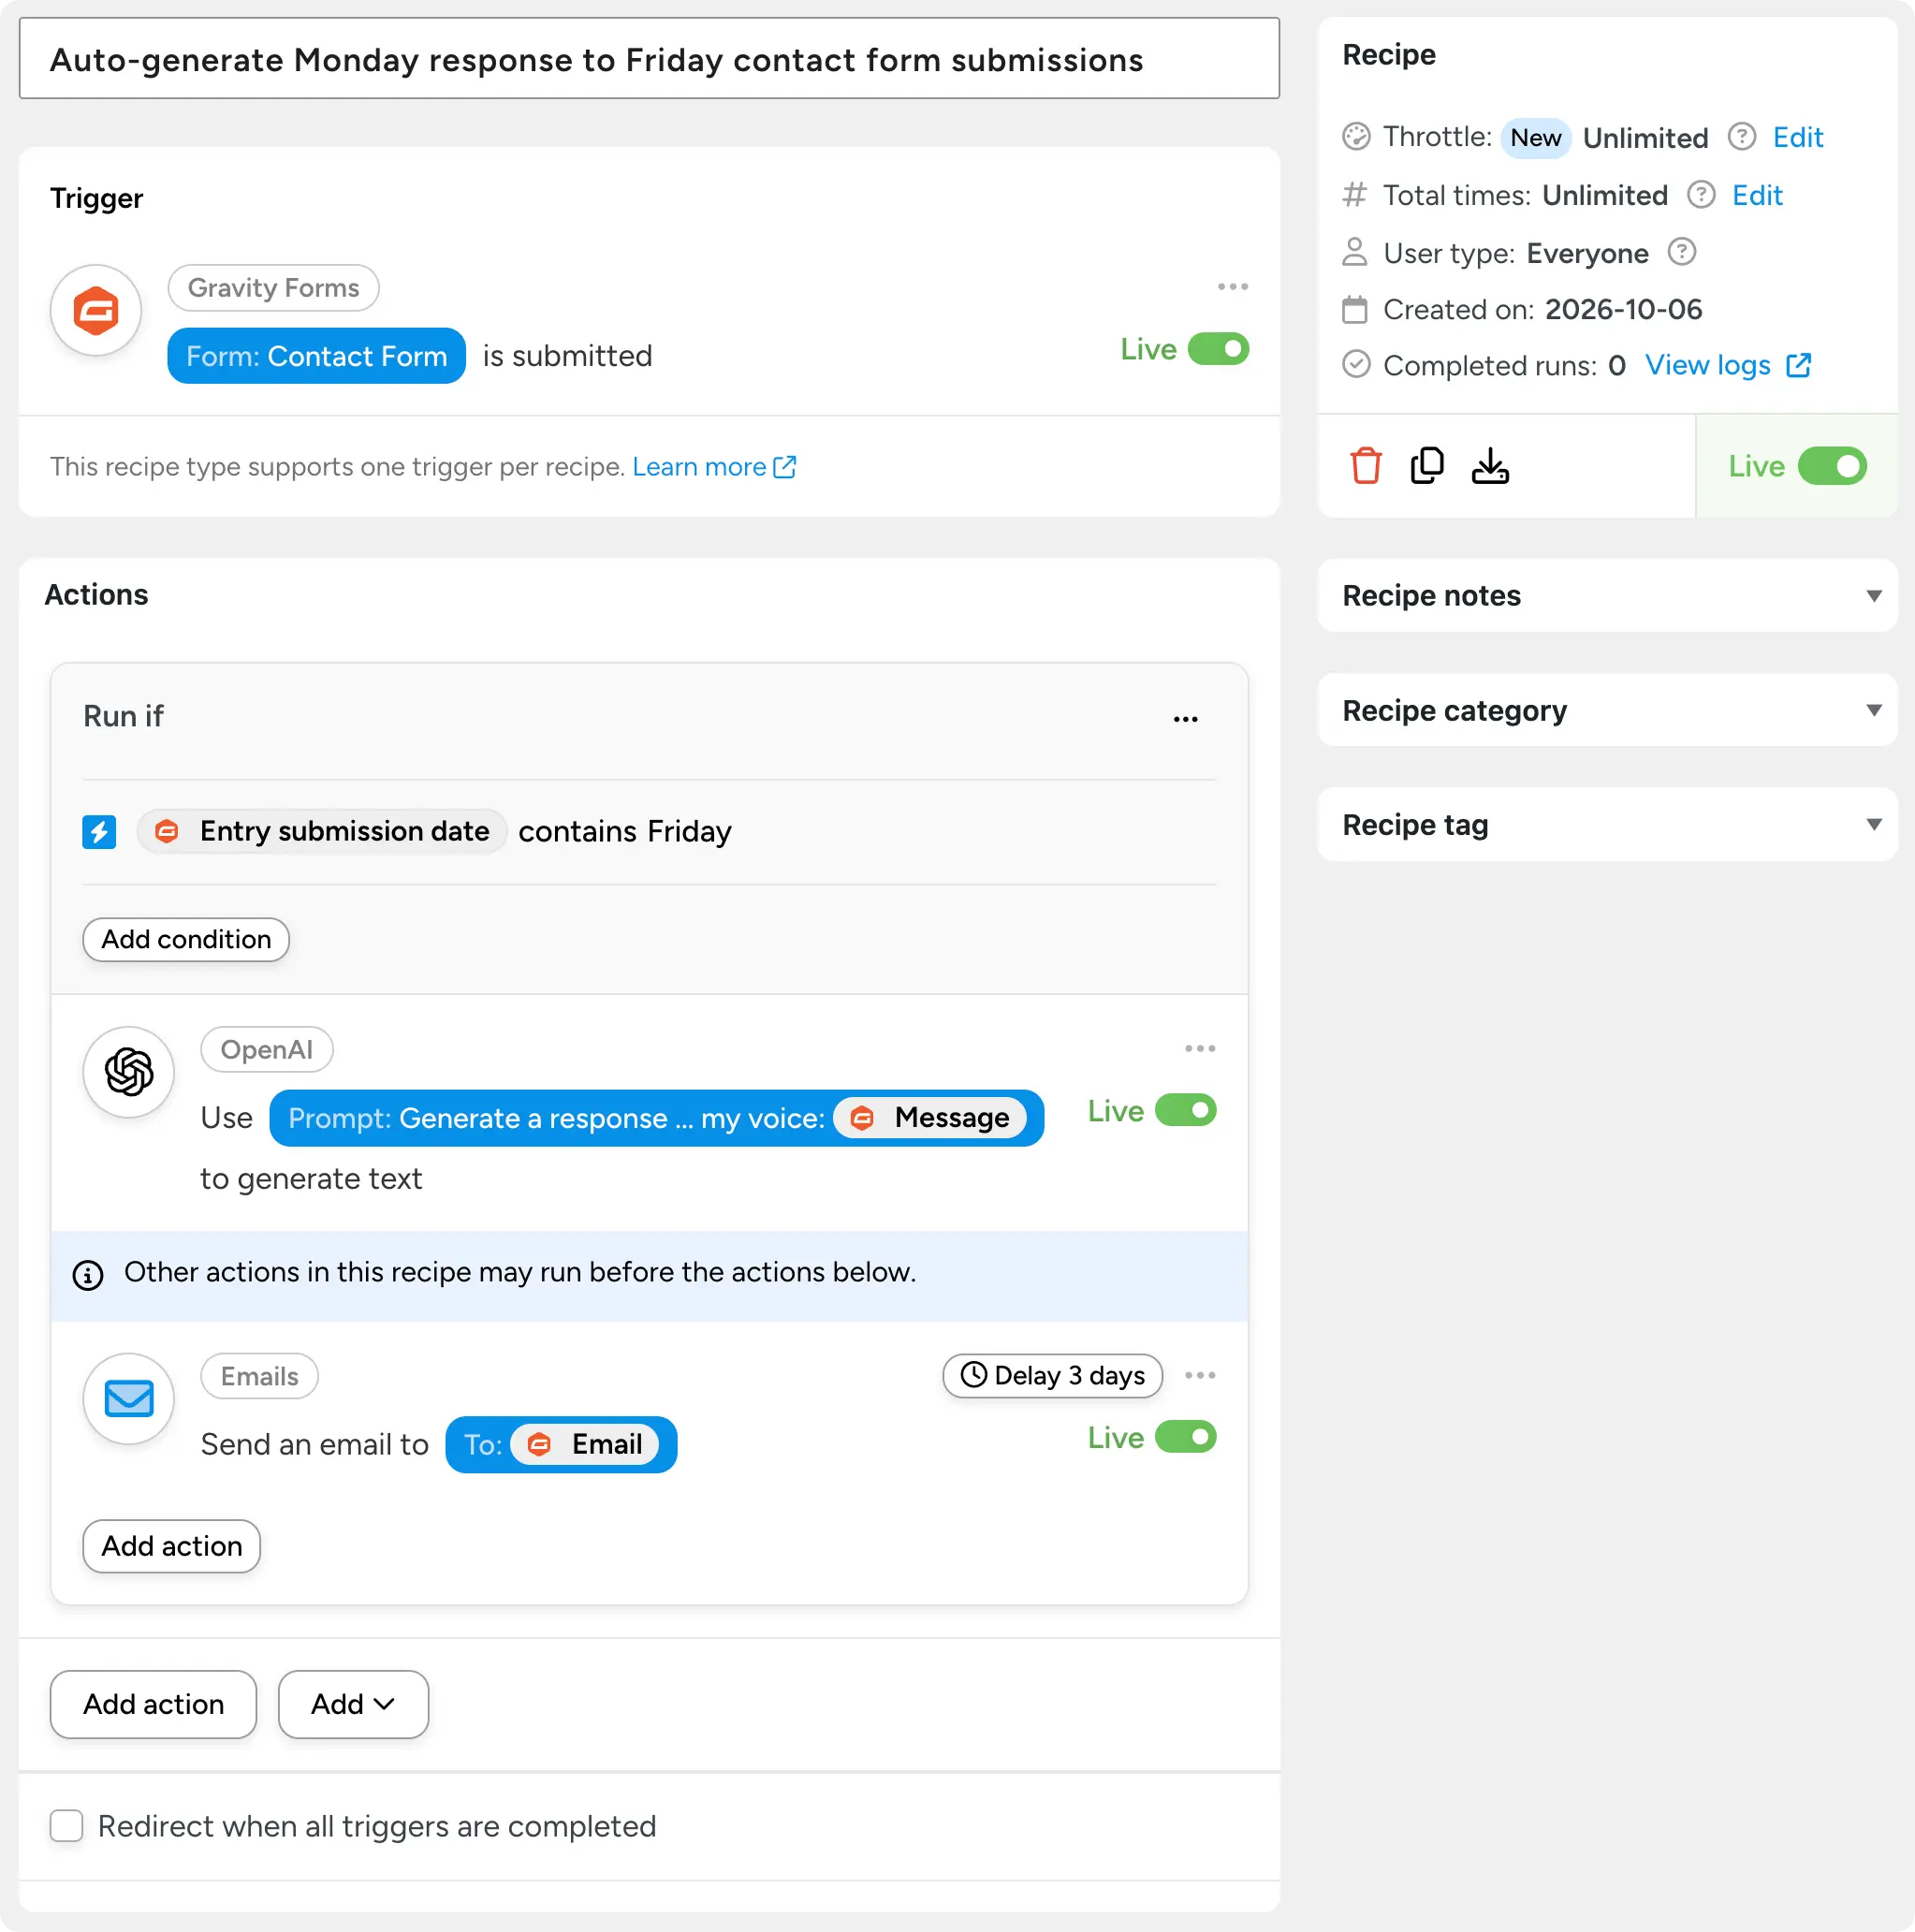
The trigger is Gravity Forms > A form is submitted, on the Contact Form. Then wrap the actions in a condition: run only if the Entry submission date token contains “Friday.” Automator shows this as a “Run if” block, and both actions sit inside it.
The first action is OpenAI > Use a prompt to generate text. The prompt asks for a reply in your voice and ends with the Message token, so the AI answers the actual question. The second action is Emails > Send an email to the Email token, with the OpenAI response as the body and a three-day delay. Friday plus three days is Monday.
Want it to land at 9 a.m. sharp instead of three days to the minute? Swap the delay for one of Automator’s custom schedules, which take plain English. “Next Friday at 1 pm” and “1pm tomorrow” are documented examples, and “next Monday at 9 am” follows the same pattern.
The condition, the delay and the custom schedule are all Automator Pro features. From now on, a Friday-afternoon inquiry gets a Monday reply drafted in your voice and sent by the recipe. Nobody clears a Monday backlog of follow-ups.
(Note: the condition reads the entry’s submission date, which is fixed the moment the form is submitted. It still says Friday when the email goes out on Monday.)
Time saved: about 1 hour 20 minutes/week. That assumes 40 entries a week and two minutes each to write and send a reply by hand.
9. Register a WordPress User From a Form (No User Registration Add-on Needed)
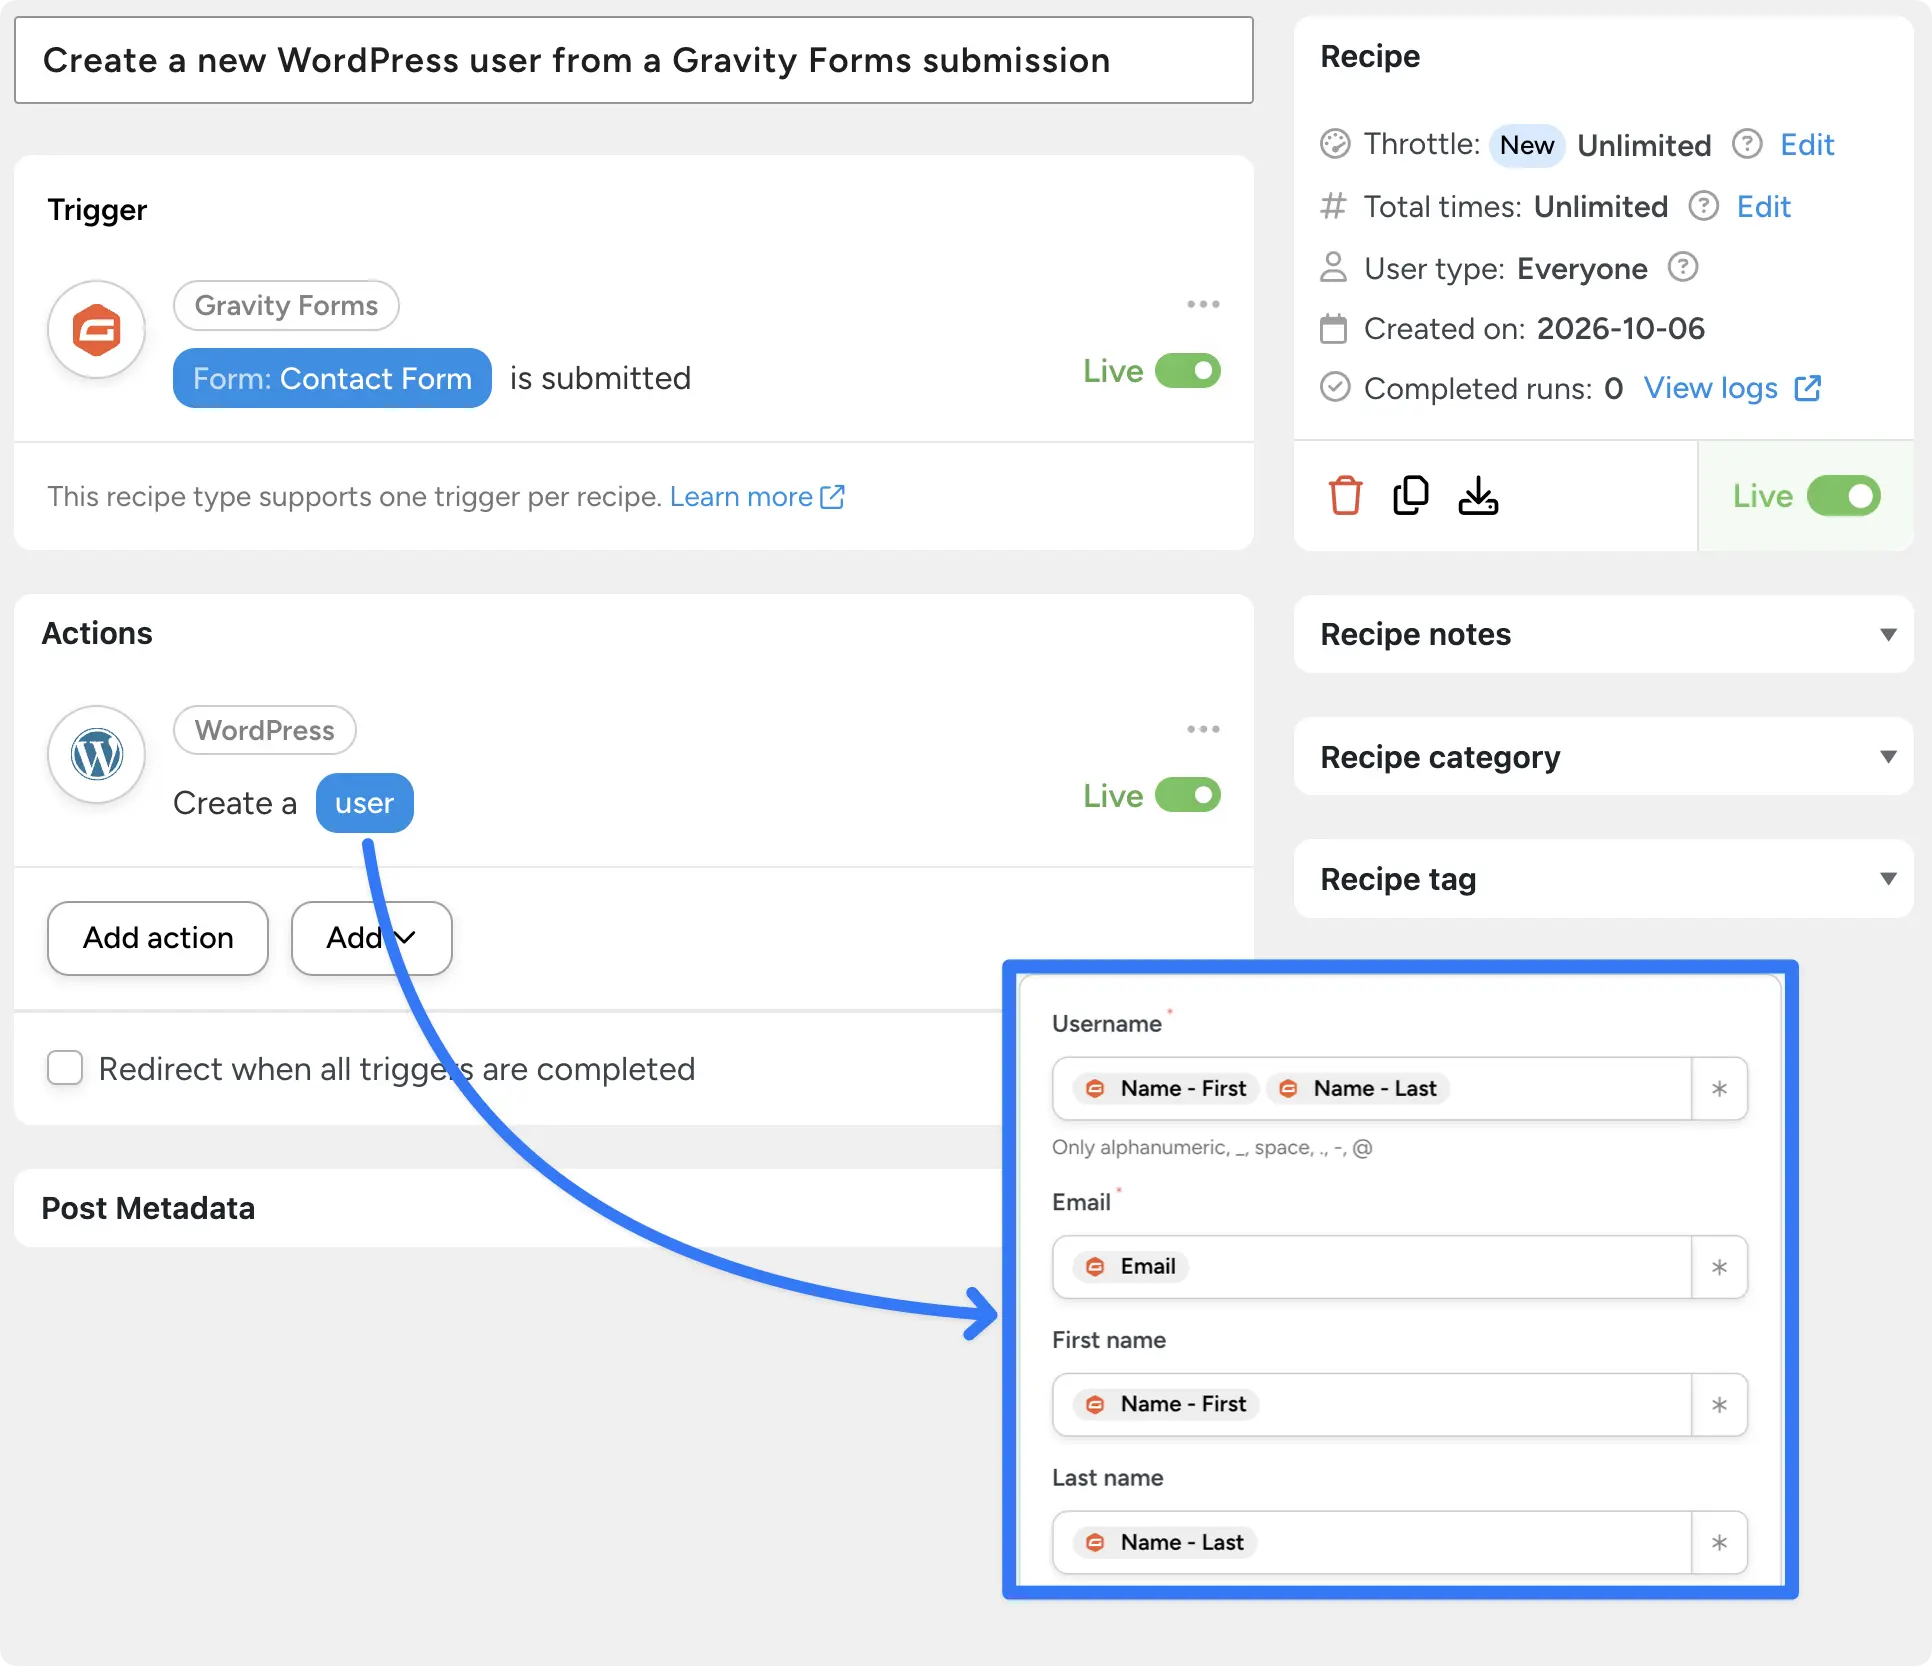
The trigger is Gravity Forms > A form is submitted, on the Contact Form. The action is WordPress > Create a user. Build the username from the Name – First and Name – Last tokens, then map the Email, First name and Last name fields to their tokens.
If not every visitor should become a user, start from recipe 7’s field-value trigger instead, so only the right submissions create accounts.
Applicants, members, vendors and students now get their WordPress accounts the moment they submit the form. No one creates logins by hand or emails passwords around.
Gravity Forms’ own User Registration add-on comes with its Elite license. This recipe works on any Gravity Forms license. The WordPress > Create a user action is what makes it an Automator Pro recipe. Sites that do use the add-on also get the Pro trigger Gravity Forms > A user registers with a form.
The knowledge base has another route in Create a WordPress registration form with Gravity Forms, plus a note on running the add-on and a recipe side by side.
Time saved: about 30 minutes/week. That assumes 10 sign-ups a week and three minutes each to create the account and send the password by hand.
10. Enroll a Learner in a Course After Payment (Gravity Forms as a Payment Gateway)
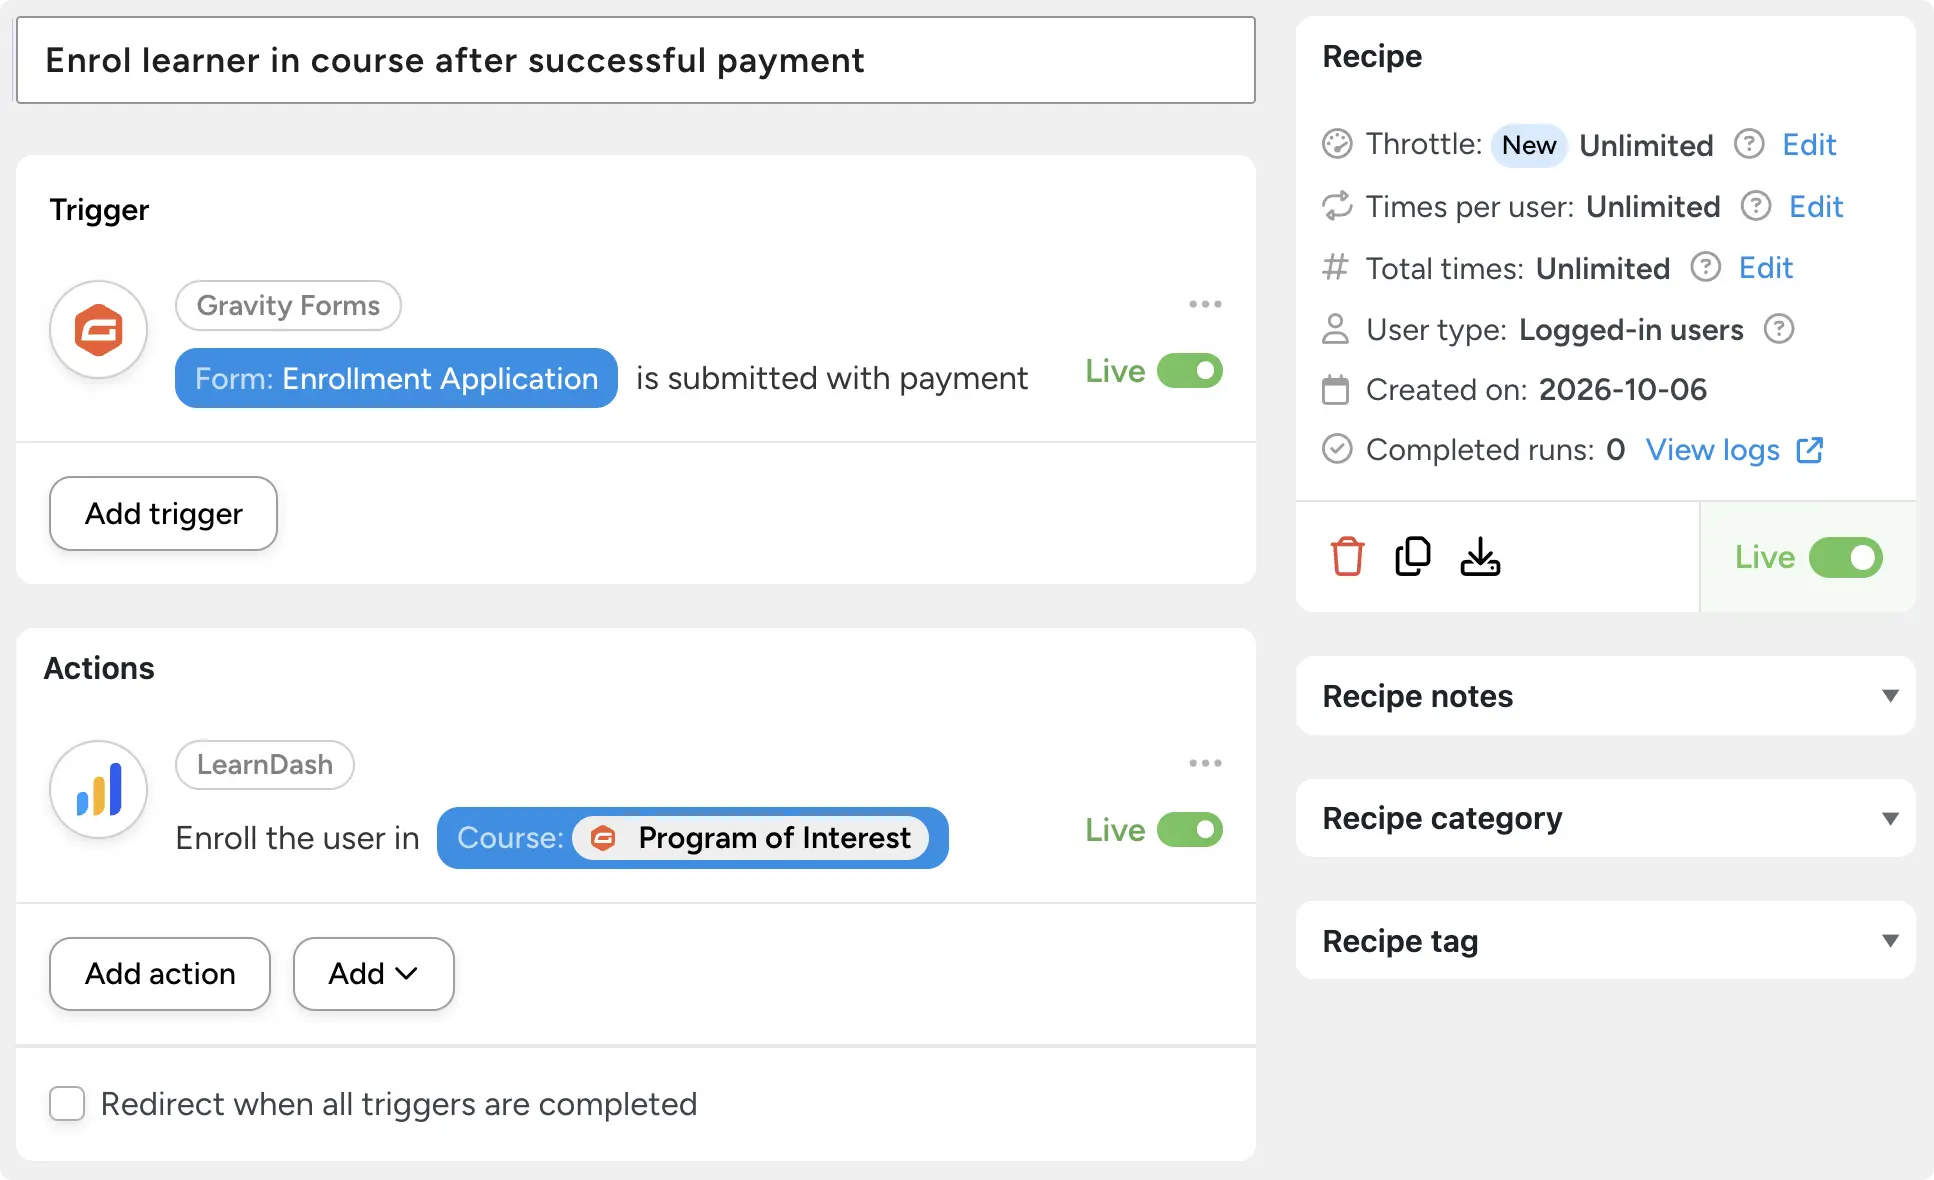
Gravity Forms with a payment add-on is a checkout you already own. Add a product field and a Stripe or PayPal feed, and your enrollment form takes the payment. What it can’t do on its own is open the door afterwards: enroll the learner in the course they just paid for. This recipe does that part.
This one is a recipe for logged-in users, because the learner needs an account to be enrolled. The trigger is Gravity Forms > A user submits a form with payment, on the Enrollment Application form. It needs one of the Gravity Forms payment add-ons (2Checkout, Authorize.Net, Mollie, PayPal, Square or Stripe) to collect the payment.
The action is LearnDash > Enroll the user in a course. Instead of a fixed course, it takes the course from the form’s Program of Interest token. One form can sell every course on the site.
Now a learner pays, and the course is in their account before the receipt reaches their inbox. No WooCommerce checkout, no membership plugin, and no one copying names from a payment report into LearnDash. Learners without an account yet? Recipe 9 creates one from a form.
The same pattern unlocks any paid content. Swap the LearnDash action for LearnDash > Add the user to a group, or for the matching action in your membership or LMS plugin, and the payment opens whatever it should.
Time saved: about 40 minutes/week. That assumes 10 paid enrollments a week and four minutes each to check the payment and enroll the learner by hand.
Not on Automator yet? Install Automator Lite free and build recipes 1 to 6 today >>>
Four Habits That Keep Gravity Forms Automations Reliable
Ten recipes add up to a lot of moving parts. A few habits keep them tidy:
- Name recipes after the chore, not the plugins. “Demo requests → Slack #sales” tells you what it does six months from now. “GF Slack 1” doesn’t.
- Use the visitor trigger for lead forms. Gravity Forms > A form is submitted fires for anyone. Gravity Forms > A user submits a form only fires for logged-in users. That difference is the most common reason a lead recipe “doesn’t work.”
- Watch the recipe log for the first week. Automator > Logs shows every run. App actions that fail show the response they got back, and webhooks expose a status code token.
- Map only fields that exist on the form. A Company token on a form without a Company field sends a blank, and Slack and Sheets will show it. Check the form before you map the tokens.
Conclusion
Back to Monday morning. The weekend’s entries are already in the sheet. The hot ones hit Slack on Saturday, each with an AI read on the sender’s mood. Every contact is tagged. Friday’s inquiries got a Monday reply, drafted in your voice and sent by the recipe.
At those volumes, the ten estimates above add up to about 8 hours/week, roughly a working day. Start with one. The Slack alert or the Sheets log takes a few minutes on Automator Lite. You’ll notice the difference by Friday. When you need routing, timing, user accounts or payments, that’s what Automator Pro is for.
Install Automator Lite free on WordPress.org >>>
Get Automator Pro >>>
What will you do with more time?
Frequently Asked Questions
Can I create Gravity Forms automations for free?
Yes. Six of the ten recipes in this post run on Automator Lite. Recipes 3 and 6 use nothing but the plugin. Recipes 1, 2, 4 and 5 reach Slack, Google Sheets, ClickUp or OpenAI, so they run on app credits. A free Automator account includes 250, and Pro plans are unlimited. Recipes 7 to 10 need Automator Pro for a field-value trigger, conditions and delays, user creation and a payment trigger.
Do I need a Gravity Forms add-on to automate form submissions?
No, with one exception. Recipes 1 to 9 start from the core Gravity Forms > A form is submitted trigger, which needs no add-on. Recipe 10 starts from a payment, so it needs one of the Gravity Forms payment add-ons, such as Stripe or PayPal. Automator also has triggers for the User Registration add-on, but none of these recipes depends on it.
Can one submission run several actions at once?
Yes. A single recipe can add a row to a sheet, post to Slack and tag the CRM contact. Each action gets its own line. On Automator Pro, conditions let you switch individual actions on or off based on what’s in the entry.
How is automating Gravity Forms with Automator different from Gravity Forms notifications and add-on feeds?
They do different jobs. Notifications send email when an entry arrives. Feeds pass entries to the add-ons you’ve installed. Automator takes the same submission and uses it as a trigger for 250+ plugins and apps. It also adds the logic: conditions, delays, schedules and multi-step chains. Most sites keep their notifications and add recipes on top.

Related Posts

























































Comments (0)