

Access levels are named groups of users, such as VIP members or Gold, Silver, and Bronze plan holders, that decide who can see restricted content on your site. This article covers creating, editing, and deleting them in the Restrict Content Addon, adding users to them, and the access restriction message.
You need the Restrict Content Addon installed and active, which requires the Plus or Elite plan. Once the addon is active, an Addons tab appears in Automator > Settings with a Restrict content entry.
What access levels are
An access level identifies the users who belong to a group, membership, or plan, so they can see more, or less, content than other users. Buyers of a VIP membership might get the VIP level, which unlocks extra pages, restricted videos, and members-only forums; Gold, Silver, and Bronze plans might each unlock more content. A recipe usually grants the level. This one adds a user to the Gold level when they complete an order for a Gold membership product:
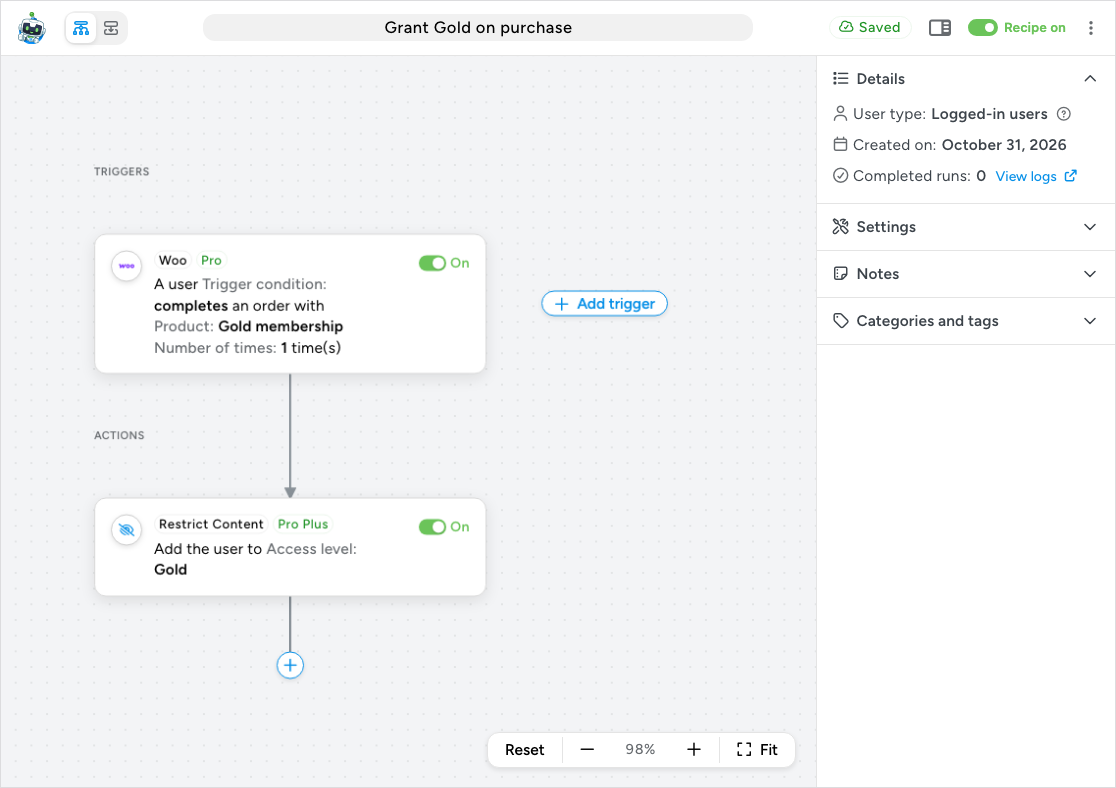
The level then controls access to pages and posts, blocks, and shortcodes.
Creating an access level
- In your WordPress dashboard, go to Automator > Settings > Addons > Restrict content.
- In the Access levels section, click Add level.
- In the Create level dialog, enter a Level name. The name is required, and it is how the level appears in recipes, in the post editor, and on the Users screen, so choose one you will recognise.

- Leave Use custom slug set to No. The addon generates the slug from the name, for example
uarc_goldfor Gold. Shortcodes use the slug to identify the level, so switch to Yes only when you need a particular slug, such as one that shortcodes already on your pages refer to. - Click Save.
The new level appears in the table with its ID, Level name, Slug, and a Shortcode you can copy, such as [automator_rc access_level="uarc_gold"]Content to show[/automator_rc]. Content placed inside that shortcode is shown only to users in the level.
Adding users to an access level
Users join and leave levels in two ways:
- By recipe: the Add the user to an access level and Remove the user from an access level actions, as in the recipe above; see Restrict Content integration: triggers, actions, conditions and loop filters.
- By hand: on a user’s Edit User page, the Uncanny Automator Restrict Content Access Levels section has a checkbox for each level. Select or clear the boxes and click Update User.
Users > All Users gains an Access levels column and a filter by level.
Editing and deleting access levels
To edit a level, click the pencil icon (Edit level) in its row and change it in the Edit level dialog. If you change a level’s slug, update every shortcode that uses the old slug: a shortcode whose slug matches no level treats the requirement as met and shows its content to every logged-in user.
To delete a level, click the trash icon (Delete level) in its row and confirm. Deleting a level is permanent: the level and its list of members are removed, and recreating a level with the same name does not bring the members back.
Any restriction that relied on the deleted level stops applying. Suppose a page is restricted to the VIP level: once VIP is deleted, every logged-in user who meets the page’s other requirements can open it. Blocks and shortcodes that named the level behave the same way, so update those restrictions before you delete a level.
Access restriction message
The Restrict Content settings page also has an Access restriction message, which “will be shown in place of blocked content on the page”. Until you change it, the message reads “Access denied. Please contact support if you believe you should have access to this page.” Change the text and click Update message; a message that says how to get access, such as a link to your membership page, helps more.
Restricted pages and posts show this message by default. Each page or post can redirect denied users to another page or URL instead; see Restrict WordPress Pages & Posts. Shortcodes do not use this message; they show their own restriction_message attribute, or nothing.
Related: Restrict WordPress Pages & Posts, Restrict Content Shortcodes, Restrict Content for Blocks, Restrict Content integration: triggers, actions, conditions and loop filters, Installing the Restrict Content Addon.

Comments (0)